~ How To Projects ~
How to Single Crochet
Learn how to single crochet with this beginner's guide to crochet basics. Great pictures with instructions show you how to do the single crochet stitch.

Click below for more
Craft Projects and Patterns
|
~ Related Projects ~
Get this entire project
WITHOUT
Ads, Banners, Logo or Margins
Purchase the Ad Free / Easy Print PDF Version for only $1.49

|
|
Crochet Instructions: How to "Single Crochet"
Go back to How to Crochet a Scarf Main Project Page
© Copyright 2007 by AOK Corral Craft and Gift Bazaar All rights reserved.
These projects are for your personal use only and may not be reprinted or copied.
You may print this page as is or... See our easy print option below.
|
|
|
|
|
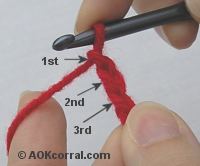
Step 1.
When you begin working a row you will count chains or stitches starting at the crochet hook and counting away from it. If your project says to single crochet into the 2nd chain or stitch, than you count the chain closest to the hook as 1 and go to the 2nd one.
|
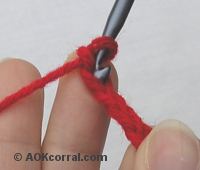
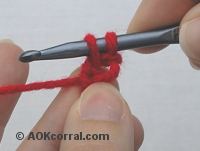
Step 2.
For basic single crochet, begin your first row by sending your hook through the second chain from the hook.
The first chain that you skipped is to create height along the edge to match up to the level of the single crochet stitches that you will be making.
|
| |
|
|
|
|
Beginner's Informational Tip
When sending your crochet hook through the chain, you can send it through both the top loop and the back ridge of the chain or just the back ridge. In our photo example, we sent it through the top loop and the back ridge.
(Look at your chain and see that it actually consists of 3 strands of yarn, the two most obvious loops that form the V looking chain and one strand behind them.
Insert your hook under the top loop that forms the left most side of the V and under the ridge that is behind the V as shown in the photo or you can insert the hook in just the back ridge loop.)
|
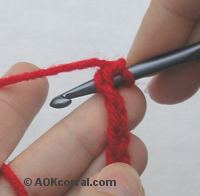
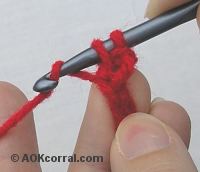
Step 3.
Put your yarn over the crochet hook by holding the yarn still and moving your needle under the working yarn from front to back. This is called "yarn over" and is usually abbreviated; YO
|
| |
|
|
|
|
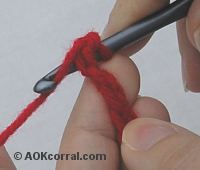
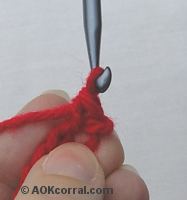
Step 4.
Pull your crochet hook with the yarn hooked onto it, through the chain loops only. You should now have two loops left on your hook, the one you started with and a new one.
|
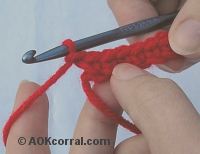
Step 5.
Put your yarn over the crochet hook again and pull the crochet hook and yarn through both of the loops this time.
|
| |
|
|
|
|
Step 6.
Now there will only be one loop on the crochet hook. You have now completed your first sc (single crochet) stitch.
|
Step 7.
Follow steps 2 through 6 from right to left across the whole first row. When you have completed the sc stitch in the last chain, make one additional chain stitch.
|
| |
|
|
|
|
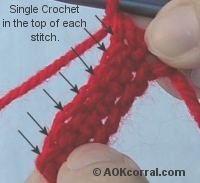
Step 8.
Now turn your work around. Work across from right to left making one sc in the top of each single crochet from the previous row. At each row end, chain 1 before turning to complete the next row.
Beginner's Information Tip:
(The top ridge of your work will look like a chain with two sides or loops in kind of a V shape (see top view). Unless stated differently in the pattern you are using, your hook should be inserted under both loops along the top ridge.)
|
|
|
You may Print this page as it is ...OR...
Purchase the Easy Print Version for $1.49
The Easy Print Version includes, chain, single crochet, double crochet, and scarf; all directions, photos and instructions for this entire project without margins, ads or logos.
Great copy for classes or personal learning on the go!
|
|
Go back to How to Crochet a Scarf Main Project Page
|
|
|


