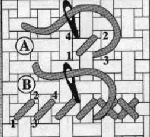
 Make
one cross-stitch for each symbol on chart (A).
Make
one cross-stitch for each symbol on chart (A).
Come up through Hole 1.
Go back through Hole 2.
Come up through Hole 3.
Go back through Hole 4.
Determining the Center of the Fabric and Graph:
It is necessary to determine the center of the fabric. Fold the
fabric in half from the bottom to the top and in half again from side to
side. Use a needle or thread to mark the center, which is the folded
corner. Unfold the fabric. To begin stitching, count from the
center of the fabric to the corresponding place you wish to begin on the
graph. One square on the graph represents two threads on the fabric
(or one cross stitch.) The center of the graph is designated by arrows
on two sides of the graph which point to the center. Follow both
lines until they intersect.
Using your graph key and floss:
Follow the graph key to find the colors of floss you will need and
to work the picture. The cloth you will need for Beginners is Counted
Cross Stitch Fabric called Aida Cloth. It comes in different count
sizes. Your graph key should specify the finished picture sizes for
several different aida cloth counts. (For example: Fabric count = 14, Finished
picture = 6 1/2" x 11") Floss comes with 6 strands intwined together.
You will need to unwind the number of strands needed. The smaller
the count number you are using, the more strands of floss you will need
to use. Generally: For 14 count use 3 strands, for 16 count use 2
strands. Most backstitch is done with one strand unless otherwise noted
on the key.
The Cross Stitch:
The basic stitch is the cross stitch. An X is formed by crossing
over two threads or one aida cloth square. When beginning the first
stitch, leave about 1" of floss as a tail on the back side of the fabric
to be caught by the first few stitches and held securely. Knots are
not used to secure the thread as they make lumps under the fabric.
Use the diagram with the following instructions:
Make
one cross-stitch for each symbol on chart (A).
Come up through Hole 1.
Go back through Hole 2.
Come up through Hole 3.
Go back through Hole 4.
For horizontal rows, stitch across, then work back as shown (B).
 Use
one-quarter and three-quarter stitches to obtain rounded shapes and add
detail as shown.
Use
one-quarter and three-quarter stitches to obtain rounded shapes and add
detail as shown.
Periodically, drop your needle and let your floss unwind. The thing to remember is the top thread must always lay in the same direction. In this method, the top thread lies from upper left to lower right. Crossing all threads in the same direction gives the stitching a smooth sheen. To secure a strand of floss after stitching, on the back side, catch a length of the floss under several stitches and clip short. Long tails make framing or finishing work difficult.
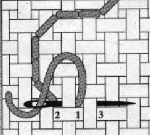 The
Back Stitch:
The
Back Stitch:
The back stitch is used to outline, make lines, and is often used to
form letters. The first stitch is made by coming up at 1, going back
down through 2, and then coming up at 3. After the first stitch,
all stitches are formed by always looping back on top and then coming up
ahead of the next stitch.
| Home | Back to How To | Contact Us |