|
How to Knit a Teddy Bear
~
For More Projects available on project
library page.
Click
Here
Do you enjoy these projects?
Please help us keep the project
library online, growing and free by supporting our site through;
Shopping our bazaar
or
A sponsorship of $10 or more.
Thank you.
|
Please wait...Photos on this
page take a few moments to load.
After you look at this months project,
there are more craft projects available in our project library page.
Please don't forget to Visit
our Craft and Gift Bazaar and enter to WIN in our latest giveaway!
 |
How to Knit a
Teddy Bear
For Intermediate
Learning Level 3
~
February 2006
|
© Copyright 2006 by AOK Corral Craft and Gift Bazaar.
All rights reserved.
These projects are for your personal use only and may
not be reprinted or copied.
Never learned how to
knit?
If you have never learned how
to knit, you might want to start with, "How
to Knit a Scarf" which is our simplest project for learning how to
knit. "How to Knit a Hat" is still simple enough for a beginner but
involves learning additional knitting basics such as: purl, and ribbing.
"How to Knit Slippers" is also simple enough for a beginner. "How to Knit
a Teddy Bear" requires all of the skills learned in these previous projects,
once you have learned them, you should be ready for this project.
How to Knit for Beginners
- Learning Level 1: How
to Knit a Scarf
How
to Cast On
How
to Knit
How
to Bind Off
How to Knit for Beginners
- Learning Level 2: How
to Knit a Hat
How
to Purl
How
to do Ribbing
How to Knit for Beginners
- Learning Level 2: How
to Knit Slippers
(No New Stitches)
How to Knit - Intermediate
- Learning Level 3: How
to Knit a Teddy Bear
How
to Increase Stitches
Stockinette Stitch:
Knit
one row, purl one row, continue to repeat.
You will always knit on
the same side and purl on the same side.
How to Knit a Teddy Bear
Materials Needed:
-
1 Skein of Black Yarn or any color
you want for body.
-
A small amount of tan yarn for the
muzzle, white and black for eyes.
-
US#10 Knitting Needles
-
Yarn Needle with large eye
|
-
Scissors
-
Polyfil Stuffing
-
4 Large Wood Buttons ( 1" or less in
diameter)
-
Needle with eye that is thin enough
to fit through the button holes but large enough to get a piece of yarn
threaded through it.
|
Knit the
Teddy Bear Pieces Using the following instructions:
Head:
-
Cast on 10 stitches.
-
Knit increasing 1 stitch in each stitch
across row, (now 20 stitches)
-
Purl
-
Knit
-
Purl
-
Knit increasing 1 stitch in each stitch
across row, (now 40 stitches)
-
Starting and Ending with a Purl row,
Continue with *Stockinette Stitch for 15 more rows. (*Stockinette
Stitch:
Knit one row, purl one row,
continue to repeat. You will always knit on the same side and purl on the
same side.)
-
Knit 2 stitches together, 20 times.
(now 20 stitches)
-
Purl
-
Knit
-
Purl
-
Knit 2 stitches together, 10 times.
(now 10 stitches)
-
Cut yarn about 12 inches from finished
knitting and thread the end of the yarn with the yarn needle.
-
Remove the knitting needle from the
remaining stitches and send the yarn needle through all the stitch loops.
Pull tight. This will bring the ending edge together and start to create
the top of the head.
-
Turn the head so the knit side is inside
and do a running
stitch along the edge until there is just a small hole at the bottom.
Tie off with a knot and trim off extra yarn.
-
Turn the head right side out so the
knit side is outside and fill with polyfil stuffing.
Body:
-
Cast on 15 stitches.
-
Knit, increasing 1 stitch in each stitch
across row, (now 30 stitches)
-
Purl
-
Knit
-
Purl
-
Knit, increasing 1 stitch in every
other stitch across the row, (now 45 stitches)
-
Starting and Ending with a Purl row,
Continue with Stockinette Stitch for 27 more rows.
-
*Knit 2 stitches together, then knit
1 stitch; repeat from* 15 times. (now 30 stitches)
-
Purl
-
Knit 2 stitches together, 15 times.
(now 15 stitches)
-
Purl
-
Knit 3 stitches together, 5 times.
(now 5 stitches)
-
Cut yarn about 12 inches from finished
knitting and thread the end of the yarn with the yarn needle.
-
Remove the knitting needle from the
remaining stitches and send the yarn needle through all the stitch loops.
Pull tight. This will bring the ending edge together and start to create
the bottom of the body.
-
Turn the body so the knit side is inside
and do a running stitch along the edge until there is just a small hole
at the top. Tie off with a knot and trim off extra yarn.
-
Turn the body right side out so the
knit side is outside and fill with polyfil stuffing.
Arms (Make 2):
-
Cast on 10 stitches
-
Knit
-
Purl
-
Knit, increasing 1 stitch in each stitch
across row, (now 20 stitches)
-
Starting and Ending with a Purl row,
Continue with Stockinette Stitch for 21 rows.
-
Knit 2 stitches together, 10 times.
(now 10 stitches)
-
Purl
-
Knit 2 stitches together, 5 times.
(now 5 stitches)
-
Cut yarn about 10 inches from finished
knitting and thread the end of the yarn with the yarn needle.
-
Remove the knitting needle from the
remaining stitches and send the yarn needle through all the stitch loops.
Pull tight. This will bring the ending edge together and start to create
one end of the arm.
-
Turn the arm so the knit side is inside
and do a running stitch along the edge until there is just a small hole
at the other end.
-
Turn the arm right side out so the
knit side is outside and fill with polyfil stuffing.
-
Finish sewing up the opening at the
end of the arm. Tie off with a knot and trim off extra yarn.
Legs (Make 2):
-
Cast on 28 stitches
-
Knit
-
Purl
-
Knit
-
Purl
-
Knit 2 together once, knit 24 stitches,
then knit the last 2 stitches together
-
Purl 2 together once, purl 22 stitches,
then purl the last 2 stitches together
-
Knit 2 together, 2 times, knit 16 stitches,
then knit 2 stitches together, 2 times again. (now 20 stitches)
-
Starting and Ending with a Purl row,
Continue with Stockinette Stitch for 21 rows.
-
Knit 2 stitches together, 10 times.
(now 10 stitches)
-
Purl
-
Knit 2 stitches together, 5 times.
(now 5 stitches)
-
Cut yarn about 10 inches from finished
knitting and thread the end of the yarn with the yarn needle.
-
Remove the knitting needle from the
remaining stitches and send the yarn needle through all the stitch loops.
Pull tight. This will bring the ending edge together and start to create
the top end of the leg.
-
Turn the leg so the knit side is inside
and do a running stitch along the edge until there is only a hole at the
bottom of the foot.
-
Turn the leg right side out so the
knit side is outside and fill with polyfil stuffing.
-
Finish sewing up the opening at the
end of the foot. Tie off with a knot and trim off extra yarn.
Muzzle:
-
Cast on 3 stitches
-
Knit
-
Knit, increasing 1 stitch in each stitch
across row, (now 6 stitches)
-
Knit
-
Knit, increasing 1 stitch in each stitch
across row, (now 12 stitches)
-
Knit next 3 rows
-
Knit 2 stitches together, 6 times.
(now 6 stitches)
-
Knit
-
Knit 2 stitches together, 3 times.
(now 3 stitches)
-
Cast off in Knit
Ears (Make 2):
-
Cast on 4 stitches
-
Knit
-
Knit, increasing 1 stitch in each stitch
across row, (now 8 stitches)
-
Knit next 5 rows
-
Knit 2 stitches together, 4 times.
(now 4 stitches)
-
Knit
-
Cast off in Knit (This end will be
sewn to the head)
Assemble Parts:
-
Details for the Head:
-
Find the side of the head that is opposite
the seam and stitch the muzzle onto the head with the tan color yarn.
-
With black yarn sew a nose onto the
muzzle using a satin
stitch and then add a mouth if desired.
-
Sew the ears into place and as you
sew, try to curve the edges of the ear forward to create the look of a
curved inside.
-
To sew on eyes we used white yarn first
and did a horizontal satin stitch in the shape of a half oval just above
the muzzle. Then we used black yarn and did a lazy
daisy stitch on top of the white stitching. (You can also use
buttons for the eyes or buy doll eyes for the bear if you want.)
-
Attach to head and body:
-
Line up the seams in the head and the
body so that they will both be the back of the bear.
-
Sew together the head and the body
around the neck making sure to add more polyfil stuffing into the neck
as needed to make sure the head will sit up securely and not flop down.
-
Attach the jointed arms:
-
Thread the needle that will fit through
the buttonholes with about 15-20 inches of black yarn.
-
Lay one arm in its place against the
teddy bears body and place a button on the arm at the shoulder.
-
Send the needle through the button,
the arm and the teddy bear's body all at once and pull the yarn through
stopping when there is still about 4 inches of yarn left outside the button.
-
Take the other arm and locate its placement
on the teddy bear's body.
-
Send the needle through that arm and
then a button at the shoulder as well.
-
Turn your needle and thread around
preparing to send them back through all the pieces but leave a loop of
yarn that is about 4 inches long on this side of the bear.
-
Now send the needle and thread back
the other way through a different hole in the button, the arm, the body,
the other arm and a different hole in the other button. (Hint: You may
have to send the needle through one part at a time so you do not loose
the needle in the stuffed piece. That is ok, you will tighten back up in
the next steps.)
-
When your needle and thread come back
out on the other side, you should have at least 4 inches of yarn sticking
out of each side of the bear's arms.
-
On the side with the loop of yarn,
cut the loop so that you have two piece of yarn you can tie together, then
tie them together against the button in a secure knot making sure to tighten
just enough so that the bear's arm is snuggled against the body. Trim the
ends about 1 inch from the button.
-
On the other side, tie the piece of
yarn together in the same way also tightening them just enough to make
the arm fit snuggly against the body. Trim the ends to about 1 inch from
the button.
-
Attach the jointed legs:
-
Follow the instructions for attaching
the arms and do the same for the legs. The only difference is that you
may want to check the placement of the legs so that when you move the legs
into a sitting position, the back side of his legs are level with the bottom
of the bear.
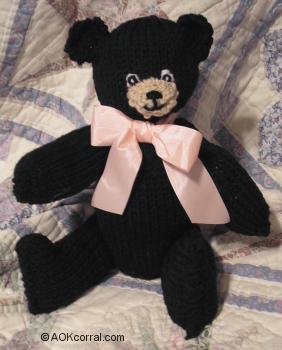
Done!
A cute and fun project to do
in any color. Enjoy!
© Copyright 2006 by AOK Corral Craft and Gift Bazaar.
All rights reserved.
These projects are for your personal use only and may
not be reprinted or copied without written permission from AOK Corral.
(Parts of this project were inspired by slippers in a
flyer done by "Coats & Clark" www.coatsandclark.com)
Do you
like to see knitting projects? What kinds of projects to you like?
Please
Tell Us
To View other Projects go to
Project
Library Page
If you enjoy these free projects, please
support our website by shopping our Craft
Bazaar
or by a sponsorship of $10 or more.
Thank you.
Home
|
