- 3 oz of 4 ply yarn in any color
- US #8 and #9 Knitting needles
- Yarn needle
- Scissors
|
This project assumes that you already have learned how to cast on, bind off/cast off and how to do the knit stitch. In this project you will learn how to understand "gauge", learn the purl stitch, and learn how to do ribbing.
If you need to know how to cast on, do the knit stitch, bind off/cast off, you can visit our first beginner level project, How to Knit a Scarf first.
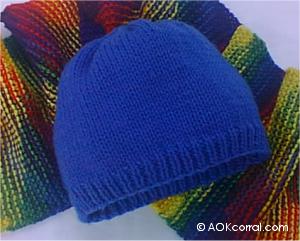
Approx. 26 to 27 inches around hat rim, 9 inches from top of hat to bottom of rim edge.
Size results given here are approximate. Your final size results may differ slightly from ours depending on how tight or how loose your knit stitches are.
Stitch = st
Stitches = sts
Stockinette/Stocking Stitch = St st
Knit 3 stitches together = k3tog
Ribbing of knit 1, purl 1 = 1 x 1 rib
Gauge: 18 sts and 24 rows = 4 x 4 inches
(All of these tutorials are included in the Easy Print Version)
Learn Gauge in Knitting
Learn How to Purl
Learn Knit & Purl Basics; Stockinette / Stocking Stitch, Switching between Knit & Purl
Learn How to do Ribbing
- Using U.S. #8 needles, Cast on 86 sts to your knitting needle.
- Work in 1 x 1 rib until your work measures 1 inch long.
- Change to U.S. #9 needles and proceed as follows. (To change needles simply pick up one #9 needle and proceed with the next row onto #9 needle. After that row is complete, pick up the other #9 needle and proceed with both #9 needles.)
- Row 1. Knit 86 sts.
- Row 2. Purl 86 sts.
- 1st and 2nd Rows set pattern in stockinette stitch.
- Continue in pattern for 6 inches ending with a "purl" row.
- To shape the top of the hat;
- Row 1. *Knit 3 sts., then k3tog, (To do this, simply do a knit stitch but instead of sliding your right needle under only one of the stitches on the left needle, slide the right needle through three stitches and knit them all together as you would have done with the one.) Start at * again and continue across row.
- Row 2. Purl
- Continue 1st and 2nd rows until there are only about 7 sts. left on your needle. (If that number doesn't come out exactly and is 6 or 8 etc.. that is fine.)
- Measure about 15 inches of yarn from your last stitch and cut yarn.
- Thread the large yarn needle with the yarn end.
- Pull the knitting needle out of the last 7 stitches.
- Send the yarn needle through the 7 stitch loops.
- Pull the yarn until you can no longer pull and the last stitch loops disappear into what makes the top of the hat.
- Fold the hat, right sides together and bottom edges even.
- Start sewing the hat edges together with the same needle and yarn from the top of the hat down to the bottom edge.
- Tie a secure knot when you reach the bottom edge.
- Turn the hat right side out.
|
You may Print this page as it is ...OR...
Purchase the Easy Print Version for $1.49
The PDF Version contains step by step instructions for doing the purl stitch and doing ribbing as well as the hat directions without margins, ads or logos.
|

|
|
|