~ How To Projects ~

How to Cast On

Learn how to cast on with this beginner's guide to knitting basics. Great pictures with instructions show you how to cast on.


Go To All Projects ~ Click Here

Click below for more
Craft Projects and Patterns

~ Related Projects ~

Knitting

How to Knit a Scarf - Beginner
How to Knit Slippers - Beginner
How to Knit a Purse - Beginner 2
How to Knit a Hat - Beginner 2
How to Cable Knit - Easy
Children's Animal Slippers - Easy
Knitted Snowman Pattern - Easy
How to Knit a Teddy Bear - Intermediate


Get this entire project
WITHOUT
Ads, Banners, Logo or Margins

Purchase the Ad Free / Easy Print PDF Version for only $1.49


AOK Corral Craft and Gift Bazaar
Craft Blog

How To Projects ~ Knitting ~ How to Cast On

Knitting Instructions: How to "Cast On"
Go back to How to Knit a Scarf Main Project Page

© Copyright 2003 by AOK Corral Craft and Gift Bazaar All rights reserved.
These projects are for your personal use only and may not be reprinted or copied.

You may print this page as is or... See our easy print option below.

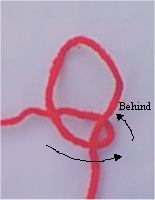
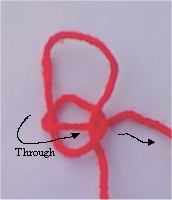
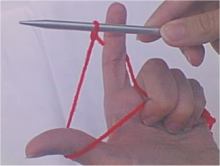
Create a slip knot about 24 inches from the end of the yarn as shown in these photos.
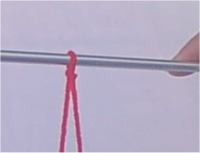


Step 1.
Place the loop onto one of your needles and tighten.
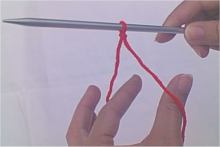
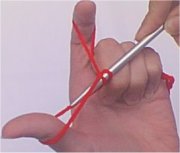
Step 2.
Place your index finger and your thumb between the two pieces of yarn as shown.
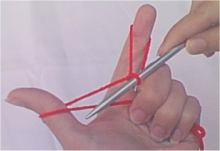
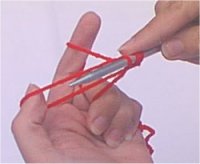
   

Step 3.
Grab the pieces of yarn with your other fingers below your index finger and thumb and spread your index finger and thumb apart.
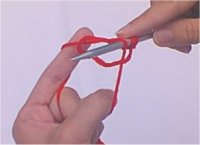
Step 4.
Notice that you have created two "loops" of yarn, one around your index finger, and one around your thumb. Send your needle down in front of the "loop" of yarn on your thumb.
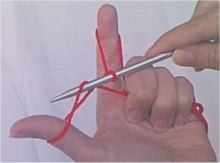
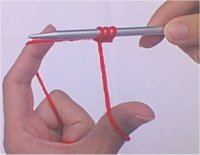
   

Step 5.
Then push your needle up from below through the "loop" of yarn on your thumb.

Step 6.
Now send your needle to the "loop" on your index finger and push the needle through the "loop", this time from above.
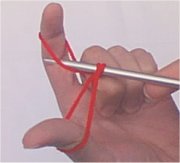
   

Step 7.
Take your needle back down to the "loop" on your thumb and go through, only this time, go through from above the loop.

Step 8.
Carefully slide the "loop" off of your thumb. This will leave a hanging loop of yarn.


Step 9.
Reposition your thumb inside the second piece of yarn coming from the grasp of your lower fingers. Use your thumb and index finger to tighten the "loop" onto the needle by spreading them and the yarn pieces apart.

(Picture shown here has the slip knot and two cast on stitches)
Now you are back to the same position as you were in step 3 and ready to repeat step 4 through step 9 for another cast on stitch.

Easy Print Option:
The easy print version includes all instructions for knitting a scarf, how to cast on, knit and bind off.


Go back to How to Knit a Scarf Main Project Page

© Copyright 2003 by AOK Corral Craft and Gift Bazaar.  All rights reserved.

Want More projects?

Go To Our: Craft Project Menu
OR

Do you like this project?
Would you like to see more?
What projects do you like?

Please Tell Us


Bookmark US &
Share us with Friends!
Bookmark and Share

Show off your Work!
When you finish this project...
Submit a photo by email to
We would love to see it and post it on this page!

(By submitting your photo, you are allowing us to post it
on this page and share it with our visitors.
Your first name and state/province may also be included.)

| Craft Bazaar Home | Craft Project Library | Craft Blog |
| Add your Site | Sitemap | About Us | Contact Us |

© Copyright 1998 - 2013 AOK Corral Craft and Gift Bazaar - All rights reserved