~ How To Projects ~

Lazy Daisy Instructions


Go To All Projects ~ Click Here

Click below for more
Craft Projects and Patterns


~ Projects By Theme ~


Get this entire project
WITHOUT
Ads, Banners, Logo or Margins

Purchase the Ad Free / Easy Print Version for only $1.49


AOK Corral Craft and Gift Bazaar
AOK Corral HomeCraft ProjectsFamily Activities

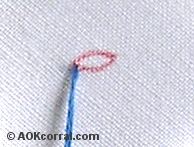
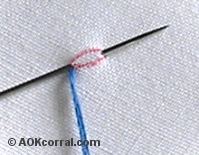
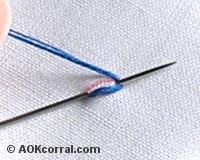
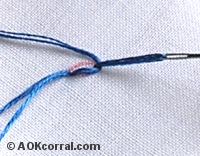
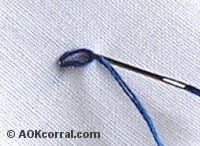
How To Projects > Hand Embroidery > Lazy Daisy Stitch

How to do a Lazy Daisy Stitch in Embroidery
Go back to How to Embroider Main Project Page

© Copyright 2011 by AOK Corral Craft and Gift Bazaar All rights reserved.
These projects are for your personal use only and may not be reprinted or copied.

You may print this page as is or... See our easy print option below.

Step 1. Send your needle up from the back at one end of the design element for the lazy daisy stitch. Step 2. Send your needle down through the fabric right next to the place where your needle first came up, and back up at the other end of the design element. Do not pull the needle through yet.
Step 3. Move the thread to the other side of the needle by wrapping it under the needle tip end. Step 4. Now pull the needle and thread all the way through.
Step 5. Send your needle back down at the same end where it just came up but on the other side of the thread that you wrapped under the needle in step 3. Step 6. Pull the thread through and you will have a completed Lazy Daisy stitch.

© Copyright 2011 by AOK Corral Craft and Gift Bazaar.  All rights reserved.


Go back to How to Embroider Main Project Page

Project
Options:

1.) Read or Print this project from our website, as is, for free.

2.) Purchase Easy Print Version:

  • Convenient - NO ads, menus, or margins - Save ink and paper
  • Complete - All instructions & patterns for this project


| Home | Craft Projects & Patterns | Family Activities |
| Sitemap | Contact Us |

© Copyright 1998 - 2023 AOK Corral Craft and Gift Bazaar - All rights reserved