- Fabric - Cotton, Muslin, Linen
- Wood embroidery hoop - 5" to 6" diameter
- Embroidery/Crewel Needle - Size 5 or 7
- Scissors
- Embroidery floss
- Iron-on transfer pencil, iron, ironing board
- Free embroidery pattern to practice
|
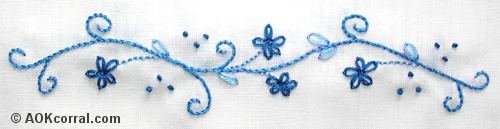
Read our beginner instructions; then follow the picture instructions to learn how to make different embroidery stitches and stitch this beginner level embroidery design that you can use to embellish pillowcases, table linens, or other cloth items.
The supplies explained:
- Fabrics: You can embroider on all kinds of fabrics, however, as a beginner you will want to do your stitching on basic cotton, cotton blend, muslin, or linen fabrics. They are the easiest to work with. Often pillowcases, table runners, fabric placemats and similar items can be good to start on.
- Hoop: The wood embroidery hoop will keep your fabric tight while you do your stitching. If your fabric is not tight and flat, your stitches will pull closer together than they should and make your fabric and finished design all puckered and wrinkled up.
- Needle: There are many different needles available for lots of different uses. You want to look for embroidery needles (also called crewel needles) because they provide a large enough eye (opening) for multiple strands of thread, while being thin enough to keep the holes made in your fabric small. Embroidery needles generally have a sharp point unless they are for cross-stitching on special cross-stitch fabric. These needles also come in different sizes. The size is related to the eye opening and the thickness of the needle. General medium sizes to use are 5 or 7.
- Scissors: You can use any good pair of sharp scissors with embroidery. Just make sure they are sharp so your thread cuts clean. A clean cut of thread is much easier to get through the eye of the needle!
- Thread: As a beginner, you will want to use regular, cotton embroidery floss. It comes in many colors as a folded up segment of floss called a "skein". When you first use embroidery floss, you will notice that the floss is actually several strands of thread all grouped together forming the floss. There are 6 strands of thread that make up the floss strand. Using different numbers of strands will make your stitches thinner or thicker. Different projects may require a different number of strands to get the desired thickness in your stitching.
Before you begin, wash and dry the fabric you will be using. Pre-washing and drying helps the fabric to do any of its shrinking before you stitch on it. If you do not do this, and later need to wash your project, the fabric may shrink and pull the stitching causing a wrinkled look. Iron the fabric so it is smooth and flat.
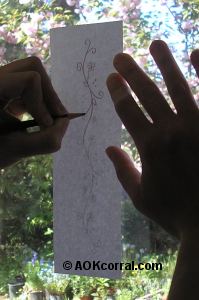
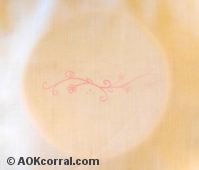
To prepare the pattern for transfer first cut away any excess paper that is beyond about 1 inch from the pattern design. This will make it easier to handle and easier to position when ironing the transfer to your fabric. Take your iron-on transfer pencil and your pattern up to a lighted window. Turn the pattern over so that the pattern is against the window but you can see the lines through the paper. Trace all the lines with your iron-on pencil. Heat your iron to the setting recommended by your pencil manufacturer (generally a low-med setting). Position your pattern onto the fabric with the iron-on pencil drawing against the fabric. Press with your iron for 20 to 30 seconds.
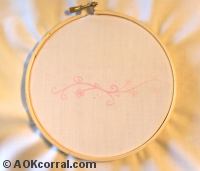
Separate the hoop into two pieces. Put the inside hoop (the one without the tightening screw) under your fabric. Move it around until the inside of the hoop is under the part of your design where you want to do your stitching. Loosen the screw on the outside hoop just enough so you can push it down over the inside hoop so that both hoops make one again and hold the fabric between them. Gently pull the fabric edges so that the fabric inside the hoops is flat and tight; tighten the screws to hold the fabric in place.
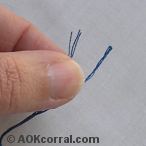
Most embroidery projects that use embroidery floss will require that you use less than the 6 strands of thread contained in the floss strand. Cut a piece of floss from the skein. (We recommend that you cut a piece no more than 18 inches long to keep it from knotting up while you stitch.) At one end of the piece of floss, separate the number of threads you need for the project (usually 2 or 3).
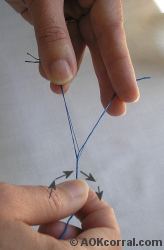
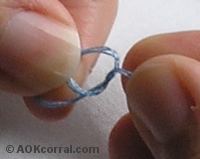
With your left hand, hold the ends of both groups of threads separately between your fingers as shown in the photo at right. Take the full piece of floss with your right hand just below the separated ends. The floss will look like a Y in your hands. Twist the floss in your right hand clockwise and it will begin to unwind down the piece of floss. Adjust the position of your left and right hands hold, further down the piece of floss and keep twisting clockwise with your right hand until the piece of floss is separated completely.
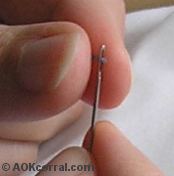
To thread the needle, first trim the end of your thread with sharp scissors so the cut is clean. Put the end of thread between your lips to wet it slightly. Wetting the thread ends slightly will make the separate threads cling together. Pinch the end of the thread between your fingers letting just the tip out and send the wetted end through the eye of the needle. Pull through until that end reaches about half way down your cut piece of thread.
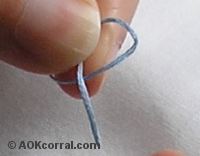
Once your fabric with design is in the hoop and your needle is threaded, you are ready to begin stitching the design. People who are experienced with embroidery will often begin their stitching without using any knots in the thread. When you are just beginning, however, it is helpful to use a small knot at the start of your work. Create a knot in the end of your thread by wrapping the end of thread over itself to make a loop, push the end through the loop and pull. Trim off excess thread.
View the instructions for doing several popular embroidery stitches:
Backstitch
French Knot
Lazy Daisy Stitch
Stem Stitch
Get a copy of our free embroidery pattern for practicing these embroidery stitches
- Pull gently when stitching. Tight pulling will result in wrinkled work.
- Only stitch connected areas with a continuous thread. Do not extend your thread from one area to another. Instead, if you need to go to another area with your color, end your thread at the back of your work, trim and start again in the other area.
- Try to keep all your stitches the same size for a nice consistent look.
- If your design has rounded bends and twists, you will want to keep your stitch size small enough to be able to include several stitches around those curves. More stitches around a curve will cause the stitches to look rounded and not square.
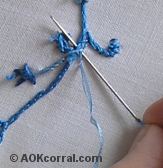
When you have reached a point where you need to stop stitching to move to a different design area, change colors or you have simply run out of thread; you will want to secure your thread behind your work before you trim off the end. To do this, turn your work over to look at the back (make sure your needle and thread are at the back of your work.) Send your needle w/thread under some of the stitching on the back next to the end of the area you just worked. If there is an area that has a group of stitches together, send your needle w/thread under the group of stitches and trim off the thread. If there are only some single lines of stitching for you to send your needle and thread under, it is a good idea to send it under the stitching a few different times to help secure the end better. Trim off the thread.
The Easy Print Version (see below) contains all instructions for how to embroider, stitch instructions, and pattern in a nice, condensed format.
|
Project
Options:
|
1.) Read or Print this project from our website, as is, for free.
|
2.) Purchase Easy Print Version:
- Convenient - NO ads, menus, or margins - Save ink and paper
- Complete - All instructions & patterns for this project
|

|
|
|