~ How To Projects ~
Easter Bracelet

Click below for more
Craft Projects and Patterns
|
~ Projects By Theme ~
- Animals
- Seasonal
- Holidays
|
|
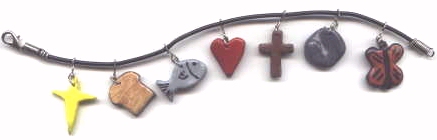
Easter Bracelet
~
March 2001
|
|
|
|
Each of the 7 charms represent Jesus Christ and what He means to us.
Star: Birth
Bread: Word of God
Fish: Fishers of Men
Heart: His Love for Us
Cross: Death
Stone: Resurrection
Butterfly: New Life in Christ - Salvation
- Sculpey III Modeling Compound
- 7 - 7 mm Jump Rings - Silver - A

- 7 - E Connectors - Silver - B
- 2 mm Black Cord
- Silver Findings Set - C
- Acrylic Paint & Brushes
- Varnish
- Knife
- Needle
- Pliers - Needle Nose
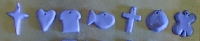
- Charm Patterns - Click Here
|
- Flatten out a piece of modeling compound to approx. 1/8 inch thickness.
- Using the Charm Patterns, cut out all seven shapes with a knife.
- Gently smooth and round all rough edges. (Be very gentle to keep the charm at 1/8 inch, and to keep the charm's finished size the same as the pattern guide.)
- Using a needle, make a small hole in the top of each charm. (About 1 cm from the edge.)
- Bake the charms on a cookie sheet at 275 degrees for 15-20 minutes. Cool.
- Paint the charms using desired colors.
- Finish the charms with varnish.
- Using the pliers, open a jump ring.
- Insert the ring through the hole in the charm.
- Before closing the ring back up, slip an e connector onto the jump ring.

- Now, close the jump ring ends with your pliers.
- Repeat steps 1-4 for each of the charms.
- Cut a piece of black cord the desired length for your bracelet. (No shorter than 7 inches.)
- Slip the charms onto the black cord through the other side of the e connector in the following order: Star, Bread, Fish, Heart, Cross, Stone, Butterfly.
- Finish the ends of the bracelet with the silver findings as shown.
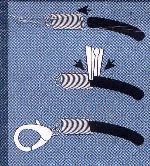
- Position the end Charms (Star and Butterfly) 1/2 inch from the findings.
- Using the pliers, squeeze the e connector loop into the black cord at the 1/2 inch position.
- Space out each of the other charms evenly across the black cord. (for a 7 inch cord that is about 3/4 inch space between charms.)
- Use the pliers as you did for the Star and Butterfly to set the charms into their positions on the black cord.
|
|
|


