~ How To Projects ~
Angel Christmas Ornaments
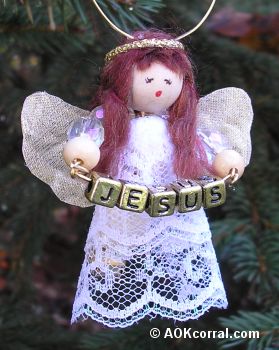
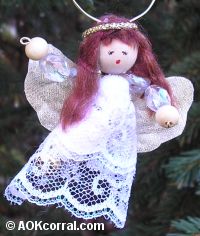
Learn how to make these sweet angel ornaments for your Christmas tree. They are easy and fun to make and can be personalized with names.

Click below for more
Craft Projects and Patterns
|
~ Projects By Theme ~
- Animals
- Seasonal
- Holidays
Get this entire project
WITHOUT
Ads, Banners, Logo or Margins
The Easy Print Version contains all instructions and pattern in an easy print format.
Purchase the Ad Free / Easy Print Version for only $1.49

|
|
Angel Christmas Ornaments
~
November 2011
|
|
|
- Head: 1 Round wood bead - 5/8 inch (16 mm)
- Hands: 2 Round wood beads - 5/16 inch (8mm)
- Body: Oval wood beads:
- 1 bead = 3/4 inch long and 1/2 inch wide
- 1 bead = 9/16 inch long and 3/8 inch wide
- Sleeves: Oval or long beads (any color or bead material for sleeves) - 2 to 3 put together should total about 3/4 inch (19mm) in length on each side.
- Jewelry wire - 20 gauge
- Small Jingle bells
- Lace - 2 inches wide
- Artificial flower petals or leaves for angel wings (gold, white, silver, etc.)
- Yarn for hair (We used "Red Heart - Light & Lofty" yarn for a realistic hair)
- Gold cord for halo
- Letter beads for name banner
- Paint or pens for face
- Hot glue gun
- Scissors
- Jewelry pliers
|
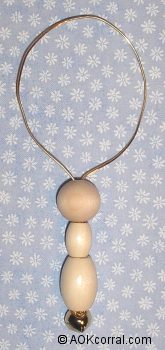
- Cut a piece of jewelry wire measuring 11 inches.
- Bend the wire so that both ends meet but keep the bend at the middle rounded.
- Slide one round head bead onto the wire ends, then slide one arm bead and then one body bead on.
- Take a jingle bell and slide the ends of the wire through the bell hanger about ¼ inch.
- Using your pliers, bend the wire ends back against themselves to secure the beads and bell.
- Slide the beads down toward the bell, tucking the wire tips into the bead hole, and spread the wire above the head bead to help hold the beads together.
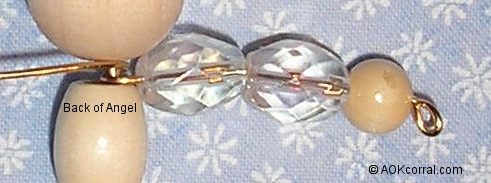
- Cut a piece of jewelry wire measuring 4 inches.
- Place the center of the wire between the head bead and the top body bead and wind around the neck wire by winding each side of the wire piece to the other side.
- String your sleeve beads and then 1 hand bead onto each wire end.
- Using your pliers, trim the wire so that only ¼ inch remains beyond the hand bead. Then bend the tip of the wire back toward the hand to form a tiny loop.
- Repeat steps 9 and 10 for the other arm.
- To determine the front and back of the angel: the back of the angel should be the side where the arm wire sides crossed passed each other at the neck. With the front facing you, if you bend the angels arms toward each other in front, you would be tightening the wire around the neck (if it is the back, you would be undoing it).
- Heat up your hot glue gun and have your 2 inch. wide lace ready to use.
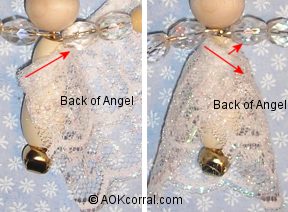
- Apply some hot glue diagonally across the top body bead at the back of the angel.
- Attach the top edge of lace along the diagonal strip of glue starting at the bottom and winding up.
- Bring the lace around to the front of the angel, under the arm. Apply some glue at the top of the angel body bead and attach the lace.
- Bring the lace around to the back again, under the arm, and apply glue diagonally across the back again but this time going the opposite way to create an X and attach the top edge of lace along the diagonal strip of glue. Trim the extra lace off.
- Prepare your flower petal or leaf for cutting out the wings by first removing any plastic veins from the back.
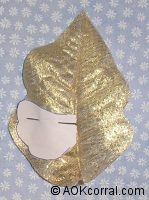
- Next, using the wing pattern cut out 2 angel wings, one in each direction (flip the pattern to do the other side). Note: If there is a center vein in the material, it will look best if you place the center edge of the wing pattern against the middle vein of the petal/leaf.
- Glue the wings to the back of the angel with hot glue.
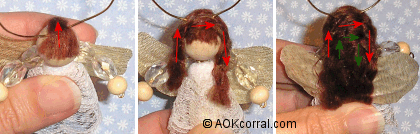
- To create the angel hair, cut several 2 inch pieces of yarn.
- Apply glue from the forehead, over the hole and through the hanger, then to the back of the head and stick one piece of yarn on with one end forming the bangs.
- Apply glue around the front of the head (in front of the hanger) to frame the face and then stick a centered piece of yarn around the head.
- Do the same thing just behind the hanger with another piece of yarn and then again just below that piece of yarn until the head is covered.
- Trim the hair to the length you want it to be.
- Make a halo by cutting a small piece of gold cord and wrap it around the top of the angels head.
- Tack it in place with just a touch of hot glue at the back of the head.
- Draw or paint on your angels face.
- Cut a piece of wire measuring at least 3 inches.
- String the letter beads onto the wire to spell the name.
- Lay the wire and beads down on a table with the name facing down and the back facing you.
- Apply a strip of hot glue along the back of the beads and let dry.
- Slip one end of the wire into the loop at the hand of your angel.
- Using your pliers, bend the end of the wire into a tiny loop that is closed securely.
- Slide the name close to the loop you just made.
- Then slip the other end of the wire into the loop at the other hand of the angel and pull through until it reaches the name beads.
- Bend the end of the wire into a tiny loop that is closed securely and trim the extra wire off.

|
Project
Options:
|
1.) Read or Print this project from our website, as is, for free.
|
2.) Purchase Easy Print Version:
- Convenient - NO ads, menus, or margins - Save ink and paper
- Complete - All instructions & patterns for this project
|
|
|
|
|


