~ How To Projects ~
Butterfly Wind Chime
Make a butterfly wind chime for your home or garden. Large beads make the butterfly wind chime catch the sunlight as the chimes ring out.

Click below for more
Craft Projects and Patterns
|
~ Projects By Theme ~
- Animals
- Seasonal
- Holidays
|

|
Butterfly Wind Chime
~
April 2005

|
|
|
- 18 - 20 Gauge Aluminum Wire
- Assorted Medium Beads - 1/4 to 3/4 inch in size. Your choice of colors. (We used Pink, Aqua, & Amethyst beads by "The Beadery" found at most large craft supply stores. Also, we used silver & gold spacer beads.)
- Needle Nose Pliers
- 1/4 inch diameter Aluminum Pipe
- Pipe Cutter
- Ruler
- Fishing Line
- Scissors
- Drill with 1/16 drill bit
- Scrap wood piece
|
First you will need to create the butterfly wire body. Please Click Here to view the instruction page for making the body.
Next you will need to add the wire wings.
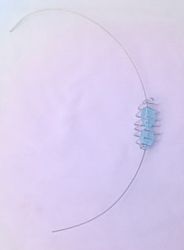
- Cut 2 pieces of wire measuring 15 inches long each.
- For the first piece, thread one end through the 1/4 circle at the bottom of the butterfly body.
- Slip a bead-(not more than 1/2 inch diameter in size) inside the wire body and thread the wire through the bead while inside the wire body. Add more beads in the same manner until the wire end reaches the 1/4 inch circle at the top of the wire body.
- Thread the wire end through the 1/4 inch circle at the top of the wire body. (see photo)
- Repeat this same set of directions for the other 15 inch piece of wire.
- Adjust the wire wings so that approximately 5 inches of each pieces is below the bottom of the butterfly body.
- For the first lower wing, thread alternating bead designs onto the wire until there is only 1/4 inch wire left.
- Using your pliers, bend the end into a tiny loop to hold the beads on the wire.
- Hold the other end of the wire at the top of the body and pull up so that the beads are tight against the bottom of the body. As you do this, gently bend the beaded lower wing into a curve. (see photo)

- Repeat these steps for the other bottom wing.
- Follow the same directions for the upper wings.
- Cut a piece of wire measuring 10 inches.
- Center the wire at the point where the wires for the wings come through the 1/4 circle at the top of the butterfly body.
- Wind the wire tightly around several times making sure that both ends of the wire end up on the same side (front or back).
- If the ends are uneven, trim them to be even.
- Take hold of one antenna end with the pliers and slowly wind inward to form the spiral at the top of the antenna.
- Repeat on the other side.
- Cut the 1/4 inch diameter aluminum pipe into the lengths of 8", 7", 6", 5" and 4".
- Set out a piece of scrap wood to drill on.
- Using the 1/16 drill bit, drill a hole approx. 1/8 inch from one end of the pipe. After the drill goes through the thickness of the pipe, without moving the pipe send the drill bit all the way through the other side of the pipe.
- Do this to each of the pipes. Sand rough edges around the holes if necessary.

- To assemble the aluminum pipes, lay the butterfly on a table, take 12 inch pieces of fishing line and thread them through each of the pipe holes.
- Tie the fishing line in a knot above each pipe, tie the knot a few more times.
- Trim the tied end of the fishing line to within 1/4 inch from the knot.
- Tie the other end of the fishing line for the 6 inch pipe centered, at the base of the butterfly body. Make sure that it is hanging at least 2 inches away from the butterfly.
- Tie up the other pipes making sure their spacing is not more than 1/2 inch away from each other and being careful to align the tops of each of the pipes. They should be placed in order left to right from 8" to 4" or 4" to 8".
- Securely Tie both ends of another 12 inch piece of fishing line just below the antenna to use as the hanger.
|
|
|


