~ How To Projects ~
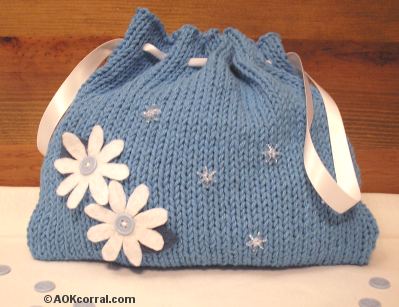
How to Knit a Purse
This is a great project when you want to practice your knitting skills and learn to purl. Our instructions are easy to follow and will help you knit a purse in no time.

Click below for more
Craft Projects and Patterns
|
~ Projects By Theme ~
- Animals
- Seasonal
- Holidays
Get this entire project
WITHOUT
Ads, Banners, Logo or Margins
Nice copy to take with you wherever you want to practice purl stitching or make your purse.
Purchase the Ad Free / Easy Print PDF Version for only $1.49

|
|
How to Knit a Purse
for Beginners
~
January 2010
Learning knitting
through projects
Project #2
These projects are for your personal use only and may not be republished or copied.
|
|
You may print this page as is or...
Easy Print Option:
Includes all detailed instructions for making the purse, how to purl, stockinette stitch, recognize knit and purl, change between knit and purl. Great for printing out several copies to learn with your group.
|
Nice copy to take with you wherever you want to practice knitting.
|
|
- 2 oz of cotton yarn in any color
- U.S. #8 (5 mm) Knitting Needles
- Yarn sewing needle
- Scissors
- 1 yard of ½ inch wide ribbon
- Flower Embellishment:
- Felt for flowers and leaves
- Sewing thread and needle
- Buttons for flower centers
- Beads to embellish
Empty purse finished size: 9 inches wide by 8 inches high
|
Basic Info about this project:
To make this purse you will need to know how to do the knit and purl stitches. This project assumes that the user already knows how to cast on, knit, and bind off. (These instructions can be found in our first project, How to Knit a Scarf for Beginners.) You will find instructions on the linked pages in the instructions below to learn to do the purl stitch, to learn to tell the difference between a knit stitch and a purl stitch by looking at your work and how to change back and forth from knit to purl stitches in the same row.
Stitch = st
Stitches = sts
Right Side = RS
Stockinette/Stocking Stitch = St st
Learn How to Purl - Click Here
Learn Knit & Purl Basics - Click Here
- Using U.S. #8 needles, Cast on 40 sts.
- 1st Row. Knit 40 sts. (RS)
- 2nd Row. Knit 1 st., Purl 38 sts, knit 1 st.
- 1st and 2nd Rows sets pattern, repeat 1st and 2nd rows.
- Continue in pattern until work measures 16 inches.
- Bind Off
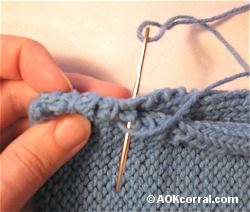
- Fold your work in half with right sides (knit sides) together.
- Stitch the sides of your work together using yarn and a yarn needle. (see photo)
- Open your purse so that the knit side is facing out.
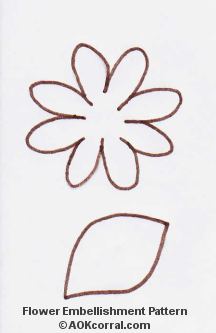
- Embellish both sides of your purse with felt flowers, buttons and beads. (see flower and leaf patterns on this page.)
- The easiest way to add the flowers to your purse is to stitch the flower, leaf and button center all at one time through the button. To do this, thread your needle with regular thread.
- Put the leaf end under the center of the flower, then put the button on top of the center of the flower. Hold together.
- Send the needle up from the underside of the flower assembly through all pieces and through one hole in the button, leave a couple inches of the thread end at the underside of the flower.
- Send your needle and thread back down through a different hole in the button back to the underside of the flower assembly. Tie the thread together in a couple of knots.
- Now you can add the whole flower assembly to your purse. Continue to stitch through the purse and all pieces of the flower and the button holes several times. Make several knots in the yarn behind the flower to end.
- Thread your yarn needle with ribbon.
- Find a starting point near one of the side seams of your purse and about 1 to 1 ½ inches from the top edge.
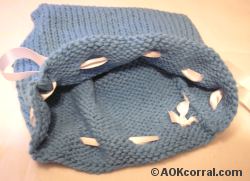
- Send your needle with ribbon from the inside of the purse to the outside of the purse through an opening in the knit weave. Continue to send the needle with ribbon in and out of the knit weave every 1 inch or so ending with the ribbon end on the inside of the purse again.
- Tie the ends of ribbon together in a tight knot and trim ends. (see photo)
- Slide the extra ribbon to the outside of the purse and adjust as one or two handles on either side of the purse. Pull ribbon to close purse.
|
|
|


