~ How To Projects ~
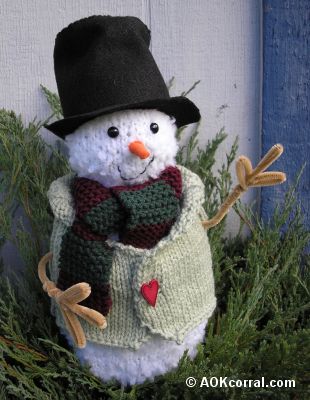
Knitted Snowman Patterns
Get all the patterns you need to knit a snowman and his clothes with our knitted snowman patterns and instructions.

Click below for more
Craft Projects and Patterns
|
~ Projects By Theme ~
- Animals
- Seasonal
- Holidays
Get this entire project
WITHOUT
Ads, Banners, Logo or Margins
The PDF Version contains instructions for knitting the snowman and his clothes and making the hat.
Purchase the Ad Free / Easy Print PDF Version for only $1.49

|
|
Knitted Snowman Pattern
~
November 2010
|
|
You may Print this page as it is ...OR...
Purchase the Easy Print Version for $1.49
The PDF Version contains instructions for knitting the snowman and his clothes and making the hat without ads, margins, ads or logos.
|
|
|
- 1 Skein of White "Bernat Baby Boucle Yarn"
- US #10 knitting needles
- Black Doll eyes - approx. 6mm
- Felt: 1 piece white, orange scraps
- Embroidery Floss; orange, white
- 4 pieces of brown chenille (craft pipe cleaners) - 12 inches
- Needles: yarn & sewing needles
- Scissors
- Polyfill stuffing or your favorite doll stuffing
- Approx. 1 cup of medium size beads
- Tape measure or ruler
Finished Snowman measures 11 1/2 inches tall and 6 inches wide
|
k = knit
p = purl
st = stitch
sts = stitches
inc = increase
tog = together
St. st = Stockinette stitch which is; knit one row, purl the next row, repeat.
- Cast on 5 sts
- Row 1: k, inc 1 st into this and each k st to end (now 10 sts)
- Row 2: purl
- Row 3: k, inc 1 st into this and each k st to end (now 20 sts)
- Row 4: purl
- Row 5: knit
- Row 6: purl
- Row 7: k, inc 1 st into this and each k st to end (now 40 sts)
- Row 8: purl
- Row 9 through 24 (16 rows): Do stockinette stitch starting with a knit row and ending with a purl row
- Row 25: k2 sts tog, repeat to the end (now 20 sts)
- Row 26: purl
- Row 27: knit
- Row 28: purl
- Row 29: *k1, (k1 and inc 1 st); repeat from * 20 times (now 30 sts)
- Row 30: purl
- Row 31: *k1, (k1 and inc 1 st); repeat from * 30 times (now 45 sts)
- Row 32: purl
- Row 33: knit
- Row 34: purl
- Row 35: *k7, (k1 and inc 1 st); repeat from * 5 times, k5 (now 50 sts)
- Row 36: purl
- Rows 37 through 58 (22 rows): Do stockinette stitch starting with a knit row and ending with a purl row
- Row 59: *k10, k2 sts tog, repeat from * 3 times, k2 (now 46 sts)
- Row 60: purl
- Row 61: knit
- Row 62: purl
- Row 63: *k5, k2 sts tog, repeat from * 5 times, k4 (now 40 sts)
- Row 64: purl
- Row 65: knit
- Row 66: purl
- Row 67: k2 sts tog, repeat to end (now 20 sts)
- Row 68: purl
- Row 69: k2 sts tog, repeat to end (now 10 sts)
- Row 70: purl
- Row 71: k2 sts tog, repeat to end (now 5 sts)
- To finish body:
- Cut the yarn about 12 inches from your work, thread your yarn needle with the end of the yarn.
- Slide the last 5 stitches off of the knitting needle and send your yarn needle through all 5 stitches. Pull tight*. (*TIP: When using the "Boucle" yarn be sure your knit stitch loops stay open for this process to allow the little tuffs of yarn to get through them before pulling tight.)
- Turn the body right sides together (knit sides together) and stitch the edges together along the body until you are about halfway up the body. Stop here, remove the yarn needle from the yarn but do NOT cut the sewing yarn, leave it hanging for later.
- Thread another piece of yarn onto the yarn needle and secure one end to the top of the head.
- With right sides still together (knit sides together), stitch the edges of the head together down to the neck secure the yarn with a knot and trim off the extra yarn.
- Turn the body right side out.
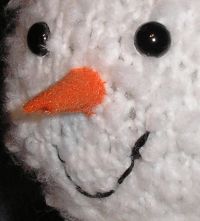
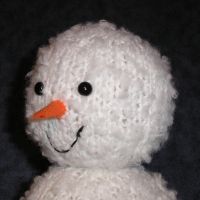
- Put some stuffing into the snowman head so you can see where you want to place the eyes, nose and mouth.
- When you like what you have, secure the doll eyes with their backing. (You may have to pull the stuffing back out of the head for this part. Then put it back in before sewing on the other face parts.)
- Create the snowman carrot nose with a piece of orange felt by first cutting a circle measuring 2 inches in diameter. Cut the circle into quarters.
- Take one of the quarters and roll it up while keeping the point as the tip of the nose.
- Using a needle and orange thread, stitch the rolled edges together and then stitch the nose to the snowman face.
- To create the mouth, use full thickness embroidery floss and stitch the mouth onto the snowman.
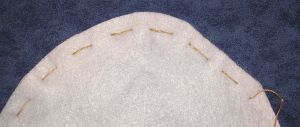
- Cut an 8 inch circle out of white felt.
- Thread a sewing needle with embroidery floss
- Create a running stitch (up and down stitching) around the circle edge about ½ inch from the outside edge. Leave a tail of several inches at the end of the thread and do not tie a knot.
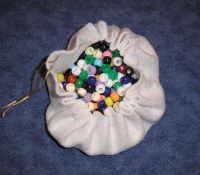
- When you complete the running stitch around the circle, pull both ends of the thread to gather up the circle edges into a pouch.
- Fill the pouch with beads, pull the pouch closed and tie the thread ends together tightly.
- Insert the pouch of beads into the bottom of the snowman body.
- Add some polyfil stuffing on top of the pouch until the snowman body is at least half full.
- Follow directions to make the stick hands/arms - Click Here.
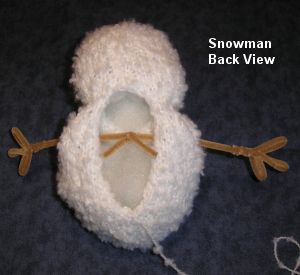
- To attach the arms to the snowman body, turn the snowman to his side and measure 2 inches below the neckline. Insert the arm end of the snowman hand & arm assembly into a hole in the stitching at that point. Do the same to the other side.
- Inside the snowman body, pull both arm ends in until there is only about a 3 inch arm (from wrist to shoulder) outside the snowman.
- Bend and hook the two ends together inside the snowman and wind the ends around each other to secure.
- Finish filling the snowman body with polyfil stuffing around the arm assembly.
- Stitch up the back opening of the snowman.
- Cut a 12 inch piece of white yarn. Wrap the yarn piece around the neck of the snowman, and tie it tight in the back. This will help define the snowmans neck by rounding the bottom of the head and top of the body.
|
You may Print this page as it is ...OR...
Purchase the Easy Print Version for $1.49
The Easy Print Version includes instructions for knitting the snowman and his clothes as well as making the hat without margins, ads or logos.
|
|
|
|
|


