~ How To Projects ~
How to Make Placemats
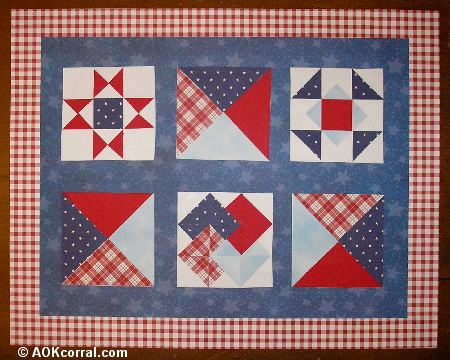
Learn how to make your own set of placemats in this month's project. You will create a quilted placemat look using different paper styles and colors.

Click below for more
Craft Projects and Patterns
|
~ Projects By Theme ~
- Animals
- Seasonal
- Holidays
Get this entire project
WITHOUT
Ads, Banners, Logo or Margins
Purchase the Ad Free / Easy Print PDF Version for only $1.49

|
|
How to Make Placemats
Paper Quilted Placemats
~
June 2009
|
|
You may print this page as is or...
Easy Print Option:
Includes all patterns and instructions for this entire project without margins, ads or logos.
|
|
|
- 1 Poster Board Sheet for each placemat - 11" x 14"
- Glue stick
- Ruler
- Pencil
- Scissors
- Regular white paper (copy or printer paper is fine)
- An assortment of card stock and scrapbooking papers (see chart below for ideas)
- Clear Contact paper
|
You can change the color scheme to match whatever theme or décor you are making the placemats for. If you are not sure how to select your own colors and patterns for this design follow the instructions below.
When selecting your colored papers, lay them all together to see if they will compliment each other. Keep in mind that it is a good compliment to have patterned papers contain some of the other solid colors in the patterns. The chart below can help you put together a combination that will contrast the light and dark with the patterns for a nice "quilt". Follow the additional recommendations in the chart below. (Colors and patterns that we used in the example photo are given in italics.)
|
Color #1
Dark Patterned - Navy w/stars
Medium (Pattern or Solid) 1 - Smokey blue w/faint, lt. blue stars
(This medium could be solid or have a pattern. If you choose a patterned paper, make sure that all the other papers will show up nicely when they lay against this one.)
Light Solid - lt. blue
|
Color #2
Dark Solid - Red
Medium Patterned 1 - Red Plaid
(This medium pattern should contain some of the dark solid color in the design.)
Medium Patterned 2 - Red Gingham Check
|
Color #3
Light Solid - White
|
These quilt blocks are made with a combination of 1" squares cut crossways into triangles and then cut again into smaller triangles or 3" squares cut crossways into triangles and then cut again into smaller triangles.
Each quilt block is put together with glue stick onto white printer paper and then cut out so they can be assembled onto the placemat as a completed quilt block.
- Measure and cut 1" wide strips of each color.
- Measure and cut the strips into 1" squares.
- Color #1 Dark Patterned = 5 squares
- Color #1 Light Solid = 3 squares
- Color #2 Dark Solid = 5 squares
- Color #2 Patterned 1 = 2 squares
- Color #3 Light Solid = 14 squares
- Make your squares into triangles: Using the straight edge of a ruler, draw a line across the back of the square from one corner to the alternate corner. Cut along line. You now have 2 triangles.
- Color #1 Dark Patterned = Cut 4 squares like this
- Color #1 Light Solid = Cut 3 squares like this
- Color #2 Dark Solid = Cut 4 squares like this
- Color #2 Patterned 1 = Cut 2 squares like this
- Color #3 Light Solid = Cut 10 squares like this
- Make your 2 triangles into smaller triangles: Using one of the triangles as a guide, place its top point at the center base of the other triangle and then make the edges of the triangles line up together. (This will help ensure you have a straight line down the center of each triangle.) Draw a line from the top of the triangle down to the center base of the triangle along the edge of the paper. Do the same thing to the other triangle.
- Color #1 Dark Patterned = Cut 1 triangle like this
- Color #1 Light Solid = Cut 2 triangles like this
- Color #2 Dark Solid = Cut 3 triangles like this
- Color #2 Patterned 1 = Cut 1 triangle like this
- Color #3 Light Solid = Cut 4 triangles like this
- Measure and cut one 3" square for each of the following colors: Color #1 - Dark and Light, Color #2 - Dark and Medium Patterned 1.
- Follow the same cutting directions given in steps #3 and #4 above to make these squares into triangles and then into smaller triangles.
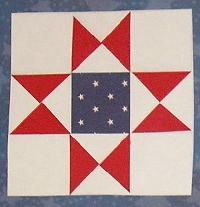
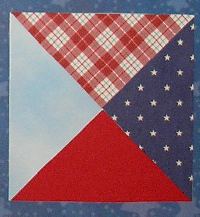
Ohio Star
 |
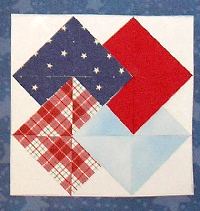
Card Trick
 |
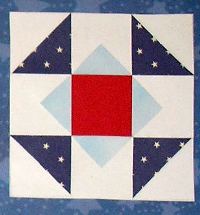
Shoo Fly
 |
Triangles
 |
- Using Color #2 - Medium Patterned 2, cover the entire sheet of poster board with this paper color.
- Cut a piece of Color #1 - Medium that measures 12" x 9" and glue it to the center of the poster board. (It can help to make light marks 1" from each of the poster board edges to make sure your piece is centered.)
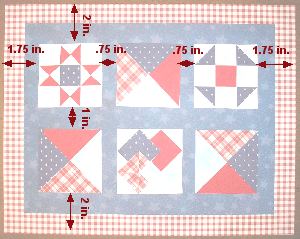
- Make measurements for the placement of the quilt blocks as shown in the chart.
- Cut two pieces of contact paper that are 1 inch larger than the poster board on all sides. Carefully place the contact paper over the top of the placemat. (*Hint: Only peel back the paper backing from half of the contact paper. Center the contact paper over the placemat and press the center down first, then press it on toward the edge. Then peel back the other side and press it on starting in the center and pressing toward the edge.)
- Do the same with the contact paper for the back. Then trim the excess down to about ½ inch from the poster board edge.
|
|
|


