~ How To Projects ~
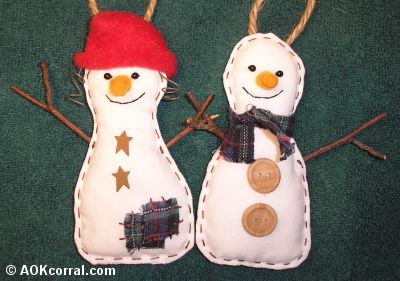
Snowman Ornament Pattern
Learn how to craft these cute snowman ornaments for Christmas.

Click below for more
Craft Projects and Patterns
|
~ Related Projects ~
~ Related Shopping ~
[an error occurred while processing this directive]
Get this entire project
WITHOUT
Ads, Banners, Logo or Margins
The PDF Version contains all instructions and patterns for making the ornaments.
Purchase the Ad Free / Easy Print PDF Version for only $1.49

|
|
Snowman Christmas Ornament Pattern
~
November 2000
|
|
You may Print this page as it is ...OR...
Purchase the Easy Print Version for $1.49
The Easy Print/PDF Version contains all instructions and patterns for making the snowman ornaments without margins, ads or logos.
|
|
|
- Old white sheet or white muslin fabric
- Red fleece scraps
- Plaid scraps
- Orange felt
- Poly-fill stuffing
- 4 mm black beads
- Thin craft wire (5 inch piece)
- 3 inch Y shaped sticks (2 per snowman)
- Black & Brown embroidery floss
- White & Orange thread
- Medium Twine
- Wooden Buttons and Rusty Metal Star Shapes or other button items
- Snowman Patterns - Click Here
Finished Size: 5 1/2 inches tall
|
- Cut out all pieces for snowman and accessories using the patterns located through the link in the materials list.
- With wrong sides together, Pin both snowman pieces together.
- Stitch together at about ½ inch from the edge with white thread, using a sewing machine or hand stitch using a backstitch. (Be sure to leave the openings for the arms and for stuffing the bottom as shown on the pattern.)
- Trim ¼ inch off of the seam allowance edge after you are done stitching.
- Make small cuts in the seam allowance, up to the stitching, about every ½ inch around the head and neck of the snowman. (This helps the fabric to press out smoothly.)
- Turn the snowman right side out through the bottom hole.
- Press all edges with your iron.
- Gently stuff the snowman with poly fill until he is just about ½ inch thick.
- Stitch up the bottom opening with white thread.
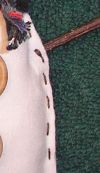
- Insert a Y stick into each of the arm openings about 1 ½ inches deep.
- Using 3 strands of brown embroidery floss, start a running stitch around the snowman about 1/8 inch from the finished edge.
- When you get to one of the arm sticks, stitch tightly around the stick 3 times before continuing around the snowman.
- Using black embroidery floss, 2 strands, sew on the eyes and mouth. (approximate placement is shown on the pattern)
- For the nose, roll up the nose piece tightly. (The straight edge will be the point and should be kept as tight and pointy as possible.)
- Using orange thread, one strand, stitch the nose together and then onto the face.
- Tie the scarf piece around his neck.
- Glue on Buttons.
- Stick the piece of craft wire through her forehead. (The areas where the wire goes in and out of her head will be covered by the hat).
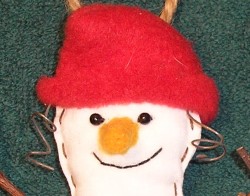
- Wind each end of the wire around a pencil to make curly ringlets.
- For the hat, fold the hat piece in half, wrong sides together.
- Stitch the hat together along seam lines. (About ¼ inch from the edge)
- Turn right side out, turn up the bottom edge and sew into place on the girls head.
- Stitch patches into place on her body.
- Glue rusty star shapes as buttons onto her body.
- Add a little blush to her cheeks if you want.
For a hanger, use a 6 inch piece of twine string, tie the ends together and stitch the loop to the back of the snowman's head. Or you can use embroidery floss and a needle to just stitch a piece through the back of the head and tie the ends together to form a loop hanger.
|
You may Print this page as it is ...OR...
Purchase the Easy Print Version for $1.49
The Easy Print Version contains all instructions and patterns for making the snowman ornaments without margins, ads or logos.
|
|
|
|
|


