~ How To Projects ~
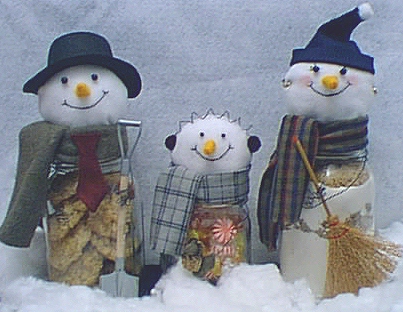
Snowman Gift Jars

Click below for more
Craft Projects and Patterns
|
~ Projects By Theme ~
- Animals
- Seasonal
- Holidays
|
|
Terra Cotta Bunny Ornaments
~
December 1999
|
- Felt (white and orange)
- Thread (black or black/brown, orange, white)
- Black Beads (medium)
- Miscellaneous Fabric Scraps
- Craft wire
- Needle
- Poly or Cotton Stuffing
- Pencil
- Glue Gun
- Pliers
- Scissors
- Regular mouth Canning Jars (pint and quart) or other jars.
- Cardboard
- Black top hat
- Basket
- Pompoms (black and white)
- Mini Broom
- Mini Shovel
- A good imagination :o)
|
Print out your Patterns for Snowmen and Accessories here.
- Print out the pattern and cut on the solid line.
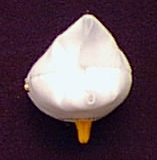
- Cut two pieces of white felt to make the head.
- Sew the pieces together 1/4" from edge (dotted line of pattern).
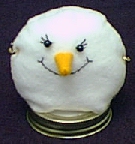
- Turn inside out. Place the pattern over the head. Using a pencil, poke through the dots on the mouth making a light mark on the fabric. Do the same for the eyes.
- Sew on the mouth and eyes. (Hint: Do not use the same strand of thread for this as it will show through) Use the black beads for the eyes.
- Print and cut out the pattern on the solid line.
- Cut out a piece of orange felt using the pattern for the nose.
- Fold the nose so that the raw edges are together.
- Starting at the point, sew the edges together and tie off.
- Turn the nose inside out using scissors or something with a point that will fit in the nose.
- Make small stitches in the nose randomly to make it look like a carrot.
- Center the nose on the face and sew on.
- Stuff the head, leaving about 3/4" to 1" of fabric space at the bottom edge.
- Fold in both seam sides. (as shown) Then place some glue down with your hot glue gun and fold the back flap in.
- Being careful of the shape of the head, do the same with the front flap.
- If using a jar with a full lid already, omit next step.
- If using a canning jar, cut a piece of cardboard (from a cereal box, etc.) to fit inside the lid.
- Invert the lid. Place some glue around the inside edge of the lid and quickly insert cardboard.
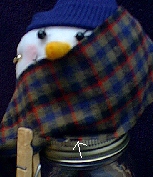
- Turn the jar lid right side up again. Place a generous amount of glue on the top of the lid and center the head on. (as shown)
- Once your head is attached to the lid, you are ready for the scarf. Screw the lid onto the jar. Wrap your fabric around the lid rim the way you want it to look in the end.
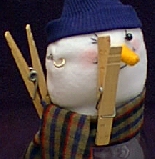
- Clamp clothespins on both sides of the scarf tie or mark both sides with a pin. (See scarf figure 1)
- Untie the scarf but leave the marking pins on the fabric until you are ready to start gluing.
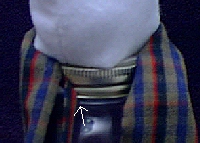
- For the top edge of the scarf, turn under the upper edge of your fabric about 1/8 to 1/4 of an inch (whatever is easier to work with).
- Attaching the fabric between the two marking pins, start gluing the scarf to the top of the lid rim, just to the right of where you want your scarf tie to be.
- Dot some hot glue on the top edge of the lid. Place the folded edge of the fabric down onto the glue, but do not let the top of the fabric get glued down, you want that part to be flexible. (See scarf figure 2)
- Continue around the top edge of the lid until you reach the other marking pin.
- For the bottom of the scarf fabric, turn under the bottom edge as you did with the top, then dot the glue above the bottom rim of the lid and press fabric down. (See scarf figure 3) You do not have to worry about keeping the outside layer of fabric from being glued down.
- Continue around the lid until you are about 1 1/2" from where you started. Re-tie the scarf.
- Take the wire and your pliers and make some curves back and forth to resemble a hand.
- Position that hand, creating the desired arm length and then wrap the wire tightly around the glass jar just under the glass lip. Wrap it around twice and then bring it down to form the other arm. Form the other hand the same way you did the first. For added strength while still allowing the arms to move freely around the jar, take each arm and wrap it once around the double wire that circles the jar.
|
|
|


