~ How To Projects ~
Lighted Snowman

Click below for more
Craft Projects and Patterns
|
~ Projects By Theme ~
- Animals
- Seasonal
- Holidays
|
|
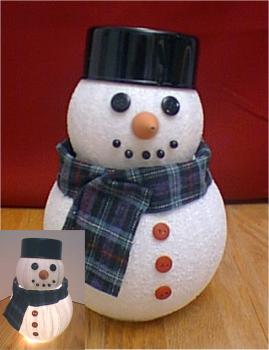
Lighted Snowman
~
December 2003
|
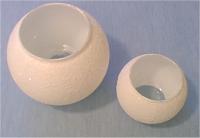
- 2 Round Glass bowls (look for plain glass floral bowls or votive holders)
- 1 Large size (top opening measures approx. 3 1/2" diameter)
- 1 Small size (top opening measures approx. 2 3/4" diameter)
- White Spray Paint (most even look when lit) or White Acrylic Paint (gives a more stroked grainy appearance when lit)
- Black Spray Paint - High Gloss
- Orange Acrylic Paint
- 1/2" wide Paint Brush
- Masking tape
- Clear Glitter
- 3 Colored Buttons - 1/2 inch
- 2 Black Buttons - 1/2 inch
- #4 Round Cake Decorators Tip (for carrot nose)
- Several 6 mm Black Beads
- 1 Tuna Can - Cleaned
- Clear Tacky Glue
- Clear Acrylic Sealer Spray
- Single Accessory Light with cord (The type used with lighted ceramic houses - 5 watt bulb) or 10 mini white light set.
- Fabric scrap: 2 inches wide and a length of approx. 18" or 4 inches longer than the length needed to go around the top of the large bowl.
|
- To paint with Spray Paint:
- Prepare the glass bowls for painting by applying masking tape across the round base of each bowl. (Trim into a circle if necessary.)
- Lay out newspaper in a well ventilated area and place one of the bowls, top down on the newspaper.
- Paint one of the glass bowls evenly with white spray paint and immediately sprinkle the entire bowl with clear glitter. In order to cover the bowl completely with the glitter, you will need to pick up the bowl by carefully grasping it on the masking tape at the base and at the top rim. For the larger bowl you will want to place your fist or part of your hand into the top opening of the bowl so that it is hanging on your hand. You can then rotate the bowl around your hand as you sprinkle the glitter all over the bowl. Carefully remove the bowl from your hand by again grasping it on the masking tape at the base and at the top rim. Place it, top down, back on the newspaper to dry.
- Repeat for the other bowl.
- Let dry completely and remove masking tape.
- To paint with Acrylic Paint & Brush:
- If you prefer to paint the bowls with acrylic paint by brush, you will need to completely cover the bowls with one coat of paint and let dry. Grasp the small bowl at the base and the top rim. Place the large bowl over your fist and rotate as you paint. Do not paint the base of the bowls.
- Then, apply a second coat over one quarter of the bowl and apply glitter, then over another portion of the bowl, then apply glitter, etc.. until you have completely covered the glass bowl. This is necessary to make sure the glitter is applied while the paint is still very wet.
- Repeat for the other bowl.
- After the paint and glitter has dried, place the bowls, top down, on newspaper in a well ventilated area.
- Spray the bowls completely with clear acrylic sealer gloss.
- Let dry completely.
(*Important: Make sure that your scarf does not cover the top rim of the snowman body (large glass bowl) or hang over into the bowl's opening at all.)
- Apply a thick line of tacky glue around the top of the large bowl about 1/2 to 3/4 inch* below the top rim. (Enough of a distance to be sure that the scarf will not hang over the top rim at all.)
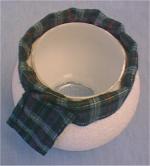
- Take the fabric for the scarf and fold it in half lengthwise.
- With the folded edge of the fabric facing up, stick one end of the scarf to the front center of the large bowl on the glue.
- Continue to wrap the scarf around the large bowl on the glue line all the way to the front center where you started.
- Then apply 1 more inch of tacky glue on the scarf from the center and continue to wrap the scarf over the extra inch of glue.
- Open out the remaining end of the fabric and turn it to hang down as a scarf.
Add tacky glue to hold the end in place hanging down.
- Hand paint the cake decorator's tip with orange acrylic paint. Let dry.
- Lay out newspaper in a well ventilated area and place the clean tuna can, open top down, on the paper.
- Spray paint the can black. Let dry.
- Lay both the large bowl and the small bowl on their side so that the side you want for the front is facing up. (One good way to do this is to put some napkins (for padding) in a cereal bowl and lay one of your snowman bowls into the cereal bowl. This will keep it from rolling.)
- Glue three buttons on the body.
- Glue on the black button eyes, orange nose and evenly spaced black beads for the mouth.
- Let glue dry completely.
- To assemble the parts to your snowman;
- Hang the accessory bulb in the large bowl body with the cord coming out over the top rim of the back.
- Place the small bowl head on the top rim of the body. (This will also help to hold the cord in place and in the back.)
- Set the black can hat on top of the small bowl head.
Warning: Do not leave this lighted decoration unattended.
Set this decoration only on nonflammable surfaces as you would with any glass votive bowl
used for burning candles. AOK Corral is not responsible for any damage or injury
that may occur from misuse of this decoration or neglect of monitoring this lighted product.
|
|
|


