~ How To Projects ~
Reindeer Christmas Ornaments
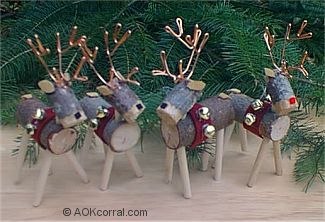
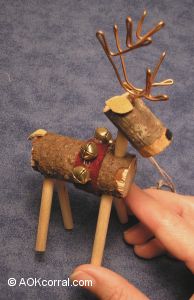
Learn how to make these cute wooden reindeer ornaments for Christmas.

Click below for more
Craft Projects and Patterns
|
~ Projects By Theme ~
- Animals
- Seasonal
- Holidays
Get this entire project
WITHOUT
Ads, Banners, Logo or Margins
The PDF Version contains all instructions for making the reindeer ornaments.
Purchase the Ad Free / Easy Print PDF Version for only $1.49

|
|
Reindeer Christmas Ornaments
~
November 2004
|
|
You may Print this page as it is ...OR...
Purchase the Easy Print Version for $1.49
The Easy Print/PDF Version contains all instructions for making the reindeer ornaments without margins, ads or logos.
|
|
|
- Tree branches with bark on them;
- One piece that is 1 inch diameter and 2 and 1/4 inches long for each reindeer
- One piece that is 5/8 inch diameter and 1 and 1/4 inches long for each reindeer
- At least ten inches of 1/4 inch diameter doweling per reindeer
- 16 Gauge Copper Wire
- Brown leather scraps or brown felt scraps.
- Red and Black Felt Scraps
- Dark Red Felt
- 10 mm Jingle Bells
- Thick Gold Thread
- Tacky Glue
- Needle Nose Pliers
- Needle
- Scissors
- Saw or wood pruners
- Drill
- 17/64 Drill bit (or size just larger than 1/4 inch dowel)
- 1/16 Drill bit
- Handheld Clamp
- Pocket knife
- Hot Glue Gun for gluing jingle bells
|
From top of head to feet: 4 ½ inches
From tail to nose: 3 ½ inches
From top of antlers to feet: 6 inches
- Cut a 1 inch diameter wood branch into a piece that is about 2 and 1/4 inches long for each reindeer body.
- Cut a 5/8 inch diameter wood branch into a piece that is 1 and 1/4 inches long for each reindeer head.
- Hold the body piece on one side with the handheld clamp.
- Fit your drill with the 17/64 drill bit.
- Drill the neck hole centered and at about 3/8 inch from the edge.
- Leaving the clamp on the wood, flip the clamp over to see the opposite side of the body.
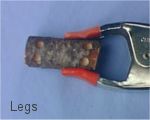 
- Place a mark for each leg hole that is 3/8 inch from the edge of the wood and 3/8 between each pair of legs.
- Each leg hole will be drilled at a slight angle toward the center of the body. To do this, tilt the clamp holding the wood to the right and to the left so that you can drill straight down but the hole is slightly angled toward the center.
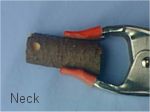
- Make a mark 1/2 inch from one edge of the head piece. That edge will become the back of the head.
- Now remove the body piece from the clamp and put the head piece in the clamp with the end that is nearest to the mark, pointing out from the clamp.
- Hold the clamp with wood up at about a 45 degree angle and drill straight down. (see photo for neck)
- Change to the 1/16 drill bit.
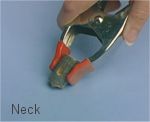 
- Flip the clamp with wood over and hold it at a 45 degree angle, drill two holes 1/8 inch from the edge and 1/4 inch apart for the antlers.
- Remove the head piece from the clamp.
- Using a pocket knife, carve off 1/4 of bark from the opposite end, the nose end.
- Cut 4 pieces of 1/4 inch doweling that are 2 and 1/4 inch long for the legs.
- Cut 1 piece of 1/4 inch doweling that is 1 inch long for the neck.
Click Here for Step by Step Antler Instructions
- Using tacky glue, attach all legs and let dry completely
- Attach neck and head, let dry completely.
- Put a little bit of tacky glue on the end of each antler and stick into the little holes on top of the head. Let dry completely.
- Cut out two 1/2 inch long ovals out of the leather or brown felt and glue them just outside of the antlers.
- Cut one slightly larger oval out of the leather or felt and glue it on as the tail.
- Cut a tiny circle or square of black or red felt and glue it on as the nose.
- To make a hanger for the reindeer, cut a piece of string or cord about 18 inches long.
- Center the string under the reindeer body and tie around the body just behind the neck. Tie again to make a knot against the body.
- Then join the two pieces of string together at the ends with a secure knot.
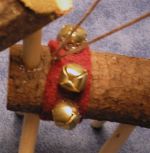
- Cut a strip of red felt that is 3 inches long and 1/2 inch wide.
- Glue the red strip onto the reindeer back just behind the neck, taking care to keep the string hanger loop free.
- Using the hot glue gun, glue 4 jingle bells, about 1/2 inch apart, along the red felt.
|
You may Print this page as it is ...OR...
Purchase the Easy Print Version for $1.49
The Easy Print Version contains all instructions for making the reindeer ornaments without margins, ads or logos.
|
|
|
|
|


