~ How To Projects ~
Christmas Ornaments

Click below for more
Craft Projects and Patterns
|
~ Projects By Theme ~
- Animals
- Seasonal
- Holidays
|
|
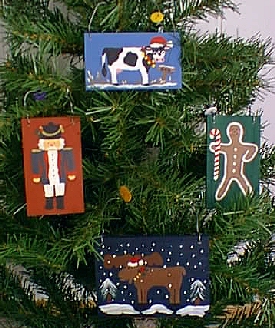
Christmas Ornaments
~
November 1999
|
- Wood pieces (size requirements with each ornament's instructions)
- Fine floral wire
- Small drill bit and drill
- Buttons
- Acrylic paints
- Paint Brushes
- Carbon Paper & Pencil
|
- Wood should measure at least 3 1/2" x 2".
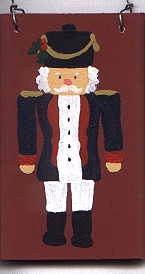
- Colors needed: Brandy Wine, Indigo Blue, Bright Red, Hunter Green, Gold, Peach, White, & Black.
- Completely paint wood with Brandy Wine.
- Using the pattern & instructions from the page link above, transfer the soldier to the wood.
- Paint the soldier's face and hands with Peach.
- Paint his coat sides, coat sleeves and hat Indigo Blue.
- Paint his shirt and pants White.
- Then paint on the Gold trim on his hat and shoulders.
- Use Hunter Green for the holly leaves on his hat.
- Paint his coat facings and cuffs with Bright Red.
- Paint his boots Black.
- Make small dots with Black for his eyes and buttons
- Mix a little Bright Red with White to paint his nose.
- Slightly thin some white and brush on a mustache and hair.
- Instructions for Finishing below.
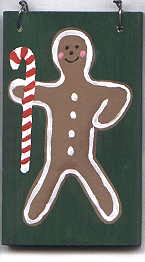
- Wood should measure at least 3 1/2" x 2".
- Colors needed: Hunter Green, Beige, Bright Red, White, Black.
- Completely paint wood with Hunter Green.
- Using the pattern & instructions from the page link above, transfer the gingerbread man to the wood.
- Paint the gingerbread man with Beige.
- Paint the candy cane completely white.
- Paint a thin strip of white along the line just inside the outer edge of the gingerbread man.
- Dot White paint for the buttons.
- Paint the stripes on the candy cane with Bright Red.
- Mix a little Bright Red and White to paint the cheeks.
- Use Black dots to make eyes, nose, and to draw a thin line for his smile.
- Instructions for Finishing below.
- Wood should measure at least 3 1/2" x 2".
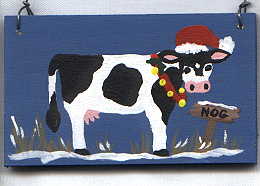
- Colors needed: Country Blue, White, Black, Bright Red, Hunter Green, Sunlight, Beige, Dark Beige.
- Completely paint wood with Country Blue.
- Using the pattern & instructions from the page link above, transfer the cow to the wood.
- Paint the White parts of the cow first.
- Paint the Black parts of the cow.
- Mix some Bright Red with White to paint the cow's nose, inner ears, and udder.
- Use a dot of White for the cow's star on its head.
- Use Black dots for the cow's nostrils.
- Paint the hat and collar Bright Red.
- Paint the holly leaves with Hunter Green.
- Use dots of Sunlight for the bells on the collar.
- Use dots of Bright Red for the holly berries.
- Paint the sign with Dark Beige.
- Brush light strokes of Beige for the grass (brush from the ground up)
- Use the White again to highlight some of the grass with snow, on top of the sign, and on the ground.
- Finally, paint "NOG" on the sign in Black.
- Instructions for Finishing below.
- Wood should measure at least 3" x 4 1/4".
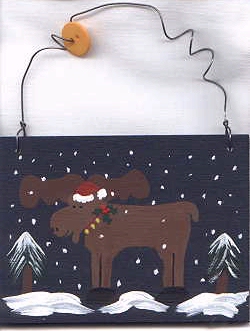
- Colors needed: Indigo Blue, Beige, Dark Beige, Hunter Green, Bright Red, Sunlight, White, and Black.
- Completely paint wood with Indigo Blue.
- Using the pattern & instructions from the page link above, transfer the moose to the wood.
- Paint the moose body Beige.
- Paint the moose antlers and the tree stumps Dark Beige.
- Paint the moose hooves Black and draw a thin Black line to separate the legs and for the mouth. Make small dots for eyes and nostrils.
- Paint the collar and hat Bright Red.
- Paint the trees with Hunter Green (start and the top of the tree and stroke down in each direction until the green meets the stump)
- Paint the holly leaves Hunter Green.
- Use dots of Sunlight for the bells on the collar and dots of Bright Red for the holly berries.
- Paint the White parts of the hat and highlight the trees with White along the lines.
- Paint the snow on the ground with White following the direction of the arrows.
- Randomly dot snow in the sky around the moose and a little over him too.
- Drill two small holes about 1/4" from the top corners of the ornaments.
- Insert one end of a piece of floral wire through the hole about one inch. (Send it through from the back)
- Bend the wire so that it comes together at the top edge of the wood and twist together.
- Wind the wire around a pencil a couple of times.
- Put a button on the wire.
- Wind the wire around a pencil again a couple of times.
- Send the other end of the wire through the hole (from the back toward the front)
- Bend the wire together again like you did with the other side, twist the wire and trim the end if necessary.
|
|
|


