~ How To Projects ~
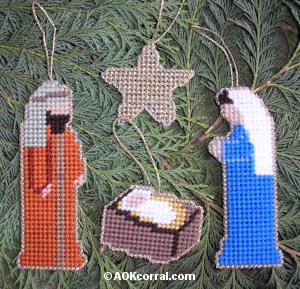
Nativity Ornaments - Nativity Christmas Ornament Set

Click below for more
Craft Projects and Patterns
|
~ Projects By Theme ~
- Animals
- Seasonal
- Holidays
|
|
Nativity Ornaments - Nativity Christmas Ornament Set
~
November 2006
|
- 7 count Plastic Canvas
- Yarn Needle
- Scissors
- Patterns:
- Gold Metallic Cord (Usually found with the plastic canvas supplies in most major craft supply stores.)
- Standard Yarn (We used Red Heart Yarn, You may substitute colors):
- White
- Buff or Cream
- Cafe Brown
- Honey Gold
- Copper
- Bronze
- Pale Sage or Lt. Sage
- Warm Brown
- Coffee Brown
- Lt. Blue
|
If you do not know how to stitch on plastic canvas, please Click Here to view our plastic canvas instructions.
- Print out the patterns and gather all your the materials from the list above.
- Follow the patterns to stitch each of the designs onto your canvas.
- Cut out each of the ornaments as indicated just outside the cutting lines shown on the patterns.
- Thread your needle with about 36 inches of gold metallic cord.
- Starting at the bottom of one of the ornaments, send the needle and cord under several stitches of yarn in the back of the ornament and pull through until the end of the cord is all that is caught under the yarn in back. This will hold the end of the cord in place in the back of the ornament.
- Begin looping the cord by sending the needle up through one of the holes on the edge of the ornament nearest the place where your cord is secured in back and pull gently through.
- Next, bring your needle around to the the back of the ornament again and send it up through the next hole on the edge of the ornament, pull gently through.
- Repeat step 7 until you reach the first hanger mark, shown on your pattern, at the top of the ornament. (Repeating this step will create a gold looping around the outside edge of the ornament.)
- At the first hanger mark send your needle up through the hole from the back as usual and pull through.
- At the second hanger mark, bring your needle around the the back of the ornament again and send it through the hole but do not pull it through all the way, instead pull just enough to leave a 2-3 inch loop above the ornament.
- Send your needle up through the next hole but be careful to only pull the cord until it has rested against the edge of the ornament. If you keep pulling your hanger loop will get smaller so check to make sure that your hanger loop is still the right length. If it got smaller, pull the cord back a little to make it the right size before going on.
- Now you can continue to repeat step 7 around the rest of the ornament.
- You will probably run out of cord before reaching the end. To secure the end of your cord before getting a new piece or when reaching the end of your ornament edging, simple send the needle through several stitches of yarn in the back of your ornament and trim the end off.
- Follow these directions to complete each of your ornaments.
|
|
|


