~ How To Projects ~
How to Enlarge a Grid Pattern

Click below for more
Craft Projects and Patterns
|
~ Projects By Theme ~
- Animals
- Seasonal
- Holidays
Get this entire project
WITHOUT
Ads, Banners, Logo or Margins
Purchase the Ad Free / Easy Print Version for only $1.49

|
|
Woodland Applique: How to Enlarge a Grid Pattern
Go back to Woodland Applique Main Project Page
© Copyright 2011 by AOK Corral Craft and Gift Bazaar All rights reserved.
These projects are for your personal use only and may not be reprinted or copied.
You may print this page as is or... See our easy print option below.
|
|
- First, measure the width and height of the area on your fabric/project that you want to fill with the design or individual appliqué. (Measure the actual width and height for the design on your finished project. Do not include space you may need for margins in your measurements.)
- If the area for your project is not square, (equal in width and height), choose the measurement that is the shortest for calculating in the next step.
- Next, you will need the number of grid squares in the design pattern you are going to use. If the shorter measurement in step 2 is width, count the grid squares for your appliqué in width. If the shorter measurement is step 2 is height, count the grid squares for your appliqué in height. (Here are the numbers for our full woodland design already counted for you: Width = 42 squares. Height = 28 squares. OR; Count the squares on the pattern piece for an individual appliqué that you want to use.)
- Now, calculate the size for your grid paper;
- Divide the project measurement by the pattern grid squares:
- Example: The shortest measurement for your desired design is the width. Your project width is 20 in. (50.8 cm.). The grid square count for the design width is 42 squares. So, 20 in. (50.8 cm) divided by 42 = .48 in. (1.21 cm). Round your final answer DOWN to the closest mark your can use on your yard stick, ruler, or straight edge measuring stick. For .48 in., which is very close to ½ inch, use the 7/8 mark which is just under the ½ inch mark. If you use a metric measurement stick, do the same for that stick.
- Now create your own grid paper. Roll out craft paper on a table and measure out vertical and horizontal lines separated by the measurement you determined in step 3, (example i. was 7/8 in.)
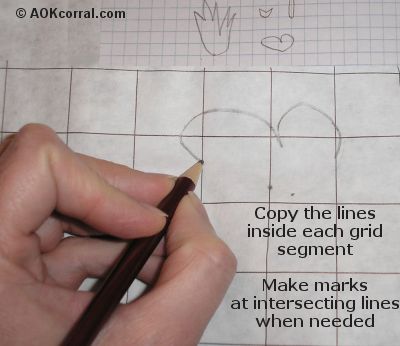
To transfer the design you will simply copy the lines in each segment one at a time. Here are some tips. See photo.
- It may be helpful to number the segments of your grid paper and the pattern, or you might find it helpful to shade in the grid segments on the original pattern after you have completed the copy on the larger grid.
- When copying a segment it is often helpful to plot the point where the line enters the grid segment and where the line leaves the grid segment. After this, you can draw the line with the correct curves while heading toward the correct ending point.
Go back to Woodland Applique Main Project Page
|
Project
Options:
|
1.) Read or Print this project from our website, as is, for free.
|
2.) Purchase Easy Print Version:
- Convenient - NO ads, menus, or margins - Save ink and paper
- Complete - All instructions & patterns for this project
|
|
|
|
|


