~ How To Projects ~
Pansy Applique Pattern
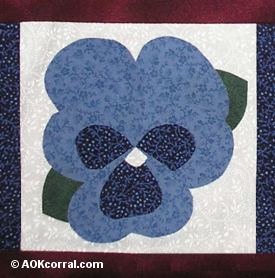
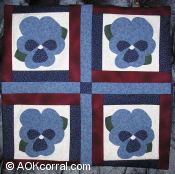
Add a pansy to your project or quilt with our pansy applique pattern. There are 3 different sizes of this pansy pattern so you can add our applique to a variety of projects.

Click below for more
Craft Projects and Patterns
|
~ Projects By Theme ~
- Animals
- Seasonal
- Holidays
Get this entire project
WITHOUT
Ads, Banners, Logo or Margins
Bonus: The Easy Print Version contains 3 pansy applique pattern sizes and quilt pillow pattern.
Purchase the Ad Free / Easy Print Version for only $1.49

|
|
Pansy Appliqué Pattern
~
May 2008
|
|
|
- Fabrics:
- Medium petal fabric
- Dark petal fabric
- Leaf fabric
- Center of flower fabric
- Fusible adhesive such as "Heatn Bond"
- Iron and Ironing Board
- Pencil
- Fabric Scissors
- (Optional: Needle and thread colors to match fabric if you plan to stitch the edges of the appliqué.)
- Medium Pansy Applique Pattern - 3 1/2" x 3 1/2"
or Large Pansy Applique - 4 1/2" x 4 1/2"
Available on Easy Print Version (see button below)
or Small Pansy Applique - 2 1/2" x 2 1/2"
Available on Easy Print Version (see button below)
|
Be sure to use the right fusible adhesive for your project. If you plan to stitch the edges of your appliqué, you should use a light fusible adhesive that can be sewn through. If you do not want to stitch the edges of your appliqué and you want it to be washable then you should use an ultra strong hold fusible adhesive. Look for fusible adhesives in your fabric store near the interfacing.
- Cut out all the pansy pattern pieces.
- Lay your fusible iron-on adhesive out with the paper side up.
- Trace each of the pattern pieces, for one fabric color, onto the paper.
- Cut the fusible adhesive paper around the group of traced patterns.
- Lay the adhesive, paper side up onto the wrong side of your fabric.
- Follow manufacturers instructions for bonding the adhesive.
- Cut out each of the pieces and peel off the paper backing.
- Follow steps 3 through 7 for the other pattern pieces that use different colors of fabric.

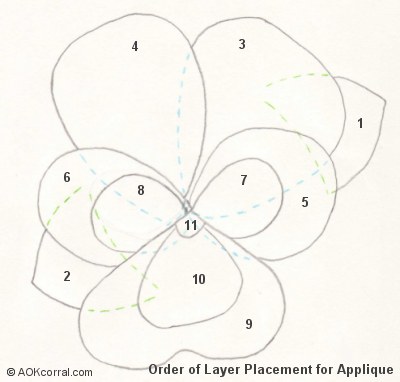
- Using the placement guide shown at right, arrange all the pieces of your pansy onto your project. Adjust as needed.
- Carefully remove all pieces except pieces 1 through 4. (2 top petals and 2 leaves)
- Follow the manufacturers directions with the fusible adhesive for bonding the pieces onto your project.
- Arrange layers 5 through 8 and bond them. (2 middle petals medium and 2 dark)
- Arrange layers 9 and 10 and bond them.
- Lastly, add layer 11, bond.
|
Project
Options:
|
1.) Read or Print this project from our website, as is, for free.
|
2.) Purchase Easy Print Version - Download NOW:
- Convenient - NO ads, menus, or margins - Save ink and paper
- Complete - All instructions & patterns for this project + Bonus*
*This version includes 3 pansy applique pattern sizes and quilt pillow pattern.
|
|
|
|
|


