~ How To Projects ~
Woodland & Mountain Applique
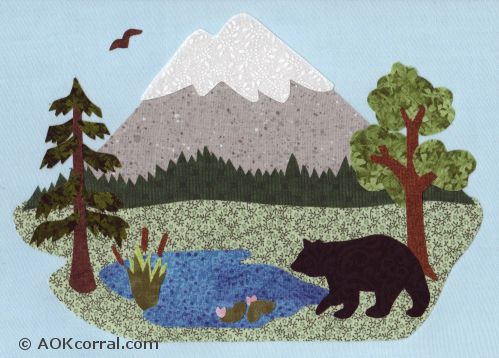
Use the patterns in our applique design for your next woodland theme project. Our free applique patterns includes a mountain scene with forest trees, lake, and bear.

Click below for more
Craft Projects and Patterns
|
~ Projects By Theme ~
- Animals
- Seasonal
- Holidays
Get this entire project
WITHOUT
Ads, Banners, Logo or Margins
The Easy Print Version contains ALL project instructions, patterns, and enlargement instructions for the woodland applique design.
Purchase the Ad Free / Easy Print Version for only $1.49

|
|
Woodland Appliques
~
February 2011
Applique Mountain Scene with Woodland, Forest, Lake & Bear
|
- Woodland Design Patterns (click on the links to get the patterns)
- Misc. Calico Fabrics
- Fusible Web/Heat n Bond (paper backed adhesive web sheet)
- Sharp Scissors
- Ball point or similar Pen
- Needle
- Iron
- Ironing board
- Optional: Embroidery Thread (colors to compliment fabrics)
- Optional: For enlarging the patterns; roll of craft paper, yard stick, pen
Finished Design Size "as is": 8 1/2 inches wide x 6 inches high
OR Enlarge this design to any size:
Learn how to Enlarge Grid Patterns
|
- Cut out the pattern pieces.
- Decide which fabric colors you will use for each of the pieces.
- Cut out a square or rectangular piece of fabric that is large enough to fit the patterns you want for that fabric.
- Cut out a piece of fusible web just a bit smaller than the square of fabric.
- On your ironing board or a flat surface prepared for ironing, turn the fabric piece so that the wrong side is facing up.
- Follow the manufacturer's directions for applying the web to the fabric. Usually, that means placing the bumpy side of the paper against the wrong side of the fabric and going over it with a hot iron for 2 to 3 seconds.
- Lay the pattern pieces right side down on top of the paper.
- Trace around each pattern piece with a ball point pen.
- Leave the paper attached to the fabric and cut out the pieces. (Leave the paper on until you are ready to apply them.)
- Prepare all the rest of the pieces for appliqué in the same way.
- Remove the paper backing from the appliqué pieces.
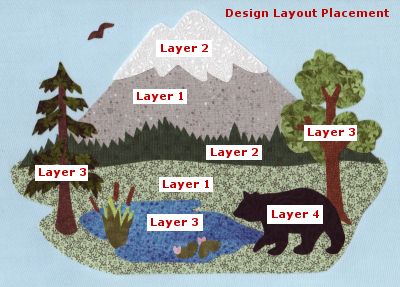
- Arrange the pieces onto your project as shown in the design layout placement photo with layers. Start with the first layer pieces.
- When each piece is correctly positioned, press a hot iron down onto the pieces and hold for 8-10 seconds. Pick up iron and place over more of the design. Do this over the whole design.
- Arrange the pieces for the next layer of the design and press with the iron again over all pieces on that layer. Finish with any other last pieces.
- When the design is complete, turn the fabric over and press the hot iron down onto the back of the design area and hold for another 10 seconds. (This is to insure that the glue has completely joined the fabric pieces together.)
- If you plan to wash your project very often, you may choose to hand stitch just inside the edge of each piece with a matching color embroidery thread (2 strands). You can use a running stitch, which is just an up and down stitch. (This will additionally secure the appliqué.)
|
Project
Options:
|
1.) Read or Print this project from our website, as is, for free.
|
2.) Purchase Easy Print Version:
- Convenient - NO ads, menus, or margins - Save ink and paper
- Complete - All instructions & patterns for this project
|
|
|
|
|


