~ How To Projects ~
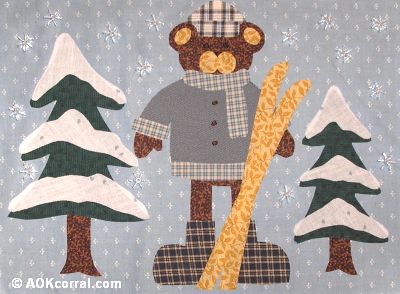
Winter Bear Applique
Use this bear applique design for your next winter theme project. Easy to do, free bear applique pattern.

Click below for more
Craft Projects and Patterns
|
~ Projects By Theme ~
- Animals
- Seasonal
- Holidays
Get this entire project
WITHOUT
Ads, Banners, Logo or Margins
The Easy Print Version contains all instructions and patterns for the bear applique design.
Purchase the Ad Free / Easy Print Version for only $1.49

|
|
Winter Bear Applique
~
January 2005
OR...If you are looking for a realistic bear applique, try this one:

|
|
|
- Design Patterns (click on the link to get the patterns)
- Misc. Calico Fabrics
- Fusible Web/Heat n Bond (paper backed adhesive web sheet)
- Sharp Scissors
- Ball point or similar Pen
- Needle
- Embroidery Thread (colors to compliment fabrics)
- 12 mm Clear Paddle Wheel Beads
- Iron
- Ironing board
Finished Design Measures: 10 1/2 inches wide x 8 1/4 inches high
|
- Cut out the pattern pieces.
- Decide which fabric colors you will use for each of the pieces.
- On a flat surface, turn the fabric so that the wrong side is facing up.
- Lay the pattern pieces right side down onto the wrong side of the fabric.
- Trace around each pattern piece with a ball point pen.
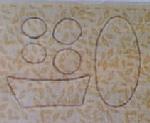
- After you have all the correct patterns drawn onto that fabric, cut around all of them to make one square. (Important: Do not cut out the individual pieces yet! - See photo)
- Cut out a piece of fusible web just a bit smaller than the square, but covering all your pieces.
- Follow the manufacturer's directions for applying the web to the fabric. Usually, that means placing the bumpy side of the paper against the wrong side of the fabric and going over it with a hot iron for 2 to 3 seconds.
- Leave the paper attached to the fabric and cut out the pieces. (You should be able to see the lines through the paper for cutting.)
- Prepare all the rest of the pieces for appliqué in the same way.
- Remove the paper backing from the appliqué pieces.
- Arrange the pieces onto your project as shown in the design layout placement guide.
- When each piece is correctly positioned, press a hot iron down onto the pieces and hold for 30 seconds. Pick up iron and place over more of the design. Do this over the whole design.
- Turn the fabric over and press the hot iron down onto the back of the design area and hold for another 30 seconds. (This is to insure that the glue has completely joined the fabric pieces together.)
- Hand stitch just inside the edge of each piece with a matching color embroidery thread (2 strands). Use a running stitch. (This will additionally secure the appliqué.)
- Use a satin stitch to make the bear's eyes, nose and coat buttons with a dark brown embroidery thread.
- With white thread, sew on little clear paddle wheel beads at random locations around the top of the design for the look of snowflakes.
- (Optional: Instead of using a stitch around the appliqué, you can use fabric paint for a completely no sew method of securing the appliqué.)
|
Project
Options:
|
1.) Read or Print this project from our website, as is, for free.
|
2.) Purchase Easy Print Version:
- Convenient - NO ads, menus, or margins - Save ink and paper
- Complete - All instructions & patterns for this project
|
|
|
|
|


