~ How To Projects ~
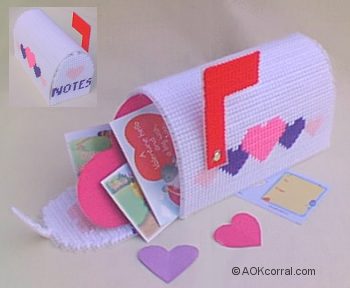
Valentine Mailbox
Learn how to make this cute mailbox for Valentines day or any day with our free plastic canvas mailbox craft project.

Click below for more
Craft Projects and Patterns
|
~ Projects By Theme ~
- Animals
- Seasonal
- Holidays
Get this entire project
WITHOUT
Ads, Banners, Logo or Margins
The Easy Print Version contains all instructions and patterns for this project.
Purchase the Ad Free / Easy Print PDF Version for only $1.49

|
|
Valentine Mailbox
Plastic Canvas Craft
~
February 2005
|
|
You may Print this page as it is ...OR...
Purchase the Easy Print Version for $1.49
The Easy Print Version contains all instructions and patterns for this project without margins, ads or logos.
|
|
|
- Clear, 7 mesh plastic canvas - Cut pieces as follows:
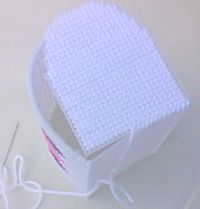
- Sides (Top) - One piece 49 squares by 69 squares
- Bottom - One piece 49 squares by 23 squares (This piece will be left as is with no stitching.)
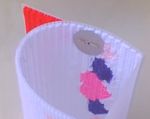
- Cut out mailbox back (see pattern link below)
- Cut out mailbox front (see pattern link below)
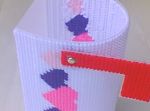
- Cut out mailbox flag (see pattern link below)
- Yarn - White, Lt. Pink, Bright Pink, Purple, and Red
- Large Needle (not sharp)
- Scissors
- Small Brad
- Thin Cardboard circle - 1" diameter also, make a small hole in the center
|
If you do not know how to stitch on plastic canvas and you need help understanding the pattern:
Click Here for Basic Plastic Canvas Instructions.
Begin by using the design patterns linked here to cut out and create all the pieces for the mailbox:
Mailbox Sides (Top) Pattern
Mailbox Front Pattern
Mailbox Back Pattern
Mailbox Flag Pattern
- To stitch together the pieces, follow these general steps;
- Thread the needle
- Line up the holes of each piece you are working with.
- Start at one corner hole and bring your needle through both adjacent holes leaving a small 1/2" tail of yarn.
- Next bring your needle around and go through the next adjacent holes.
- Guide and hold the tail end of yarn to lay in the direction you are stitching so that it will be secured under the stitches you are creating.
- Continue joining the piece by looping through each pair of holes in this manner.
- Finish your end of yarn by feeding it through a few of the completed stitches on the wrong side.
- Stitch both the sides (top) of the mailbox to the bottom piece along the sides that are 49 squares long.
- Next, stitch the back piece of the mailbox onto the bottom along the 23 square side.
- To stitch the rest of the back piece onto the mailbox follow the dot guides given on the back and side patterns.
- Place the flag onto the mailbox as indicated on the patterns. (Use the cardboard circle inside the mailbox to keep the sharp edges of the brad from snagging the yarn.)
- Stitch the front piece to the mailbox along the bottom only.
- Bend the tab toward the inside of the mailbox where shown on the pattern.
- To close, insert tab under/inside the top of the mailbox.
|
You may Print this page as it is ...OR...
Purchase the Easy Print Version for $1.49
The Easy Print Version contains all instructions and patterns for this project without margins, ads or logos.
|
|
|
|
|


