- Three pieces of 7 Count Mesh Plastic Canvas
- Yarn in the following "Red Heart" colors or substitutes:
- White
- Cafe
- True Blue
- Maize Yellow
- Blue Jewel
- Lt. Periwinkle
- Lt. Berry
- 1/8" Wood Dowel
- 10 mm Round Beads (w/approx. 1/8" holes)
- Wood Piece 9" long by 2" wide and 1/4" to 1/2" thick.
- Brass Hooks 3/4" or less
- Small Gauge Flexible Wire
- Miscellaneous Small Sea Shells
|
- Large Needle (not sharp)
- Scissors
- Ruler
- Hot Glue Gun and Glue
- Drill with 1/16" bit
- Hand pruner or Large Sharp Scissors to cut dowel.
- Wire cutting pliers
|
If you do not know how to stitch on plastic canvas and you need help understanding the patterns, Click Here.
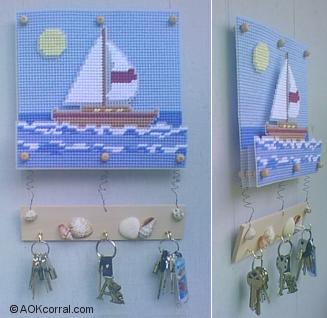
Begin by using the following instructions and design patterns to create all the pieces for the ocean and sailboat scene.
- Cut a piece of plastic canvas that measures 60 squares wide by 56 squares high.
- Cut three holes at the top and three holes at the bottom following the Background Hole Placement Pattern for the correct placement of the holes.
- Using the color "Blue Jewel" stitch 36 rows starting at the top.
- Change to "True Blue" and stitch 7 rows.
- To create the ocean you will need to print out the following patterns.
- Follow the directions on the patterns for stitching and cutting.
- To create the sailboat you will need to print out the following patterns.
- Follow the directions on the patterns for stitching and cutting.
- To create the sun you will need to print out and follow directions from the Sun Pattern.
- Take the piece of wood that measures 9" in length.
- Lay a ruler on the wood and make marks 1/4" from the top edge at 1/2", 4 1/2", and 8 1/2".
- Drill small holes at these marks.
- Lay a ruler on the wood again and make marks 1/2" from the bottom edge at 1", 4 1/2", and 8".
- Screw the brass hooks into these marks.
- Cut 3 pieces of wire, each measuring 9" long.
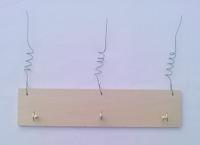
- Take the first piece and thread about 1" of the wire through the hole, bend the wire end and the wire length up and twist them together just above the wood piece's top edge.
- Do the same with the other two wire pieces and the other holes.
- For each piece of wire, starting about 1/2" from the wire connections, wrap the wire around a pencil about 4 or 5 times to create a curly wire spring and leaving about 2 inches of straight wire at the end.
- Using your hot glue gun, randomly attach small sea shells as desired onto the wood.
- Heat your glue gun.
- Cut 3 pieces of dowel each measuring 3" long.
- Drop a dot of glue on the hole of a wood bead and send a piece of 3" dowel into the hole and glue just until it reaches the opening of the bead on the other side. (Do not send the dowel out the other side of the hole.) Hold until set.
- Repeat this step for the other two 3" pieces of dowel.
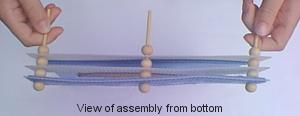
- To begin assembly of the design, turn the ocean design over so that the wrong side is facing up.
- Send the 3 pieces of dowel up through the 3 holes in the ocean design. (The beads will be up against the right side of the ocean design.)
- Next, do NOT use any glue, simply slide one bead onto each of the 3 dowels until they are resting up against the wrong side of the ocean design.
- Now, with right side facing down, slide the sailboat design onto the dowels through the holes until it is resting up against the beads.
- Again, do NOT use any glue, simply slide one bead onto each of the 3 dowels until they are resting up against the wrong side of the sailboat design piece.
- Finally, with right side facing down, slide the background design onto the dowels through the bottom holes until it is resting up against the beads.
- Again, do NOT use any glue, slide one bead onto each of the 3 dowels and this time, cut the dowel off right against the bead.
- Remove each of the last beads.
- Apply a dot of glue onto the hole of one of the beads and slide it back onto the dowel just until the end of the dowel reaches the opening of the bead on the other side. Hold until set.
- Repeat this step with the other two beads.
- Separate and use 2 strands of 4 ply white yarn and thread the needle with it.
- Find the location on the sail where you are suppose to attach the spacer bead. (see sail pattern)
- Just behind that spot send the needle up through the background from the wrong side and leave about a 2" tail of yarn.
- Next, send the needle through one bead.
- Now, send the needle up through the lower spacer bead hole in the sail.
- Send the needle back down through the upper spacer bead hole and then back through the bead and back out through the background.
- Tie the yarn ends together into a knot and trim the ends.
- Separate and use 2 strands of 4 ply yellow yarn that you used for the sun.
- Find the location on the sun where it is suppose to be attached to the sky background. (see sun pattern)
- Decide where you would like to place the sun and send the needle up through the background from the wrong side and leave about a 2" tail of yarn.
- Next, send the needle up through the lower hole of the attachment location in the sun.
- Send the needle back down through the upper hole of the attachment location and then back out the background.
- Tie the yarn ends together into a knot and trim the ends.
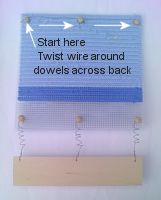
- Lay the Ocean and Sailboat design on a table with wrong side up.
- Lay the Key Holder wood with wires on the table under the design also with wrong side up.
- Attach each wire, one at a time, by winding it around the dowel directly above it several times just in front of the background and just under the last bead that was glued on. Trim off excess wire. (Be careful to try and keep the key holder wood parallel with the bottom of the ocean and sailboat design. If the wood key holder and the design are not parallel, adjust the spring curls in the wire as needed to make it parallel.)
- To make the hanger, cut 3 pieces of dowel that measure 1" long each.
- Using hot glue, attach a bead to one end of each of the dowel pieces just as you did when getting started putting the ocean and sailboat design together above.
- With the wrong side of the finished ocean and sailboat design still facing up, send the 3 pieces of dowel up through the top 3 holes in the sky background. (The beads will be up against the front side of the sky background.)
- Next, do NOT use any glue, slide one bead onto each of the 3 dowels and up against the back of the background, then cut the dowel off against the bead.
- Remove each of the beads.
- One at a time, apply a dot of glue onto the hole of one of the beads and slide it onto the dowel just until the end of the dowel reaches the opening of the bead on the other side.
- Repeat this step with the other two beads.
- Cut a piece of wire measuring about 12" long.
- Wind one end of the wire around the left top dowel just in front of the background and just under the ending bead, then take the wire to the middle top dowel and wind it around a few times, then take the wire to the right top dowel and wind it around a few times.
- Trim any left over wire.
- Hang your key holder by setting these wires onto two wide headed nails.
|
|