|
This project assumes that you know how to do basic stitches on plastic canvas. If you need help...
- Front, Back, Sides, Bell Tower, and Steeple: Cut all the pieces as shown by the solid lines on each graph pattern.
- Roof: Cut 2 pieces that are 37 squares by 23 squares.
- Nativity: Cut 2 of the nativity pattern piece as shown by the solid lines, one will be for back and one for the front. When put together, it will stand like an A framed sign.
All colors used are regular yarns by "Red Heart" or "Caron". See chart on patterns page for color code.
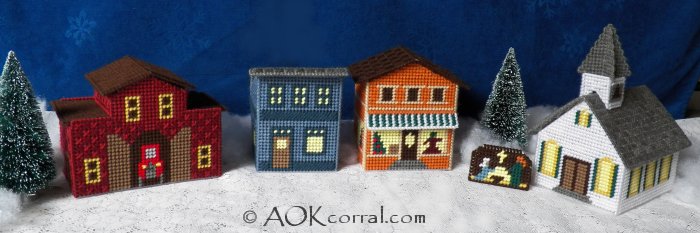
Church: White, honey gold, soft yellow, real teal, grey heather, coffee, café.
Nativity: Coffee, soft yellow, honey gold, real teal, carrot, country blue, white, café.
- Use the yarn color specified for the building you are putting together when joining the pieces.
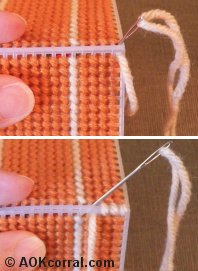
- Line up the holes along the sides of two pieces that are to be joined together.
- As you begin, secure the end of the yarn by sliding it under several stitches on the back of one of your pieces and near the corner where you will begin.
- Start at one corner hole and bring your needle through from the wrong side.
- Next, go through the adjacent hole in the other piece from the right side through to the wrong side.
- Continue joining the piece by looping through each pair of holes in this manner. Secure the end of the yarn as you do when stitching.
- Stitch all the pieces together in this way.
- Use the yarn color specified for the piece you are finishing.
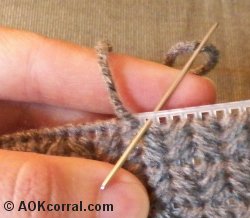
- As you begin, secure the end of the yarn by sliding it under several stitches on the back of one of your pieces and near the edge where you will start.
- Send your needle through one of the holes along the edge from the wrong side.
- Next, bring your needle and yarn around the edge and back to the wrong side of the next square and send it through again.
- Continue looping through all the squares this way. This is called the overcast stitch.
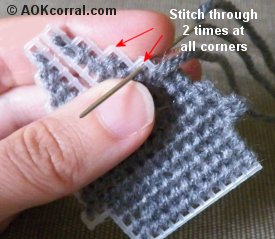
- When you reach a corner, loop the yarn through the corner square two or three times to cover the corner.
- Follow directions for finishing edges and loop a stitch through each complete square that is connected to the edge.
- Additionally at each square corner that protrudes from the piece, loop the yarn through the square at least two times for better coverage.
- After stitching the church walls together, overcast stitch all around the top edges of the building with white.
- After assembling the church bell tower, overcast stitch both the top and bottom edges of the tower with white.
- Overcast stitch all edges of the steeple pieces with grey.
- Stitch the two roof pieces together along the 37 square lengths. Then overcast stitch the entire edge of the roof all around with grey.
- Stitch the back piece for the nativity with the basic half cross stitch in coffee brown.
- Stitch the front and back pieces of the nativity stand together at the top edge. Then overcast stitch around the edges of the nativity stand all around with coffee brown.
|
Project
Options:
|
1.) Read or Print this project from our website, as is, for free.
|
2.) Purchase Easy Print Version - Download NOW:
- Convenient - NO ads, menus, or margins - Save ink and paper
- Complete - All instructions & patterns for this project + Bonus*
*This version includes all village building patterns and instructions.
|
|
|
|