|
Penguin Doll Pattern
~
January 2007

|
These projects are for your personal use only and may not be republished or copied.
|
The patterns for this project are available for only $1.95. The pattern download includes the penguin pattern with sewing instructions.
|
|

|
|
-
Black Flannel fabric
-
White Cotton/Muslin fabric
-
Orange Felt or Flannel fabric
-
White Felt
-
Orange Embroidery Floss (color to match
orange felt or flannel fabric)
-
White Thread
-
Black Thread for sewing machine
-
Polyfil Stuffing
-
4 Black Buttons each 1/2" diameter
-
4-ply Yarn for hair
-
Fabric Scissors
-
Needle for hand stitching
-
Sewing Machine
- Penguin Pattern - $1.95 (includes all instructions too)
-
Disappearing Ink Pen*
|
*This penguin doll may be used as a write-on / wipe-off doll if you purchase
a special marking pen from your local fabric store. Purchase the disappearing
ink pen. Test the pen on a sample piece of the fabric you plan to use for
the front of the penguin to make sure that it will disappear when rubbed
with a wet rag.
-
Cut out each of the pieces for the
penguin doll according to the directions given on each pattern. Patterns
for the penguin doll are available through the link in the materials list
above.
-
All seam allowances for this doll are
1/4 inch unless otherwise stated.
-
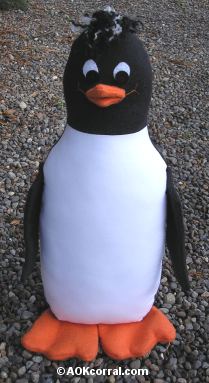
Finished Penguin Doll measures approx.
13" tall and 6" wide.
-
Cut a small strip of the black flannel
to measure about 2 inches long and 1/2 inch wide and lay it out on
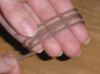 your
sewing table. (This strip will be used to secure the yarn hair.) your
sewing table. (This strip will be used to secure the yarn hair.)
-
Take the yarn color(s) you wish to
use for the hair and wind it around 4 of your fingers about 3 or 4 times.
(see photo) Slide the yarn off your fingers but hold it together at one
end.
-
Lay that end of the yarn on one half
side of the black flannel strip that you made.
-
Take the other half of the strip and
fold it over the yarn to incase the yarn.

-
Sew through all thickness using your
machines zig-zag stitch.
-
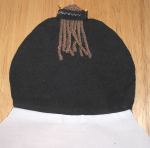
At the other end of your "hair", cut
at the center of the loops so that your hair will look like many strands.
(see photo)
-
Unravel all the 4-ply yarn pieces to
make the yarn look more like hair.
-
Sew the front head to the front body.
Press seam allowance toward the front head. This piece will now be referred
to as the "front".
-
Lay the penguin "front" on your sewing
table with right side facing up.
-
Place the hair piece that you made
onto the front head with the yarn portion of the hair pointing down toward
the body and so that the black strip will be above the seam line at the
top of the head and not be caught in the seam. (see photo)
-
With right sides together, pin the
penguin back to the penguin front.
-
Sew the penguin body pieces together
around the body leaving the bottom of the body open.
-
Make small cuts in the seam allowance
along the curves.
-
Turn body right side out.
-
Press seams lightly.
-
Fill the penguins body with polyfil
making sure to stuff it firmly from top to bottom. As you fill the doll,
watch that the seam allowances are pushed toward the back of the doll so
that the black parts of the seam allowances don't slow through the white
front of the body when finished. (If this doll is to be used to write-on/wipe-off,
it needs to be firm.)
-
Thread your sewing needle with white
thread.
-
Fold the seam allowances at the bottom
of the penguin body toward the inside and use small stitches to sew up
the opening.
-
To make the penguin beak; with right
sides together, match the tip and edges of Beak Piece #2 along the tip
and edges of Beak Piece #1 and sew along the seam lines as shown on the
pattern.
-
Next; with right sides together, match
the tip and edges of Beak Piece #3 along the opposite tip and edges of
Beak Piece #1 and sew along the seam lines as shown on the pattern.
-
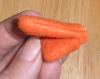
Trim the seam allowances close the
the stitching and trim off each of the tips. (see photo)
-
Turn each triangular end of the beak
right side out. (You may need to use a pencil to push the tip of each end
out.)
-
Thread your sewing needle with the
orange embroidery floss and knot the end.
-
Fold the beak at the center with Beak
Piece #1 as the inside of the beak. (see photo)
-
Find the location you want to place
the beak on the penguin's face and begin to sew just inside the edge of
the orange felt all around the beak using a running
stitch.
-
(Hint: To sew the beak on without having
to pull the thread inside the head, put your needle in at the start of
your stitch and then back out again at the end of a stitch, pull through
and then repeat all around the beak. You may need to go around the beak
more than once.)

-
Stitch lines for a smile at the corner
of each side of the beak if desired.
-
To end your stitching with a knot,
tie off in a knot under the edge of the orange felt at the bottom of the
beak so it will not be seen.
-
Thread your sewing needle with white
embroidery floss and knot the end.
-
Place one of your white eye pieces
where you want an eye and sew it on using a running stitch again just inside
the edge of the white felt. Again, make sure to hide the knots under the
edge of the white felt at start and finish.
-
Sew on the other white eye felt piece.
-
Thread you sewing needle with black
embroidery floss and knot the end.
-
Sew a black button onto each of the
white eye felt pieces.
-
Sew two of the penguin feet with right
sides together as indicated on the pattern.>
-
Clip into the seam allowance around
curved edges.
-
Turn the feet right side out.
-
Thread your sewing needle with some
of the orange embroidery floss, fold the seam allowances from the opening
in the foot toward the inside and then use small stitches to sew up the
opening.
-
Repeat for the other foot.
-
Sew two penguin flipper pieces with
right sides together as indicated on the pattern.
-
Clip into the seam allowance around
the curved edges.
-
Turn the flipper right side out.
-
Fold the seam allowance from the opening
in the flipper toward the inside.
-
Using your sewing machine with black
thread, edge stitch along the entire back edge of the flipper.
-
Repeat for the other flipper.

- To attach the flippers, position a
flipper onto the side of the penguin about where the body finishes widening
and using the placement mark from the flipper pattern.
-
Place a black button at the button
mark on the flipper and sew the button on through the flipper and the side
of the penguin. Sew the button on through the flipper and side several
times for strength.
-
Repeat to attach the other flipper
to the penguin.
-
Thread your sewing needle with orange
embroidery floss.
-
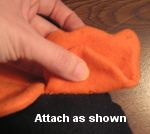
Fold one foot along the "attachment
line" shown on the pattern.
-
Position the foot fold on the bottom
of the penguin with one side edge at the center point of the body bottom.
(some of the foot on the other side edge will not touch the penguin's body
bottom but will stick out a bit - see photo)
-
Stitch the foot in place along this
fold as far as it touches the penguin body bottom.
-
Repeat to attach the other foot.
|
The patterns for this project are available for only $1.95. The pattern download includes the penguin pattern with sewing instructions.
|
|
|
|
|
|


