~ How To Projects ~
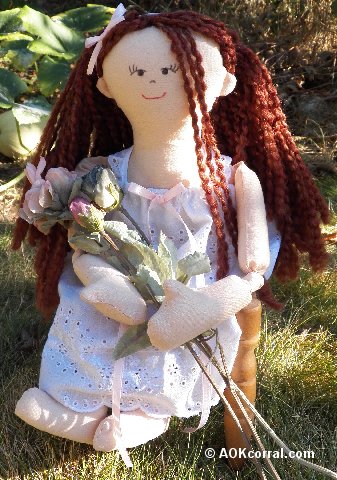
Rag Doll Pattern
Make a rag doll and her clothes with our cute rag doll pattern with accessories.

Click below for more
Craft Projects and Patterns
|
~ Projects By Theme ~
- Animals
- Seasonal
- Holidays
Get this entire project
WITHOUT
Ads, Banners, Logo or Margins
Purchase this pattern and instructions for only $1.95

|
|
Rag Doll Pattern
~
September 2012
|
|
Purchase this Rag Doll Pattern & Instructions for $1.95
The patterns and all instructions are available on this pdf file for immediate download in an easy to read version.
|
|
|
- Fabric for doll - ½ yard per doll
- Eyelet Fabric for dress ¾ yard
- Lace ruffle ½ yard or more
- Ribbon
- ¼ wide Elastic
- Fiberfill Stuffing
- Homespun bulky yarn for hair
- Needle and thread in colors matching doll skin and doll hair
- Sharp sewing scissors
- Pins
- Ruler or tape measure
- Fabric marking pencil
- Ball Point pens for drawing face
- Sewing Machine
- Doll pattern pieces - $1.95 (Includes all patterns and instructions for this entire project on easy print pdf without any banners, ads or logos.)
|
- Cut out the doll patterns and join them as indicated by the overlap areas.
- Cut out the fabric pieces using the patterns.
- Transfer the markings for the positions of the ears, arms, legs, and opening onto the fabric before going on to the sewing.
- Trace the doll face onto the front piece before sewing.
- Pin two ear pieces, right sides together and stitch along stitching lines.
- Clip into seam allowance every ¼ around curve.
- Turn right side out.
- Take two of the arm pieces, pin them right sides together and stitch together.
- Make small cuts in the seam allowance every ½ around all curves and corners.
- Turn the arm piece right side out. (Use the eraser end of the pencil to push the fabric right side out and to push the hand and fingers out to the seams.)
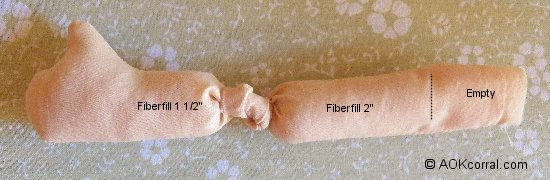
- Stuff the hand and about 1 ½ of the arm with fiberfill. (You will need to use your pencil to push the filling down the arm.)
- Tie a knot in the arm, just after the filled section. Adjust the knot if necessary so that the arm seam below the knot, lines up with the seam above the knot.
- Stuff the arm after the knot about 2 (Leave the remaining arm unstuffed.)
- Repeat this same process to make the other arm.
- Take two of the leg pieces, pin them right sides together and stitch together.
- Make small cuts in the seam allowance every ½ around all curves and corners.
- Turn the leg piece right side out. (Use the eraser end of the pencil to push the fabric right side out and to push the foot out to the seams.)
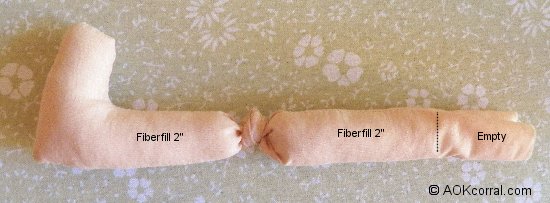
- Stuff the foot and about 2 of the leg with fiberfill. (You will need to use your pencil to push the filling down the leg.)
- Tie a knot in the leg, just after the filled section. Adjust the knot if necessary so that the leg seam below the knot, lines up with the seam above the knot.
- Stuff the leg after the knot about 2. Leave the remaining leg unstuffed.
- Repeat this same process to make the other leg.
- Lay the doll front on a table with the right side facing up.
- Position and pin the ear pieces between the markings on the head with the raw edge of the ear matched up with the raw edge of the head.
- Stitch the ear pieces onto the head very close to the raw edge.
- Position and pin the arms between the markings on the body with the raw edges of the arm matched up with the raw edge of the body and the thumb side of the hand facing up toward the head.
- Stitch the arm pieces onto the body very close to the raw edge.
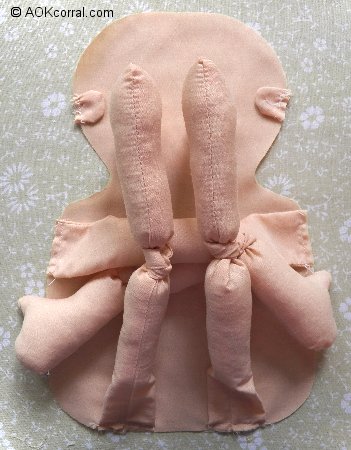
- Position and pin the legs between the markings on the body with the raw edges of the leg matched up with the raw edge of the body and the toe of the foot against the body piece. (see photo)
- Stitch the leg pieces onto the body very close to the raw edge.
- Now you will prepare to stitch the body pieces together; bend the legs and arms into the middle of the body. (see photo)
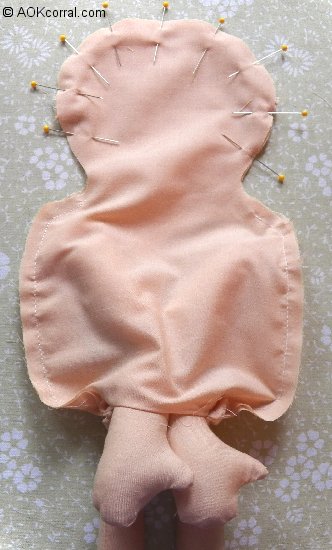
- Pin the body back piece from the neck down the lower half of the body, right side facing down, together with the body front being careful not to catch any of the legs or arms in the pins and making sure the raw edges match.
- Stitch the body pieces together leaving the opening at the bottom of the body for turning right side out. Remove the pins.
- Carefully pull the legs and hands out the opening at the bottom of the body.
- Now pin the neck and head together making sure that all raw edges match.
- Stitch, making sure your seams overlap the seams you made when stitching the lower half of the body by about 1 inch.
- Clip the seam allowances around all curves approximately every 1/2.
- Turn the body right side out and push all curves and corner seams out completely with the eraser end of a pencil.
- Stuff the body with fiberfill and hand sew the body opening closed.
(Instructions for doll hair on easy print pdf with pattern.)
- Cut a piece of eyelet fabric measuring 24 wide by 10 high.
- Turn the fabric so the wrong side is facing you and fold a 1 hem at the top. Press fold and pin in place. Stitch ½ from the folded edge along all 24 width. This forms casing.
- Cut a 12 piece of ¼ elastic and thread it through the casing you just formed until the other end is at the edge of the opening. Vertically stitch the elastic end in place through the fabric casing. Continue to pull the elastic through the casing until it comes to other side and vertically stitch the elastic end in place through the fabric casing.
- Even out the gathers. With wrong side facing you, measure across the top of the dress to find the center. Then measure 1 from the center in both directions and mark.
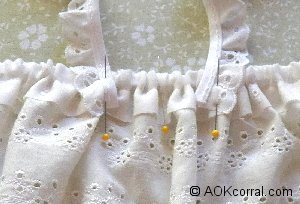
- Cut 2 pieces of ruffle trim measuring 9-10 each to create strap neck tie. Lay each piece of ruffle trim with the ruffles facing outward and 1 of the trim end inside the top edge of the dress. Stitch in place along the casing stitch lines.
- Fold the dress in half, right sides together, and stitch ½ seam allowance from top to bottom. Press the seam open and trim the elastic close to the stitching.
- Add a ribbon on the front, vertically stitch through the ribbon, elastic, and casing.
|
Purchase this Rag Doll Pattern & Instructions for $1.95
The patterns and all instructions are available on this pdf file for immediate download in an easy to read version.
|
|
|
|
|


