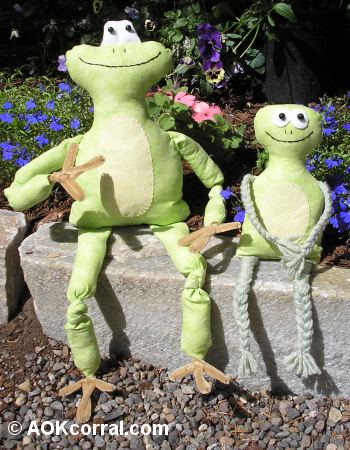
~ How To Projects ~

Stuffed Frog Patterns

Make these adorable stuffed frogs with our patterns. The larger frog doll pattern is made with bendable arms and legs so you can put him in cute poses. The smaller free frog pattern would make a good project for a beginner to sewing.


Go To All Projects ~ Click Here

Click below for more
Craft Projects and Patterns


~ Projects By Theme ~


Get this entire project
WITHOUT
Ads, Banners, Logo or Margins

The PDF Version contains both the small and large stuffed frog patterns and instructions

Purchase the Ad Free / Easy Print PDF Version for only $1.35


AOK Corral Craft and Gift Bazaar
AOK Corral HomeCraft ProjectsFamily Activities

How To Projects ~ Dolls ~ Stuffed Frog Patterns

Frog Doll Patterns

Stuffed Frog Patterns
~
September 2008


Small Frog Pattern: Free
Large Frog Pattern: Purchase PDF

© Copyright 2008 by AOK Corral Craft and Gift Bazaar All rights reserved.
These projects are for your personal use only and may not be republished or copied.

You may print this page as is or...
Easy Print Option:
Includes all patterns and instructions for this entire project without margins, ads or logos. The PDF Version contains both the small and large frog patterns with instructions

Bookmark or Share with Friends!

Finished Size for Frog Dolls:

Small Frog: Approximately 11 inches from top of head to bottom of feet and 3 ½ inches wide
Large Frog: Approximately 16 inches from top of eyes to bottom of feet and 5 ½ inches wide

Materials Needed:
  • 1/4 Yard of green fabric
  • Scrap of fabric for belly circles
  • Scrap of white felt for eyes
  • Yarn in matching color
  • Frog pattern
  • Fiberfill Stuffing
  • Black embroidery floss
  • Black Beads - 6mm for eyes
  • General plastic beads 1/2 - 1 cup
  • Non-zip plastic sandwich bags, one per frog
  • Heat’nBond iron-on adhesive
  • Iron & Ironing Board
  • Sewing machine
  • Needle and Thread
  • Sharp sewing scissors
  • Pins
  • Ruler
  • Fabric marking pencil

Seam Allowances: 1/4" unless otherwise stated (Using the side of your sewing machine foot as a guide along the raw edge works well for this.)

Make the Frog Arms:

  1. Cut 18 pieces of yarn that each measure 6" long.
  2. Cut 2 strips of fabric that each measure 1/2" x 2".
  3. Lay one fabric strip down with the 2" length from left to right.
  4. On the left 1" of the fabric strip, lay the ends of 9 pieces of the yarn.
  5. Fold the right 1" over the yarn ends and hold in place.
  6. Stitch through all thicknesses to secure the yarn ends between the fabric.
  7. Braid the yarn starting at the fabric strip.
  8. Tie the braid off with another small piece of yarn about 1/2" to 3/4" from the end.
  9. Trim the yarn ends to make them even.
  10. Repeat for the other arm.

Make the Frog Legs:

  1. Cut 30 pieces of yarn that each measure 8" long.
  2. Cut 2 strips of fabric that each measure 1/2" x 3".
  3. Follow steps 3 to 10 given for the arms to make the legs substituting the 9 pieces of yarn for each arm with 15 pieces of yarn for each leg and dividing the 3" strip of fabric into 1 1/2" sections instead of 1" sections.

Make the Frog Body and Assemble:

  1. Cut out the pattern pieces
  2. Follow manufacturer’s directions to apply "Heat’nBond" or other brand iron-on adhesive to the wrong side of the frog belly circle.
  3. Place the frog belly circle onto the frog body front at the marked location, iron on.
  4. Stitch around the frog belly circle edge with a zig-zag stitch or hand stitch.
  5. Lay the frog front on a table with the right side facing up.
  6. Pin the finished arms into place pointing toward the inside of the body and making sure that the fabric strip is going to be outside the 1/4" seam allowance of the final stitching.
  7. Stitch the arm pieces onto the body 1/8" from the raw edge and remove the pins.
  8. Pin the finished legs into place pointing toward the inside of the body and making sure that the fabric strip is going to be outside the 1/4" seam allowance of the final stitching.
  9. Stitch the leg pieces onto the body 1/8" from the raw edge and remove the pins.
  10. Lay the right side of the frog back piece onto the front.
  11. Beginning with the top of the frog’s head, carefully pin the pieces together making sure that the raw edges meet and that the frog arms and legs are not going to be caught in the stitching except where they are attached to the body.

  12. Stitch the frog body together leaving the opening at the bottom of the frog for turning right side out. Remove the pins.
  13. Turn the frog body right side out.
  14. Stuff the body with fiberfill leaving only about 1" at the base of the frog unstuffed.
  15. Take a non-zip plastic sandwich bag and put enough plastic beads into it to fill the 1" of space at the base of the frog body. Wrap the excess bag around the beads.
  16. Slip the bag into the frog body base. If needed add or remove some fiberfill and adjust.
  17. Hand sew the frog body opening closed.
  18. Finish the frog by sewing on the felt eye circles first and then adding the black beads in the center of the eyes, then stitch on the nose and the mouth.

The Large Frog Pattern is available on the Easy Print/PDF Version for $1.35


Done!
Make several frogs in different shades of green. Great gift idea for the frog collector.


© Copyright 2008 by AOK Corral Craft and Gift Bazaar.  All rights reserved.


| Home | Craft Projects & Patterns | Family Activities |
| Sitemap | Contact Us |

© Copyright 1998 - 2023 AOK Corral Craft and Gift Bazaar - All rights reserved