~ How To Projects ~
Stuffed Dog Pattern
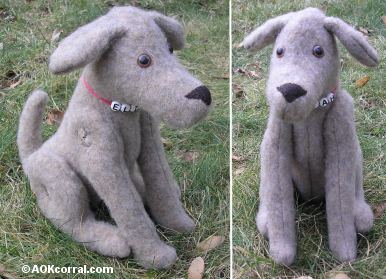
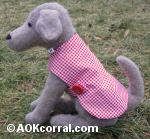
This pattern makes a sweet cuddly stuffed dog. You can make the dog in your choice of color and fabric and have the option of making a cute dog coat for him too.

Click below for more
Craft Projects and Patterns
|
~ Projects By Theme ~
- Animals
- Seasonal
- Holidays
Get this entire project
WITHOUT
Ads, Banners, Logo or Margins
Purchase this pattern for only $3.95

|
|
Stuffed Dog Pattern
~
January 2008
|
These projects are for your personal use only and may not be republished or copied.
|
The patterns for this project are available for only $3.95. The pattern download includes the dog pattern with sewing instructions and the dog coat with instructions.
|
|
|
|
- ¾ Yard of fabric or lightweight fleece
- Dog & Coat Patterns - $3.95
- Sewing machine
- Needle and thread
- Sharp sewing scissors
- Pins
- Two doll eyes
- Four 3/4" buttons
|
- Fiberfill Stuffing
- Embroidery floss (color that matches buttons)
- Long needle that is thin enough to fit through buttonholes
- (Optional Name Collar: Letter Beads and Embroidery Floss, String or Yarn.)
|
Cut out one piece at a time when you are using fleece, fur or other thick fabrics to insure accuracy. To make sure that the pairs of pieces line up when placed right sides together, cut out the first piece and then flip the pattern over to cut out the second piece. (See Photo 1) If you are using regular fabrics, you can simply fold the fabric so the wrong sides are together and cut out the two pieces at once.
 (Hint: For textured our furry fabrics be sure to notice the direction that the fur lays. You will want to lay out your pattern pieces so that the fur will brush downward on the finished dog.)
 Be sure to transfer the markings for the positions of the eyes, ears and legs onto the fabric before going on to the sewing. The best method of transferring is to thread a needle with a piece of contrasting thread color, send it into the fabric and back out again at the point you wish to mark leaving short tails of thread at that point. The threads will be pulled out easily when you do not need them anymore and there will not be any markings on your finished dog.
- Match pieces right sides together and secure with a pins.
- Carefully stitch together each of the dog pieces along the stitching lines (approx. ¼ inch from edge) as shown in the patterns. Secure the beginning and ending spots by stitching back and forth an extra time.
- Clip into the seam allowances every ½ to 1 inch around all curves and at all turning points.
- Turn pieces right side out. (Use the eraser end of a pencil to help push the small areas out completely.)
- Clip a tiny hole at each of the marked eye locations, insert and secure the eyes.
- Fill the dogs body with fiberfill stuffing as much as you desire for a softer or harder body.
- Fill the dogs front legs with enough stuffing to make them stiff.
- Fill the dogs back foot with stuffing so that it is stiff like the front legs but only put a small amount of stuffing in the round part of the back leg. That part of the leg should remain mostly flat for a correct look.
- Do not fill the ears.
- Turn the seam allowances inside at each opening and stitch the openings together with small stitches. Leave the ears until later.
- Thread your long needle with at least 12 inches of embroidery thread in a color to match the buttons.
- Attach the back legs.
- First, position each of the back legs against the dogs body matching the center connection points and hold in place with a few long pins.
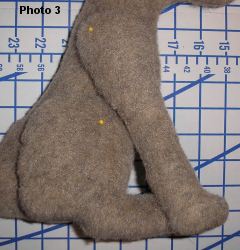
- To further position the back legs, take one of the front legs and hold it up against the dogs body where it looks correct to you. Check to see if the front foot rests on the ground as the back foot does. If it does not, either adjust the front legs position or you may need to rotate the back leg a little bit. Adjust if needed and pin again. (See Photo 3)
- Next, lay a button at the center connection point on one of the dogs back legs.
- While holding all the pieces in place, send the needle and thread through the button, first leg, body, second leg and out at the center connection point of the second leg.
- Slip another button onto the needle and slide it on until it is laying up against the second legs connection point.
- Pull the thread leaving several inches of the end at the entrance point.
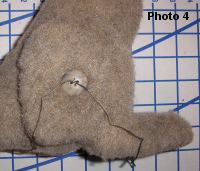
- While still holding all the pieces in place, send your needle and thread back through a different hole in the button at the center connection point of the second leg, body, first leg and a different hole in the first button. Pull all loose thread through.
- Lastly, remove the needle from the thread and tie both ends of the thread together several times to make a secure knot. (See Photo 4)
- Remove the pins.
-
Attach the front legs next.
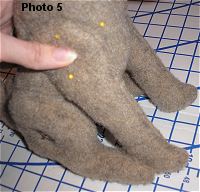
- Position the front legs by putting the dog in a sitting position and holding the front legs up against the body. Adjust their position until the bottom of the front legs rest against the floor while the bottom of the back feet also rest against the floor. (See Photo 5)
- Pin in place.
- Attach the front legs the same way that you attached the back legs.
- Remove the pins.
-
Attach the ears and nose:
- Turn the top ¼ inch of the opening of one of the ears to the inside, stitch the opening closed with small stitches.
- Position the ear onto the head and stitch into place along the top edge with small stitches.
- Repeat for the other ear.
- Place the nose piece onto the dogs face. The center point of the triangle should line up with the stitching line that is below the nose. Stitch in place along the edge of the nose.
- Make the Name Collar:
- For the name collar simply cut a piece of string, yarn or embroidery floss that measures about 7 inches long in the color you desire.
- Thread a needle and string all the letters of the name on in the correct order.
- Remove the needle, rap the collar around the dogs neck and tie a knot at the back of the neck. Trim the ends of the string.
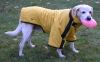 Do you have a dog? Try our How to Make a Dog Coat project! Do you have a dog? Try our How to Make a Dog Coat project!
|
|
Do you like this project? Would you like to see more like it?
What kinds of projects to you like?
Please Tell Us
If you enjoy these free projects, please support our website by shopping our Craft Bazaar
or by purchasing the AD Free/Easy Print PDF Version above.
To View other Projects go to Project Library Page
|


