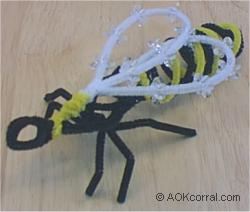
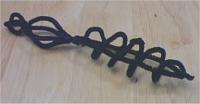
|
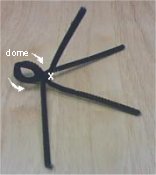
Instruction Symbol Key
x = Twist chenille together at this point two times.
o = Twist the chenille stem you are working with around another piece of chenille at this point one time.
dome = Make the chenille rounded as a dome to create a multi-dimensional look for this part of the body.
|
Materials Needed:
- Black chenille stems;
- 5 - 12 inch pieces
- 3 - 7 inch pieces
- Yellow chenille stems;
- 3 - 12 inch pieces
- 1 - 2 inch piece
- White chenille stems;
- 14 clear paddle wheel beads 18 mm in size.
- Sharp craft scissors
|
| |
|

|

|
|
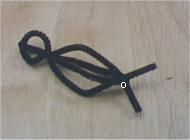
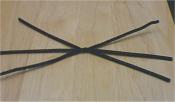
Step 1.
Take two 12 inch pieces of black chenille and twist together in the middle. Spread out all four ends in a cross as shown.
|
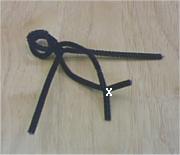
Step 2.
Take two of the ends that are opposite each other and curve each of them slightly starting at the twisted joint. Cross them about 1 inch from the twisted joint. Then twist together as shown. This should form a circle about 1 inch in diameter.
|
| |
|
|
|
|
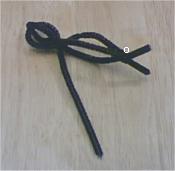
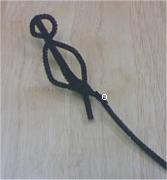
Step 3.
Now take the other ends that are opposite each other and curve each of them slightly starting at the twisted joint. Cross them just beyond the twisted joint made from the other two ends. Twist together. This should form another circle that is perpendicular to the first circle creating a round head.
|
Step 4.
Take both of the chenille pieces that you first used when forming the head in step 2. Bend them slightly as you cross them again about 1 inch from their ends, twist together as shown.
|
| |
|
|
|
|
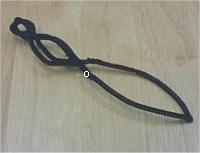
Step 5.
While bending it slightly, bring one of the remaining two pieces to the twisted joint as shown in the photo and connect it by twisting it all there.
|
Step 6.
Repeat step 5 for the other side. You should now have an oval type shape for the thorax (mid section) of the bug.
|
| |
|
|
|
|
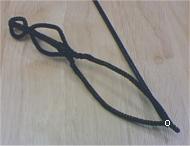
Step 7.
Attach another 12 inch black chenille stem to one of the thorax ends as shown.
|
Step 8.
Bring the other end of the stem around and attach it to the other end of the thorax as shown. Find the center of the loop and bend it to a point.
|
| |
|
|
|
|
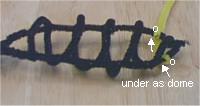
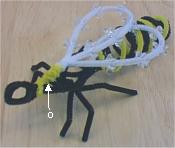
Step 9.
Attach another 12 inch black chenille stem at the point in the abdomen (end section) that you just made. Leave a short point of the end sticking out as the stinger. Twist at o.
|
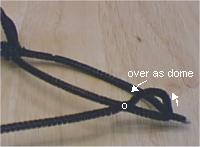
Step 10.
Slightly bend the chenille stem upward as a dome and about 1 inch down the abdomen and twist at the o as shown.
|
| |
|
|
|
|
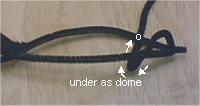
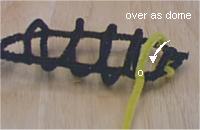
Step 11.
Now, continue to bend the chenille stem slightly under the abdomen as a dome and attach on the other side as shown. (About 1 inch from the point/stinger.)
|
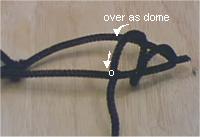
Step 12.
Continue going around in this manner moving up the abdomen about 1/2 inch to 3/4 inch from each previous place of attachment. Connect another 12 inch piece of black chenille stem at the end to continue until you reach the joint of the thorax.
|
| |
|
|
|
|
Step 13.
When you reach the thorax, attach the stem and trim excess if necessary.
|
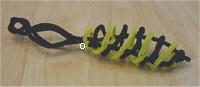
Step 14.
Get one 12 inch yellow chenille stem and attach the end onto the abdomen as shown in the photo between the stinger and the first black connection to the abdomen outline. Twist around once at o marks.
|
| |
|
|
|
|
Step 15.
Continue to go around the abdomen as you did with the black connecting to the abdomen outline between the black connections. Connect another 12 inch piece of yellow chenille stem at the end to continue until you reach the joint of the thorax.
|
Step 16.
When you reach the thorax attach the stem and trim excess if necessary.
|
| |
|
|

|
|
Step 17.
Take the three 7 inch black chenille stems and twist them together in the middle to form the legs.
|
Step 18.
Position the twisted joint of the legs on the bottom stem of the body and, one group at time, wrap each group of 3 legs around the bottom body stem. Tighten.
|
| |
|
|
|
|
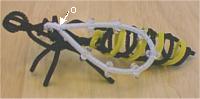
Step 19.
Bend each of the legs down at a point about 1/2" away from the thorax. Bend the two legs closest to the abdomen back toward it as shown in the photo and trim each of the leg ends as shown.
|
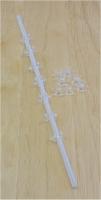
Step 20.
Take one white 12 inch piece of chenille stem and slide on 7 clear paddle wheel beads. Space them evenly leaving extra space at each end of the stem.
|
| |
|
|
|
|
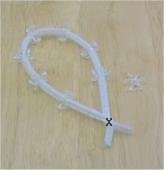
Step 21.
Bring both ends together and connect as shown.
|
Step 22.
Connect the ends of the white wing to the middle of the top stem of the body by twisting them on securely.
Repeat steps 20-22 for the other wing.
|
| |
|
|
|
|
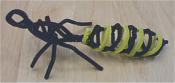
Step 23.
Take a short 2 inch piece of yellow chenille stem and connect it at the neck. Twist it around the top stem of the thorax until it meets the wings.
|
|