- Cardboard Cereal Box
- Chenille in desired farm animal colors
- 10mm Wiggly Eyes
- Felt Scraps in farm animal colors
- Magnet squares
- Hot Glue Gun
- Scissors
- Ruler
- Protractor or 2.5 inch diameter glass/cup
- Pencil
Attention: This project should not be done by young children since a hot glue gun is needed.
|
- Using your protractor or glass/cup, draw circles onto the cereal box cardboard and then cut them out. (The circles should be 2.5 inches in diameter.)
- Take three pieces of chenille stems in the color you want for your animal.
- Connect all three pieces together into one long piece by winding about 1 inch of the ends around each other.
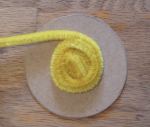
- Beginning at one end of the long chenille piece, bend the chenille into a circle around a finger and then tighten that circle so there is no hole in the center. Continue winding the chenille around that circle into a spiral about four times.
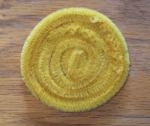
- Put some hot glue onto the center of a cardboard circle about the size of the spiral of chenille you have started and place the spiral into place on the glue.
- Continue winding the chenille around in a spiral about 1 inch at a time, each time adding a line of hot glue to the cardboard just before winding the chenille.
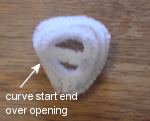
Muzzle for Cow or Dog:
- Take one piece of chenille and bend the end around your pointer finger into a small triangle shape. (The triangle point with the end of the chenille stem will be the bottom of the muzzle.)
- Continue to bend the chenille again into a small triangle shape just behind the first triangle and just a little bit larger. You should be able to do this 4 times and have about 1/2 inch long end left over at the bottom of the triangle.
- Squeeze the pieces together at the bottom point of the triangle then take what is left of the chenille stem and wrap it around all the pieces at that bottom point to hold them together.
- At the front of the muzzle, turn the end of the stem in a little so that it will cover up some of the opening.
Snout for Pig:
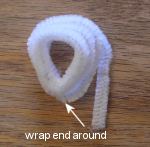
- Take half a piece of chenille and wind it around your finger about three times, there should be a tiny bit left over at the end.
- Squeeze the wound pieces together in one place and wrap the little bit of the stem that is left over around all the pieces to hold them together. (This spot where the stem end is wound will be the bottom edge of the snout.)
- At the front of the snout, turn the end of the stem in a tighter circle so that it will cover up the opening.
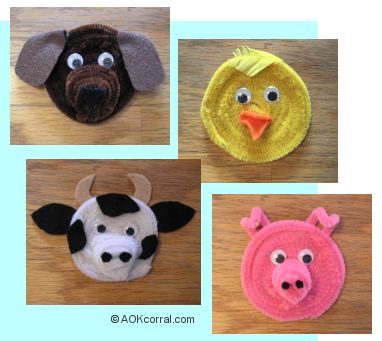
Make each of the animals by adding beaks, ears, noses and more as indicated below. Follow the directions below for each of our animals shown or make up your own ideas.
Chick - To make the chick use a yellow background
- Cut a diamond shape out of orange felt. This diamond will fold into a beak.
- Put a tiny dot of hot glue in the center of the diamond and pinch the felt from the other side onto the glue. This creates the beak.
- Glue the beak and eyes onto the head and glue a tiny piece of yellow feather on the top of the head.
Cow - To make the cow use a white head background
- Make a white muzzle following the instructions above and glue the muzzle to the head at 6:00.
- Cut out the following shapes in black felt: two oval shapes about 1 and 1/2 inches long, two circles about 1/8 inch in diameter, three pieces that are in irregular shapes for the spots.
- Cut out a 2 inch long letter C with pointy ends, then cut the C in half, this will form the two horns for the cow.
- Glue about 1/4 inch of the ears behind the head of the cow at 10:00 and 2:00, then glue about 1/4 inch of the horns behind the head of the cow at 11:00 and 1:00.
- Glue the tiny circles onto the muzzle of the cow, glue the eyes on and the irregular black pieces wherever you like for the spots.
Pig - To make the pig use a pink head background
- Make a pink snout following the instructions above and the glue the snout to the head right in the center.
- Glue the eyes into place.
- To make the ears, cut a piece of pink chenille about 3 inches long. Bend it in half to form the top of a triangle. Then about 1/2 inch down from the top of the triangle, bend the whole tip forward and down to form a droopy ear. Glue the two ends of the ear to the back of the pig head at 11:00 and 1:00.
Dog - To make the dog use a brown head background.
- Make a brown muzzle following the instructions above and glue the muzzle to the head at 6:00.
- Cut a black triangle out of felt and glue to the end of the muzzle.
- Glue the eyes on.
- Cut out two brown, tear drop shapes of felt for the ears that are about 2 inches long.
- Glue the pointed end of the tear drop onto the front of the dog's head at 11:00 and 1:00 with the rounded ends of the ears pointing straight up.
- Place a small dot of glue on top of the end that you just glued to the head.
- Fold the ear down onto the glue dot. This will give the ears a flopped over look.
- For Refrigerator Magnet: Glue medium to large square or strip magnets to the back of your animal head.
- For Stick Puppets: Instead of the adding the magnet, glue the end of a large popsicle stick to the back of your animal head to make fun stick puppets for a stick puppet show.
|
|