~ How To Projects ~
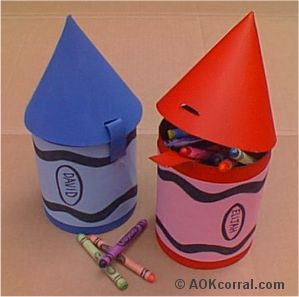
Crayon School Box

Click below for more
Craft Projects and Patterns
|
~ Projects By Theme ~
- Animals
- Seasonal
- Holidays
|
|
Crayon School Box
~
August 2004
Project idea by 8 yr old David
|
- Cardboard Quaker Oats Container Size Small - Approx. 16 - 18oz
- Cereal Box
- Self Adhesive Velcro Pieces
- Tacky Glue
- 1 and 1/2 inch wide Packing Tape
- Clothes Pin
- Ruler
- Scissors
- Black Marker
- Acrylic Paint
- Paint Brush
- Colored Construction Paper
|
- Empty the oatmeal container and discard the lid.
- Look inside the container to find the joining line that winds up the cardboard to the top of the container.
- Select two opposite sides of the container that do not land on the joining line to be the front and back of your box. (You will not want your front and back to be on the joining line because this will weaken the cuts you will create in the next step.)
- On one selected side, using your marker, make a 2 inch line down the container starting at the top.
- Then, make another 2 inch line down the container 3/4 inch away from the first line. The cardboard in between these two lines will form the front "tab" of the box, used for the clasp.
- On the opposite selected side, make a 2 inch line down the container starting at the top.
- Then, make another 2 inch line down the container 1 and 1/2 inches from the first line. The cardboard in between these two lines will form the back "tab" of the box, used for the hinge.
- Around the rest of the container, measure and make marks at 2 inches from the top.
- Connect all those marks with a line going around the sides of the container from the front tab to the back tab.
- Cut down along each of the 2 inch lines and keep cutting just 1/4 inch beyond the end of the line.
- Then cut along the lines going around the container between the tabs.
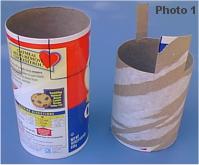
- Lastly, if you wish you can peel the label off of the container. (Your container should look like the container in photo 1.)
- Paint the container in the color of your choice.
- To make the cone shaped top of the box; Click Here to use our Cone Pattern.
- Use the cardboard from the empty cereal box and cut out the cone top using the pattern.
- Cut the little opening shown in the pattern for the clasp.
- To form the cone, bring the top edge of the cardboard over the glue area to the overlap line forcing the center into a point.
- Flatten the cardboard back out and apply tacky glue to the glue area as shown on the pattern.
- Form the cone again against the glue.
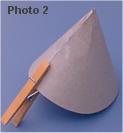
- Use a clothes pin to help hold the edges together at the base of the cone while the glue dries in place.
- After the glue has dried, Paint the cone top in the color of your choice.
- Bend the hinge tab of the container back and forth a few times to make it flexible.
- Put a generous amount of tacky glue on the outside of the hinge tab.
- Carefully place the cone onto the top of the container sliding the clasp through the hole and guiding the hinge to the inside of the cone.
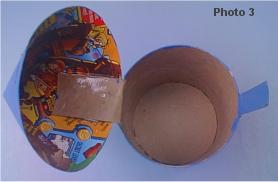
- Take notice of where the hinge tab is located inside the cone top because this is where you will secure it with the glue.
- Now, carefully open the front of the cone off of the clasp tab.
- Press the hinge tab inside the cone top as you noticed when the top was completely on.
- Also check to make sure that the bottom edge of the cone is lined up with the bend in the hinge.
- Close the cone top slightly to see that the clasp hole still lines up with the clasp. If it does not, adjust the hinge and top connection while the glue is wet.
- Then, use a piece of packing tape to additionally secure the hinge inside the cone. This will also keep it in place as the glue dries.
- Cut two strips of construction paper that are 4 inches by 8 inches.
- Glue both pieces together along the 4 inch width by overlapping one piece over the other about 1/2 inch.
- After the glue dries, draw and color 1/2 inch thick wavy black lines on both of the long edges of the paper.
- Draw an oval shape and write the owner's name inside the oval.
- Wrap the paper around the crayon container and allow the end to overlap the begining about 1/2 inch. Trim off extra paper.
- Turn the construction paper over and put tacky glue around all the edges.
- Apply the paper to the container about 1/2 inch up from the bottom and make sure the name oval will not fall directly under the clasp.
- Apply a small piece of velcro (about 1/2 inch square) to the outside end of the clasp tab.
- Feed the clasp tab up through the hole in the cone.
- Close the top of the crayon box all the way down and bend the clasp tab down.
- Apply the matching small piece of velcro to the container's side where the clasp tab meets it.
|
|
|


