~ How To Projects ~
Kid's Lemonade Stand
Your kids will enjoy getting ready for their lemonade stand with this fun project and pattern kit.

Click below for more
Craft Projects and Patterns
|
~ Projects By Theme ~
- Animals
- Seasonal
- Holidays
Get this entire project
WITHOUT
Ads, Banners, Logo or Margins
*Plus Bonus: complete lemonade stand kit containing supply list, instructions, tips, recipe, and poster letter printouts.
Purchase the Ad Free / Easy Print Version for only $1.49

|
|
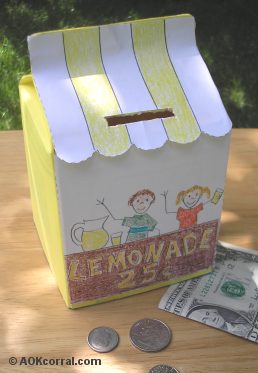
Kid's Lemonade Stand Bank
~
July 2007
|
- Half Gallon Milk Carton (rinsed out)
- Sharp Knife (adult help required)
- Marker
- Ruler
- Scissors
|
- Acrylic Paint (yellow or white)
- Paint Brush
- Color Crayons
- Glue
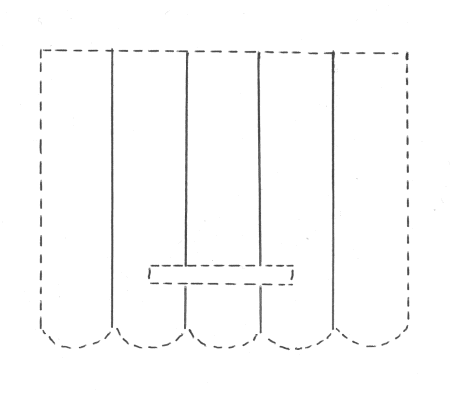
- Lemonade Bank Printouts (below)
|
- Make a line around the milk carton that is 3 inches from the base.
- Have an adult cut the milk carton in two along the line with a sharp knife.
- Glue the top opening of the milk carton back together as it was before it was opened. Use a paper clip or clothes pin to keep the top closed while the glue dries.
- Paint the top half of the milk carton all around in your desired color and let dry. (You may need to paint it over again with another coat of paint.)
- Color the lemonade bank print-out picture pieces the way you want them to look. You can color hair or other features to make the kids look like you.
- Cut out the picture pieces along the dotted cutting lines.
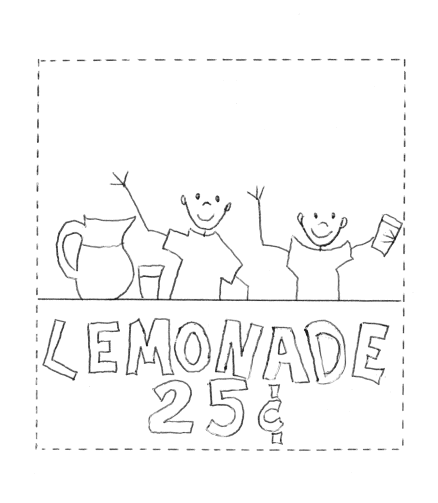
- Glue the lemonade stand picture to the front side of your milk carton.
- Glue the striped roof piece along the angled top just above the picture that you glued onto the front of the milk carton.
- Let the glue dry.
- Have an adult cut out the money slot along the lines on your roof piece.
- Push the sides of the lower half of the milk carton in slightly.
- Place the top half of the milk carton over the lower half and push down as far as it will go to close the bank.
- Your bank is now ready to use. To open again, simply take hold of the lower half of the carton in one hand and the top half of the carton in the other and pull apart.
|
Project
Options:
|
1.) Read or Print this project from our website, as is, for free.
|
2.) Purchase Easy Print Version - Download NOW:
- Convenient - NO ads, menus, or margins - Save ink and paper
- Complete - All instructions & patterns for this project + Bonus*
*This version includes complete lemonade stand kit containing supply list, instructions, tips, recipe, and poster letter printouts.
|
|
|
|
|


