- Rice crispy treats, regular and chocolate (see recipe)
- Decor Frosting (see recipe)
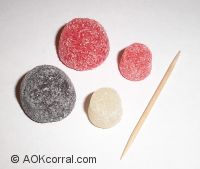
- Large Gumdrops Multicolored
- Small Gumdrops Multicolored
- Mini Milky Way Candy Bars
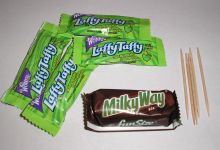
- Green Laffy Taffy
- White Taffy Rounds
- Yogurt Covered Pretzels
|
- White/Clear "Lifesavers"
- "Oreo" Cookies
- Speckled Jelly Beans/"Raisinets"
- Red or Pink Nerds
- Toothpicks
- Rolling pin or dowel
- Frosting Piping Tube
- Wax Paper
- Ruler & Scissors
|
1 Tbsp. Solid shortening or butter
1 Tbsp. Milk
2 cups powdered sugar
Green liquid food coloring
Mix the first 2 ingredients and 1 cup of powdered sugar together. Add more powdered sugar until the frosting is stiff enough to maintain peaks. Add green liquid food coloring and mix well. (Add additional powdered sugar until the frosting holds peaks again.) Recipe makes approx. ½ cup of frosting.
(Recipe from Betty Crocker cookbook)
32 large marshmallows or 3 cups mini marshmallows
¼ cup butter
½ tsp. vanilla
5 cups rice crispy cereal (regular or chocolate)
For regular treat base, butter 13 x 9 inch pan. For chocolate treat pieces, butter 9 x 9 inch pan.
Heat marshmallows and butter in saucepan over low heat, stirring constantly until melted. Remove from heat and add vanilla. Stir in half of the cereal at a time until coated. Press into pan. Cool until firm. (The regular treats in the 13 x 9 pan should be ½ thick, the chocolate treats in the 9 x 9 pan should be 1 thick.)
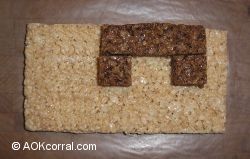
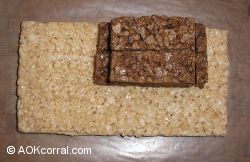
For the regular treat base, divide the 13 x 9 pan into three equal segments along the length of the pan. Remove and trim edges if desired. Each segment will measure approx. 4 x 8 inches after it has been cut.
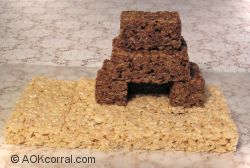
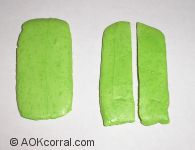
For the chocolate treat pieces, first, cut the treats into 1 inch strips.
For one tomb you will need;
One, 3 ½ inch piece
Two, 1 inch pieces
Two, 2 ½ inch pieces
One, 2 inch piece
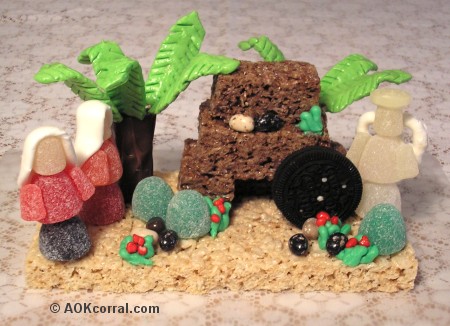
Lay wax paper on a cookie sheet or platter and then put down your 4 x 8 rice crispy treat base. To create the tomb, start with the 3 ½ piece and the two, 1 pieces and place them as shown in the photo. Next, add the two, 2 ½ pieces. Last, add the 2 piece. Last photo shows placement position of cookie stone and tree trunk. See photo at top for final placement of characters and ideas for scene; bushes (gumdrops), grass (frosting), flowers (nerds), and rocks (raisinets/jellybeans).

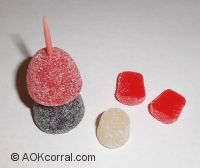
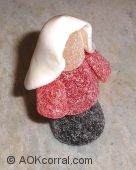
When you cut a small gumdrop in half for the arms, the inside will be sticky enough for them to stick to the body. After you finish assembling the person, make a head scarf by rolling out a piece of white taffy.
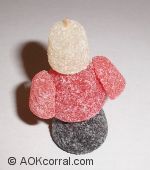
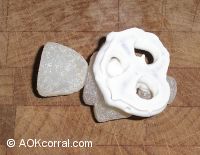
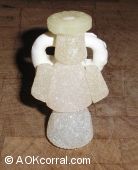
Make the angel the same way that you made the other figures but no scarf. Add some frosting to the back of the angel body and top of the head. Paste the yogurt covered pretzel to the angel back as shown and a lifesaver onto the angel head.
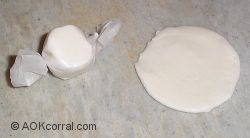
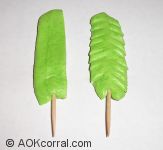
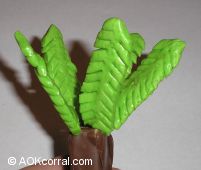
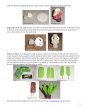
Use a rolling pin or large dowel to smooth out the pieces of taffy. Do NOT roll out very much. It must be thick enough to insert a toothpick into the taffy. Insert the toothpick into about 2/3 of the length of the branch. This will help support the weight of the candy. You can use scissors to make small cuts on either side of the branches to create the look of palm leaves. When you insert the palm branches into the candy bar base, be sure to stick them in, pointing up. The branches can be heavy and will sag down if they are hanging out to the sides too much.
|
You may Print this page as it is ...OR...
Purchase the Easy Print Version for $1.49
Includes all instructions for this entire project without margins, ads or logos.
Bonus: The PDF Version is great to easily print multiple copies to use with your Sunday School, Troop members or other group.
|
|

|
|