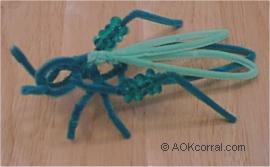
|
Instruction Symbol Key
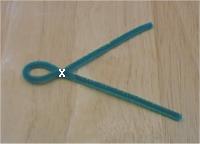
x = Twist chenille together at this point two times.
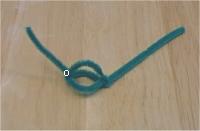
o = Twist the chenille stem you are working with around another piece of chenille at this point one time.
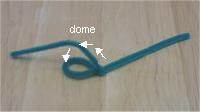
dome = Make the chenille rounded as a dome to create a multi-dimensional look for this part of the body.
|
Materials Needed:
- Green chenille stems;
- Lt. Green chenille stems;
- 8 green paddle wheel beads 18 mm in size
- Sharp craft scissors
|
| |
|
|
|
|
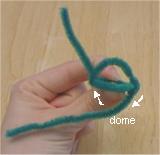
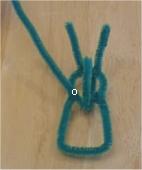
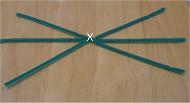
Step 1.
Take one 12 inch piece of dark green chenille and make a loop in the center that is approx. 1 inch in diameter. Twist the chenille at the X as shown.
|
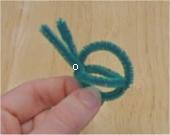
Step 2.
Take one of the ends of chenille and bend it toward the loop starting at the twisted joint. Curve it slightly to form a dome OVER the loop as shown.
|
| |
|
|
|
|
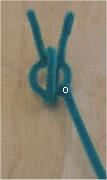
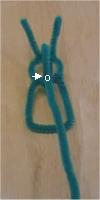
Step 3.
Connect it to the loop as shown.
|
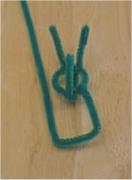
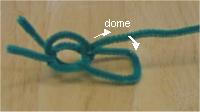
Step 4.
Now take the other end of chenille and bend it toward the loop starting at the twisted joint, only this time, form a dome UNDER loop as shown.
|
| |
|
|
|
|
Step 5.
Connect it to the loop as shown.
If the two ends that are left are longer than 1 and 1/4 inches, bend the tips to correct the length and wrap them around themselves.
|
Step 6.
Take another 12 inch piece of chenille and attach one end of it onto the back of the head (about 1/4 inch to the right of the head dome piece) at the location shown.
|
| |
|
|
|
|
Step 7.
Take the piece of chenille that you just attached to the head and bend it to form a square that is about 1 and 1/2 inches long and wide. (This square forms the thorax-mid section of the bug)
|
Step 8.
Attach the chenille to the back of the head again (about 1/4 inch to the left of the head dome piece) at the location shown.
|
| |
|
|
|
|
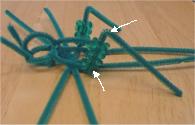
Step 9.
Turn the chenille stem toward the head dome piece and attach it at the location shown.
|
Step 10.
Create a dome, centered above the square (thorax) of the grasshopper.
|
| |
|

|
|
|
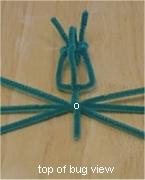
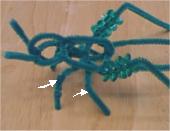
Step 11.
Attach the chenille on the square directly across from the head and centered. There should be a "tail" left that is approx. 2 inches or more.
|
Step 12.
Take the three green chenille stems and twist them together in the middle to form the legs.
|
| |
|
|
|
|
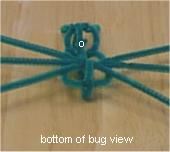
Step 13.
Place the center of the legs on the "tail" about 1/2 inch from the thorax/square connection. Twist the "tail" completely around the legs once as shown.
|
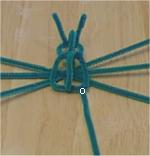
Step 14.
Flip the bug over to view the bottom.
Bring the "tail" across the center of the thorax/square along the bottom to the head and twist the end to connect it as shown.
|
| |
|
|
|
|
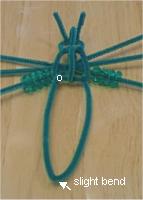
Step 15.
To form the abdomen, take another 12 inch piece of green chenille and attach it to the thorax/square on the right corner as shown.
|
Step 16.
Loop the other end of the stem around to the left corner of the thorax/square and twist to connect as shown. Create a gentle point at the end of the abdomen by slightly bending it.
Slide 4 paddle wheel beads onto each of the legs closest to the abdomen.
|
| |
|
|
|
|
Step 17.
To create the back hopping legs do as shown in the photo:
Bend the legs upward, at the point where they come out from under the thorax/square.
Then bend the legs downward, 2 inches from your upward bend.
|
Step 18.
For the other four legs; Bend each of the legs downward at a point about 1/2" away from the thorax/square. Then, starting at that bend, measure approx. 1 and 1/4 inches and trim extra off.
Direct the front legs toward the head and the middle legs toward the back hopping legs.
|
| |
|
|
|
|
Step 19.
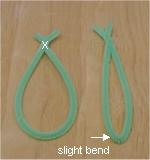
Take a light green 12 inch chenille stem.
Bring both ends together and connect as shown. Make a point in the center of the loop by slightly bending.
Repeat this step with another stem.
|
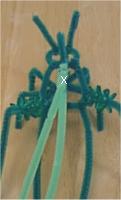
Step 20.
Connect the ends of the light green wings to the middle of the top stem of the body by twisting them on securely.
|