-
Find a coat according to measurements shown in instructions below. The selected coat should not have thick fiber filling or other extreme thickness. (thrift stores are a great place to get a coat for this project)
-
Bias tape: extra wide double fold
-
Measuring tape
-
Marking pen
-
Sharp scissors
- Sewing Machine
- Velcro Strips
|
In order to get the right size of jacket to make your dogs coat you will need to take a few measurements first.
- Neck to Tail: Start your neck measurement at the base of the head and measure to where the tail begins.
- Mid front leg to Mid front leg: Take this measurement with a flexible tape measure and go from mid front leg over the back of your dog to the other mid front leg.
- Body Circumference: Use a flexible measuring tape and wrap it around your dogs body just behind the front legs.
Take your measuring tape to the thrift store with you so you can make sure the coat you choose is the right size. (It is best to get a coat that does not have an elastic edge at the bottom unless the coat is long enough that you can cut the elastic edging off and re-finish the bottom with a regular hem.)
- Neck of Coat to Bottom of Coat: This measurement should be the same as your "Neck to Tail" measurement. If it is a bit too long, that is OK, you can shorten it by shortening the coat before you begin.
- Mid Arm to Mid Arm: Turn the coat so the back is facing up and spread the arms out. Make sure that your "Mid front leg to Mid front leg" measurement will fit across the back of the coat and partway into the arms.
- Circumference of Coat: Lay the coat out on a flat surface and measure from the front edge of one side of the coat across the back and to the front edge of the other side of the coat. This measurement should be larger than your "Body Circumference" measurement by at least 4 inches.
Once you have picked out a coat, make sure to lay it over your dog and double check the measurements. See that the front will fit around your dogs body, that the arms will go to at least the mid front leg, and that the coat is long enough to go from the dogs neck to the dogs tail.
- Lay the coat out on a flat surface, front side down and arms outstretched.
- Divide the measurement for "Mid front leg to mid front leg" in half.
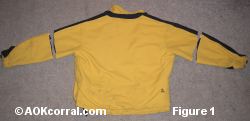
- Find the center back of the coat and measure from that point out onto one of the arms to the divided measurement length and cut the arm of the coat off there. (see figure 1.)
- Repeat for the other side. You should now be able to measure across the back of the coat with arms outstretched and it should be the same as your "Mid front leg to mid front leg" measurement.
- Put the coat on your dog and put his front legs through the arms of the coat. Make sure the coat is centered on her back.
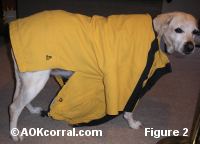
- Look at the bottom end of the coat over your dogs back legs and decide how far you want the coat to drape over the side of her back legs. When you decide how far you want it to drape down, make a cut horizontally in the coat from the bottom edge of the coat at the back of her back legs to a point just a few inches in front of her back legs. (see figure 2.)
- (Here is where you will do things just a bit different depending on whether you have a girl dog or a boy dog. If you have a boy dog you will want to continue to cut horizontally into the coat until you feel that the part of the coat that wraps until him will not get "peed" on while in use.)
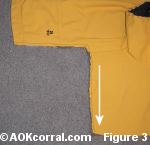
- Now take the coat off of your dog and make a cut at a right angle to the horizontal cut you just made, starting from the place where you stopped cutting and continuing across the actual front of the coat all the way through the front edge. Do this to both sides. (If there are pockets or a zipper in the coat, do not worry about cutting through them, they will not be needed.) (see figure 3.)
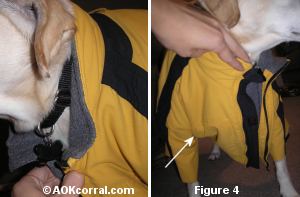
- Put the coat back on your dog and adjust it so that the neck of the coat is in a comfortable location and your dogs front legs fit nicely through the coat arms. (see figure 4.)
- Now, you will be making marks under the dogs front legs for some cutting lines. Take one of the front sides of the coat and hold it up against the dog just under and between her front legs. (There will most likely be too much coat but try to flatten it out near her leg as much as you can.) Make two marks on the front of the coat near her leg, one toward the front of her leg and one toward the back of her leg. Do the same with the other side of the coat.
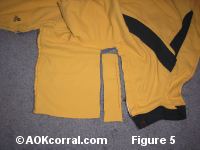
- Take the coat off your dog again and lay it out on a flat surface with the front of the coat facing up.
- Make two straight cuts across the front of the coat, one to each mark. Start at the front edge and cut across to the mark that you made. Remove the piece by cutting from one mark to the other. Do the same for the other side. (see figure 5.)
- Next, you will eliminate some of the front edge of the coat on the middle portion that you have created. This will help you to have a nice fitting wrap under her belly. Put the coat back on your dog. Wrap one of the front sides of the coat under her and around to her other side. At this point, make some cutting marks that are parallel to the front edge of the coat. (If the front side of the coat does not reach her other side, just go as far as you can.)
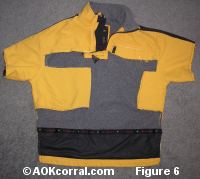
- Do the same thing with the other side.
- Take the coat off your dog and lay it out on a flat surface again with the front facing up. Straighten your cutting lines if needed so that they are each parallel to the front edges of the coat and cut along each line. (If there was a lot of overlap between the two middle sections and one side can wrap completely around to the other side, you may want to cut the middle section of the second side off completely.) (see figure 6.)
- If the coat you have chosen has more than one layer of fabric (most of them will), you will want to sew the layers together along all of the raw cut edges. Pin through all layers of fabric along all the raw cut edges.
- Stitch ¼ inch from the raw edges. Remove pins.
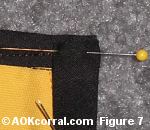
- Open out one fold of your double wide bias tape and refold over each of the raw edges of your dog coat. Pin into place. Overlap at corners. (see figure 7.)
- Stitch through all thicknesses of bias tape and coat to finish edges.
- Put the coat onto your dog once again and adjust to make sure that it is in the correct position to fit comfortably.
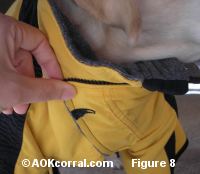
- Wrap the collar ends of the coat around your dogs neck and upper chest. (see figure 8.)
- Make marks on both sides of the coat to indicate where you will need Velcro connections to hold it in place.
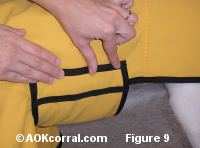
- Next, wrap the sides of the coat under your dogs belly comfortably and make marks on both the side of the coat and the wrapped side for Velcro connections. (see figure 9.)
- Apply large pieces of Velcro at your marked locations. (see figures 10. & 11.) (Each Velcro piece should cover a large area so that you will be able to adjust the coat to be more tight or more loose.)


 Do you love dogs? Try our Stuffed Dog with Coat Pattern! Do you love dogs? Try our Stuffed Dog with Coat Pattern!
|
|