|
Instruction Symbol Key
x = Twist chenille together at this point two times.
o = Twist the chenille stem you are working with around another piece of chenille at this point one time.
dome = Make the chenille rounded as a dome to create a multi-dimensional look for this part of the body.
|
Materials Needed:
- 3 pieces black chenille 5 inches each
- 1 piece black chenille 12 inches
- 2 pieces red chenille 12 inches each
- 7 black beads (approx. 1/4 inch in diameter)
- Sharp craft scissors
|
| |
|
|
|
|
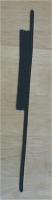
Step 1.
Lay black pieces as shown in photo with the three 5 inch piece ends just 1 inch below the 12 inch piece end.
|
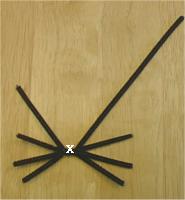
Step 2.
Twist all chenille together two times at the center of the 5 inch pieces. Spread out pieces slightly as shown.
|
| |
|
|
|
|
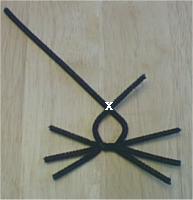
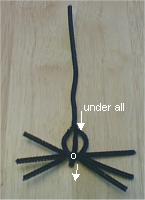
Step 3.
Take both ends of the 12 inch piece and curve them slightly right after the twisted joint to form the shape of a round head. Then cross them about 1 1/4" from the twisted joint and twist the chenille two times.
|
Step 4.
Bring the shorter end of the 12 inch chenille stem under the round head and twist to attach at the o as shown.
|
| |
|
|
|
|
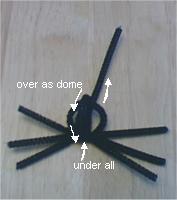
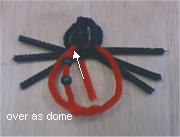
Step 5.
Bring the longer end of the 12 inch chenille stem over the round head but instead of bringing it across flat, round it upward creating a dome shape (approx. 1/2" high) above the round head. Bend the chenille around the twisted joint and under the round head back to front/top. Twist the end around the chenille at the o as shown to keep it from moving.
|
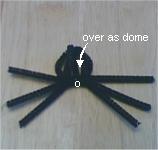
Step 6.
Again, bring the remaining chenille over the round head forming a dome as before.
Twist to attach the end of the chenille at the o as shown.
|
| |
|
|
|
|
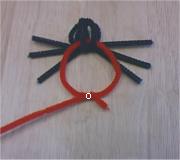
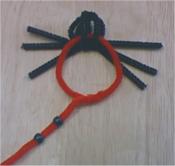
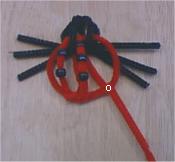
Step 7.
Thread a red 12 inch piece of chenille through the head just under the two domed pieces of black but above the other pieces. With one end of the red chenille, form a circular shape that is approx. 2 1/4 inches in diameter and twist the end as shown to complete the circle.
|
Step 8.
Slide two black beads onto the red chenille as shown.
|
| |
|
|
|
|
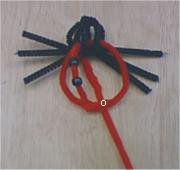
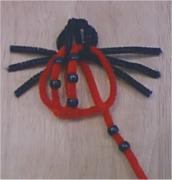
Step 9.
Now take the red chenille and thread it down through the head on the left between the black rounded head edge piece and the black domed piece. Do not pull the chenille down tight, instead pull it through just enough to form a dome shape that begins to create the raised body. Then bend the rest of the chenille end to the underside of the body.
|
Step 10.
Join another 12 inch piece of red chenille to the end of the piece you have been working with by twisting them together. Attach the red chenille in the location as shown to the circular body.
|
| |
|
|
|
|
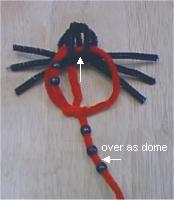
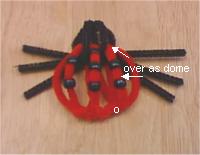
Step 11.
Slide 3 black beads onto the red chenille as shown. Again, thread it down through the head but this time between the two black domed pieces. Do not pull the chenille down tight, pull it through just enough to form another slightly higher dome shape. Then bend the rest of the chenille end to the underside of the body again.
|
Step 12.
As in step 10, attach the red chenille to the circular body in the location as shown.
|
| |
|
|
|
|
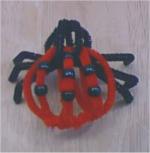
Step 13.
Slide 2 black beads onto the red chenille as shown. Again, thread the red chenille down through the head now on the right between the black domed piece and the black rounded head edge.
|
Step 14.
Do not pull the chenille down tight, instead pull it through to form a dome shape that finishes creating the raised body. Then bend the rest of the chenille end to the underside of the body. Twist to attach the end of the chenille at the location shown.
|
| |
|
|
|
|
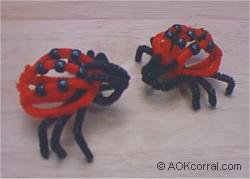
Step 15.
Adjust the black beads if necessary to space them out like spots.
Bend each of the legs down from the middle and trim ends of legs so they are even if necessary.
|
|