|
Instruction Symbol Key
x = Twist chenille together at this point two times.
o = Twist the chenille stem you are working with around another piece of chenille at this point one time.
dome = Make the chenille rounded as a dome to create a multi-dimensional look for this part of the body.
|
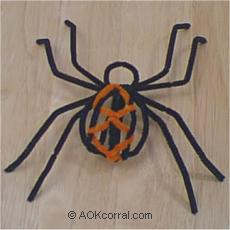
Materials Needed:
- Black chenille stems;
- Orange chenille stems;
- White chenille stems;
- 12 to 14 - 12 inch pieces
- Sharp craft scissors
|
| |
|
|
|
|
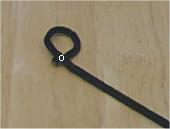
Step 1.
Take one 12 inch piece of black chenille and make a loop on one end that is 1 inch in diameter. Connect as shown.
|
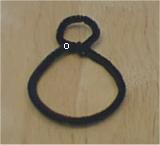
Step 2.
Form another loop by bringing the other end of the stem to the first loop and connecting.
|
| |
|
|
|
|
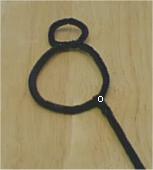
Step 3.
Attach another 12 inch piece of chenille to the larger loop (body) on the location shown in photo, lower right of body.
|
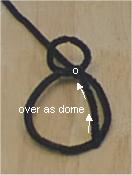
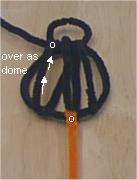
Step 4.
Now take the chenille stem over the body and attach it to body loop at the right top of the loop as shown BUT do not pull the chenille down tight, instead pull it just enough to form a dome shape that begins to create the raised body. Then bend the rest of the chenille end to the underside of the body.
|
| |
|
|
|
|
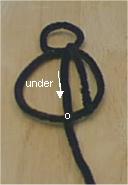
Step 5.
Attach the chenille in the location on the body loop as shown. Join another 12 inch piece of black chenille to the end of the piece you have been working with by twisting them together.
|
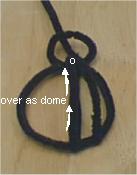
Step 6.
Again, take the chenille stem over the body and attach it to the body loop in the center top of the loop as shown. Again, forming a dome shape. Bend the rest of the chenille to the underside of the body.
|
| |
|
|
|
|
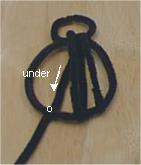
Step 7.
Again, attach the chenille in the location on the body loop as shown.
|
Step 8.
One more time, take the chenille stem over the body and attach it to the body loop on the left top of the loop as shown, forming dome. Leave the remaining end of chenille stem for use attaching legs later.
Take a 12 inch orange piece of chenille and attach to the body loop and bottom center.
|
| |
|
|

|
|
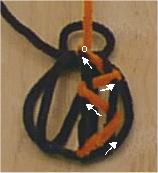
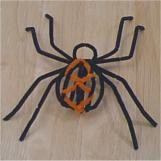
Step 9.
You should see that your body has three stem pieces that dome across the top.
Zig Zag the orange chenille stem through the right stem and the center stem as shown in the photo. Twist onto center stem as indicated.
|
Step 10.
Now Zig Zap back down through the left stem and center stem as shown in the photo. Attach the end to the bottom center and trim any extra if necessary.
|
| |
|
|
|
|
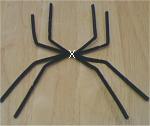
Step 11.
Take 4 pieces of 12 inch black chenille and twist them together in the center. Bend the legs as shown in the photo.
Start at top; 1st legs bend up at 2 inches from body. 2nd legs bend up at 2 and 1/2 inches from body. 3rd legs, bend down at 2 inches from body. 4th legs, bend down at 1 and 1/2 inches from body.
|
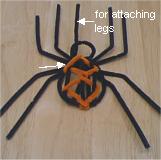
Step 12.
You will now use the remaining end of black chenille from the body to attach the legs.
Position the place where the body and head of the spider are joined on top of the joint of the legs.
|
| |
|
|
|
|
Step 13.
Bend approx. 1 and 1/2 inches of each leg downward to make him appear to be standing up.
|
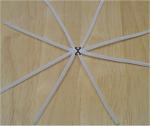
Web Step 1.
Take 4 white, 12 inch piece of chenille and twist them together in the center. Then spread the ends out evenly as shown.
|
| |
|
|
|
|
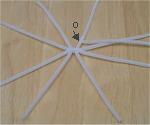
Web Step 2.
Attach another 12 inch piece of chenille to one of the ends about 1 inch from the center twisted joint.
|
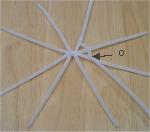
Web Step 3.
Work around in a circle attaching the chenille to each of the stems by winding it around once. Do not pull the chenille ends together as you are winding the other stem around each one. If you do pull them together, your web will not lie flat.
|
| |
|

|
|
|
Web Step 4.
After completing a circle and reaching the point where you began, wind the chenille up that stem end about 1 inch. Continue to go around the web again as in step 3 extending the chenille whenever you come to an end by twisting on another piece.
|
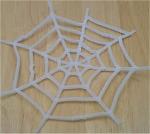
Web Step 5.
When you have gone out as far as possible on the ends. Twist the chenille onto the web to finish.
|