~ How To Projects ~
Wooden Bird Feeder Plans
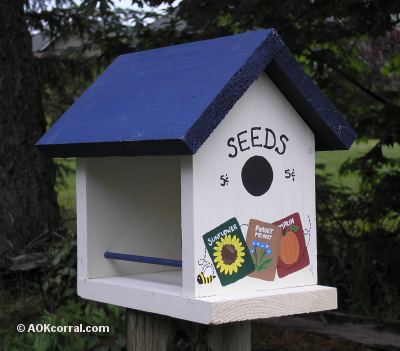
Make this wood bird feeder that looks like a cute birdhouse but is a suet bird feeder instead. Easy to make with our free bird feeder plans.

Click below for more
Craft Projects and Patterns
|
~ Projects By Theme ~
- Animals
- Seasonal
- Holidays
Get this entire project
WITHOUT
Ads, Banners, Logo or Margins
The PDF Version contains all the instructions and design pattern.
Purchase the Ad Free / Easy Print PDF Version for only $1.49

|
|
Wooden Bird Feeder Plans
~
July 2000
|
|
You may Print this page as it is ...OR...
Purchase the Easy Print Version for $1.49
The Easy Print Version includes all patterns and instructions for this entire project without margins, ads or logos.
|
|
|
- Wood Pieces: (Beginning with a board measuring, 5 1/2" wide, 3/4" thick, and at least 4 1/2' long)
- One 9" piece
- One 6 1/2" piece
- Two 8" pieces
- Two 10" pieces
- 1/4" Doweling
- Tools
- Drill (1/4" bit)
- Hammer
- Saw
- Ruler
- Protractor
- Small, 1 1/2" long, galvanized nails
- Screw in hanging hook
- Paint
- Small and Large Paint Brushes
- Outdoor Varnish
- Design supplies (optional)
|
- Have the wood cut into pieces at the hardware store where you purchase it or cut it yourself into the measurements given above.
- Next, cut 3/4" off the long side of one of the 10" pieces.
- Also, to form the top of the birdhouse, find the top and center of each of the 8" pieces. (The top and center would be the center of the 5 1/2" side)
- For each 8" piece, using the protractor, lightly draw two 45 degree angles, starting from the top and center point.
- Cut along the angle lines. These are now the front and back of the birdfeeder.
- Take the front piece and make a small mark on the lower right corner, 1" from the bottom and 1" from the side.
- Take the back piece and make a small mark on the lower left corner, 1" from the bottom and 1" from the side.
- Using the 1/4" drill bit, drill a hole about 1/2" deep into the wood at each of the marks.
- Paint all the wood. (10" pieces are for the roof. Our birdhouse was done in Satin Creme with a Navy roof.)
- Nail the front piece to the side (6 1/2" piece) as shown in Step #1. (the side wall goes inside the front)
- Place the 7" dowel into the hole.
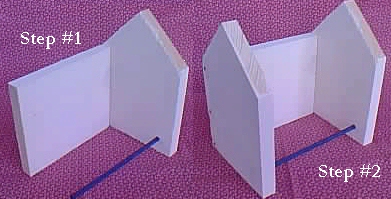
- As you align the back piece to the side, carefully slip the other end of the dowel into the hole.
- Nail the back piece to the side piece as shown in Step#2.
- Arrange the wall assembly onto the bottom (9") so that the back is even with the bottom edge and there is an extra 1" in the front. Step #3.
- Nail in place.
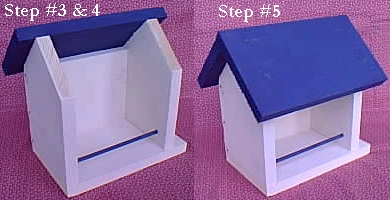
- Nail the small roof piece onto the backside of the birdfeeder. Step #4 (Make sure that the edge at the top is flush with the angle for the front side.)
- Nail the large roof piece onto the front side of the birdfeeder. Step #5 (There should be a point formed at the top of the birdhouse as shown.)
- Paint over the nails.
- To use our design, click on the link in the materials list above.
- Using carbon paper and a pencil, transfer the design onto the front, side, and back of the bird feeder.
- Colors used are as follows:
- Sunflower Seed Packet
- Packet - Hunter Green
- Flower Center - Brown
- Flower Petals - Yellow/Satin Creme
- Name - Satin Creme
- Forget-Me-Not Seed Packet
- Packet - Light Beige
- Leaves & Stems - Medium Green w/Dark Green Lines
- Flower Petals - Baltic Blue
- Flower Centers - Satin Creme
- Name - Satin Creme
- Pumpkin Seed Packet
- Packet - Brandy Wine
- Pumpkin - Georgia Clay/Satin Creme (Ribs Highlighted with a lighter mixture)
- Stem - Brown
- Vine - Medium Green
- Name - Satin Creme
- Bumble Bee
- Black
- Yellow
- Wings - White
- Screw a hanging hook into the top, hang the birdfeeder outside,
place a birdseed block in it, and enjoy!
|
You may Print this page as it is ...OR...
Purchase the Easy Print Version for $1.49
The Easy Print Version includes all patterns and instructions for this entire project without margins, ads or logos.
|
|
|
|
|


