- Wood (Basswood is best, Balsa wood also works - See chart below for dimensions)
- Glue/Wood glue
- Paint and Brushes
- Varnish-wood sealer
- Sand paper
- Ruler and Pencil
- Wooden wheels (3/4" diameter)
- Saw (or pre-cut wood pieces)
- Split Rivets ( Rivet measurements=1/2" long, split is 5/16" long, diameter is just over 1/8")
- Metal Screw Eyes ( 1/4" diameter eyes )
- Pliers
- Drill or drill press (drill bit size = 1/8" and 1/4")
|
All trains are made up of a different arrangement of five main wood cuts: (You will want to further cut these pieces into one, two, and three inch segments depending on the trains you wish to make)
- Rectangular Pieces = Approx. 3/4" x 3/4" (End dimensions) any length to start with. We used a table saw and cut a 1 and 1/2" wide by 3/4" thick piece of basswood in half. Then we cut each piece into 1, 2 and 3 inch long pieces as needed for the train cars we wanted.
- Large Dowel = 3/4" diameter, any length to start with.
- Flat Pieces = 1/8" thick by 1" wide (End dimensions) any length to start with.
- Small Dowel = 1/4" diameter, any length to start with.
- Mid-Size Rectangular Pieces = approx. 3/8" thick by 3/4" wide (End dimensions) We cut a strip of 3/4" by 3/4" above in half again
- Rectangular pieces = one piece, 3" long and one that is 1" long.
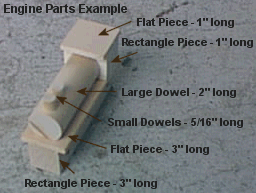
- Large Dowel = one that is 2" long.
- Flat pieces = one piece, 3" long, one that is 1" long.
- Small Dowel = two pieces, 5/16" long each.
- Rectangular pieces = two pieces, 2" long.
- Flat pieces = one that is 2" long.
- Rectangular pieces = one piece, 2" long.
- Flat pieces = one piece, 2" long.
- Mid-Size Rectangular piece = one piece, 2" long
- (We glued rock salt on top of the mid-size rectangle for the coal and painted it black, then varnished it.)
- Rectangular piece = one piece, 2" long
- Flat piece = one piece that is 2" long
- (We used small cut sticks for the logs on the log car and mini wood blocks for the boxes on the other cars.)
Rectangular pieces are used as the bottom on every train piece. Also, each train will use one Flat Piece centered on top of the bottom rectangular piece.
- Collect the correct pieces given above for the train engine or car you wish to make.
- Sand any rough edges on your wood pieces.
- For the Engine: Sand one long side of the Large Dowel so that it is slightly flattened where you will glue it to the train and on the other long side of the large dowel drill two shallow holes about 2/16" deep into it where you will want the funnel and domes. (Use the 1/4" dill bit.)
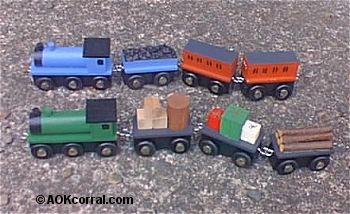
- Glue the trains together with Elmers glue or a good wood glue as shown in the picture.
- Let dry until hardened.
- Measure and mark a straight line 1/8" from the bottom edge of the train.
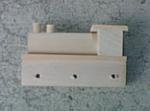
- Then, hold your ruler along the line and make marks at 7/16", 1 1/2", and 2 9/16" for the Engine or any 3" long train and mark at 7/16", and 1 1/2" for the smaller trains.
- Using the 1/8" drill bit, drill a straight hole all the way through the wood to the other side. (A drill press is best to keep the hole straight)
- Paint the trains however you want and let dry.
- Paint the trains with one coat of varnish-wood sealer.
- Paint wheels, let dry.
- For each wheel, put a rivet through the wheel and force the rivet into the hole. (Make sure that you leave enough space on either side of the wheel to allow it to turn freely.)
- Make a centered mark on both front and back ends of the train at 5/8" from the bottom edge of the train.
- Screw an eye into the front end of the train on the mark.
- Screw another eye into the back of the train on the mark and pull the end of it open to form a hook.
|
|