~ How To Projects ~
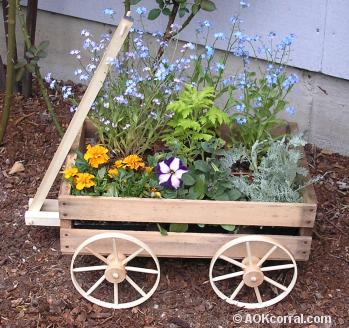
Wooden Wagon Planter
Make this rustic wooden wagon planter for indoors or outdoors.

Click below for more
Craft Projects and Patterns
|
~ Projects By Theme ~
- Animals
- Seasonal
- Holidays
Get this entire project
WITHOUT
Ads, Banners, Logo or Margins
Purchase the Ad Free / Easy Print PDF Version for only $1.49

|
|
Wooden Wagon Planter
~
May 2007
|
|
You may Print this page as it is ...OR...
Purchase the Easy Print Version for $1.49
Includes all instructions for this entire project without margins, ads or logos.
|
|
|
- 1 Wooden Crate measuring approx. 17 to 18" long by 11 to 12" wide.
- 4 Wooden Embroidery Hoops 6" diameter.
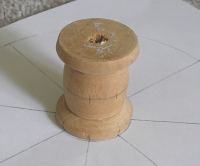
- 4 Country Style Spools approx. 1-3/4" long by 1-3/8" diameter and 5/16" hole in center. (It is ok if yours is slightly different.)
- 1/4" Round Wood Dowel - Poplar
- 5/16" or whatever diameter the center hole of your spool is - Round Wood Dowel - Poplar
- 3/4" Square Wood Dowel - Poplar
- 1" x 2" Hobby Wood - Poplar
- 4 Wood plugs 5/16" or whatever diameter the center hole of your spool is.
- Wood Glue or Tacky Glue
|
- 8 Philips Screws in Size 6 and 1" long
- 8 Philips Screws in Size 4 and 1/2" long
- Four 3" pieces of flexible wire
- Wood Pruning Shears to cut small dowel
- Hand Saw for larger wood cuts
- Adjustable Hand Clamp
- Drill
- Drill Bits in sizes: 1/8, 3/16, and 1/4"
- Philips Screw Driver
- Pencil Sharpener (electric is best)
- Ruler
- Pencil
- Spray Can of Clear Coat Sealer
- Wagon Wheel Spoke Guide
|
- Using your ruler, find the lengthwise center of one of a spool and make marks at this point around the entire spool, connect the marks in a solid line all the way around the cylinder.
- Print out the wagon wheel spokes guide. (see link in materials list)
- Lay the end of your spool onto the center of the guide sheet to see if the diameter of your spool is the same as the guide. If not, make sure your spool is centered over the dot on the guide sheet and draw a line around the end of your spool onto the guide sheet, this will be your new inner circle.
- While the spool end is standing centered on the spoke guide sheet, make marks on the edge of the spool at each spoke line.
- Make a small dot at each place where a mark on the edge of the spool and the line at the center of the cylinder intersect.
- Ready your drill with the 1/8" bit.
- Use the clamp to hold the spool while drilling.
- Drill a small shallow hole at each dot in the center of the spool cylinder. (These small holes are used to keep the larger bit, which will be used next, from slipping.)
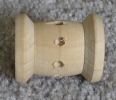
- Change to your 3/16" drill bit.
- Drill a hole, approx. 1/8" deep, at each small hole location.
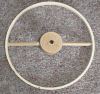
- Take your embroidery hoop pieces apart, you will use the inner hoop.
- Get out your spoke guide sheet again and this time, lay the embroidery hoop on the outside circle of the guide.
- Hold in place and make centered dots on the inside of the hoop at each spoke line.
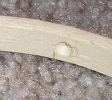
- Using your 3/16" drill bit, drill a shallow hole, about half way through the thickness of the hoops, into each of the dots.
- Once again, take out your spoke guide sheet.
- Measure the distance on the spoke guide sheet from the outside circle to the inner circle. Ours measures 2-1/4"
- Spools generally have wider ends than the cylinder in the center. Measure the depth between your spool's end and the main cylinder center. Ours measures approx. 1/8" (County Style Spools will have a rounded center so if you are using one, be sure to measure from that rounded center point to the edge.)
- Now take your first two measurements and add approx. 1/8" to give you a total spoke length. Our total came to 2-1/2".
- Measure and cut 2 pieces of 1/4" diameter doweling to your total spoke length.
- Using your pencil sharpener, sharpen each end of your pieces of doweling until the tips are each approx. 1/8" in diameter.

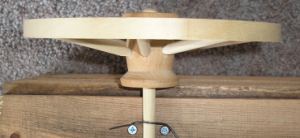
- Lay the hoop on a table and stand the spool on its end in the middle of the hoop.
- Take the 2 prepared pieces of doweling and place them into two of the holes in the spool that are on opposite sides, then, gently put the other ends of the dowels into two of the holes on the inside of the hoop. If they are the right size they should slide in easily but also rest snugly into the holes when you lift the hoop so that it lines up with the holes in the spool. The hoop should remain a circle and should not become oval in shape at all. If so, the dowels are too long. If they are a bit too long, sharpen down one end of each dowel just a bit more and try again. Continue to try these two dowels and sharpen if necessary until they fit as indicated above.
- Measure and cut the remaining 6 pieces of 1/4" diameter doweling to your total spoke length.
- Again, sharpen each end of the pieces until the tips are each the same diameter as the first two adjusted pieces.
- Now assemble the wheel by putting opposite pairs of spokes into the holes across from each other as shown in the photos.
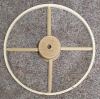
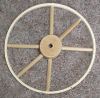
- Your wheel should hold together and none of the spokes should fall out. If some spokes do fall out then you may have some that are slightly larger than the others and you will need to check each of them. Replace any if necessary for a good fit. (*Note: When the wheel is put together the dowels will often tend to lean one way slightly, that is ok as long as the dowels rest into the holes well.)
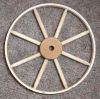
- For added strength, lay your wheel down and take off one spoke, put glue into each hole and replace the spokes. Go around the entire wheel this way.
- Now make three more wheels the same way.
- When the glue has dried on all the wheels, spray a coat of clear sealer over each of the wheels and let them dry.
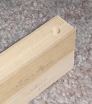
- Cut two pieces of the 3/4" square dowel each measuring 7" long.
- Make a mark on the end of one piece that is 3/8" from the end and centered.
- Using your 1/4" drill bit, drill a straight hole through the piece of wood at the mark.
- Take that piece of wood and set it on top of the second piece. Line up all edges and ends and hold together with your hand clamp.
- Carefully send your drill down through the hole in the first piece and then down through the second piece of wood. (This is to help make sure the holes will line up when assembling.)
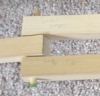
- Cut one more piece of the 3/4" square dowel to measure the length you want for your handle (Ours measures approx. 18" long).
- Using the piece of wood that you first made a hole into as a guide, set it on top of the piece that was cut for the handle. Line up the edges and ends again and hold together with a hand clamp.
- Carefully send your drill down through the hole in the first piece and then down through the second piece of wood.
- Turn the handle piece around and do the same thing to the other end through the same side.
- Cut a 4" piece of 1/4" round doweling.
- Send the doweling through the hole in one end of the handle until it is centered in the handle piece. (It should be tight but if it is too tight to slide in, send your drill back through a few more times going up and down and wiggling it just a bit to widen the hole slightly.
- Cut a 3" piece of 1/4" round doweling.
- Turn the handle back around and line up the holes in the handle with the holes in the two 7" pieces on either side. Slide the doweling through all the holes. (It should be tight but again, if it is too tight to slide through, send your drill back through each hole a few times.)
- Put your handle assembly aside.
- To make the support stands you will need to find out how high each one needs to be. Take two of your wagon wheels and slide a piece of 5/16" round doweling (or your doweling that matches the inside spool diameter) through both wheels and set it down as it will be when it is under the wagon.
- Take your ruler and measure from the ground to the top edge of the wooden dowel. This is your measurement for the support stands.
- Take the 1" x 2" wood and measure the length your determined for the supporting stands. Cut two of these support stands with your saw.
- Turn your crate upside down.
- Measure and mark the placement lines for the wheel axles at 4" from each end of the crate.
- Lay the two 7" pieces of your handle assembly onto the crate bottom at the end that will be the front. (The pieces should sit just in front of the line that is for the front wheel axle and should be center on the crate.)
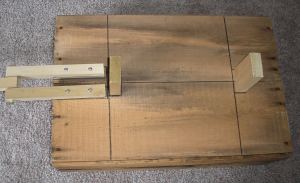
- Draw an outline onto the crate around each piece of wood so you can see the placement after you take the handle assembly off. Take the handle assembly off.
- Place one support stand about 3/8" behind each of the wheel axle lines and draw an outline onto the crate around each piece of wood. Remove the support stand pieces.
- Take your drill with 1/8" bit and drill two holes inside each outline your made for the support stand pieces.
- Place one of the support stand pieces back into its place, hold it there and turn the crate over.
- Pre-drill holes into the stands by drilling through each hole that you put into the crate bottom and into the support stand underneth.
- Screw 2 of your size 6, 1" long screws down into the support through the inside of the crate until tight.
- Do the same to attach the other support stand.
- To attach the handle assembly, turn the crate back over so the underside is facing up.
- Set the handle assembly in its place and pre-drill two holes through each piece of wood for the screw holes.
- Screw 2 of your size 6, 1" long screws through each side of the handle assembly and into the crate to secure it.
- Turn the crate so the underside is facing up again.
- Slide a piece of 5/16" round doweling through two wagon wheels. (Make sure if one side of the wheel has the spool leaning out a bit that side should face inward.)
- Lay the doweling along a wheel axle line and move the wheels so the spools lay against the crate sides.
- Pull back the doweling for one side just enough to put a wood plug into the spool of that wheel.
- Push the dowel in from the other side until it reaches the plug and mark the place where the dowel just comes out of the other spool.
- Then pull out the dowel a bit and cut the dowel about 1/8" inside that mark.
- Push the dowel back in and plug that second side side with a wood plug.
- Now that you have the right fit, slide each wheel off the dowel one at a time and put some glue into the open end of the spool, put the wheel back on the dowel and twist around one of two times to help the glue connect to both the spool inside and the dowel.
- Screw 2 of your size 4, 1/2" screws directly across from each other on both sides of the wheel axle dowel about 1" from the wheel but leave about 1/8" of the screw head out of the wood. Do the same on the other side of the axle and then repeat with the other wheel axle.
- Cut a 3" piece of wire and wind one end around a screw. Then send the wire over the wheel axle to the screw on the opposite side and wind the wire around that screw. Attach each end of the wheel axle this way.
|
You may Print this page as it is ...OR...
Purchase the Easy Print Version for $1.49
Includes all instructions for this entire project without margins, ads or logos.
|
|
|
|
|


