~ How To Projects ~
Easy to Make Wood Toy
Learn how to make wooden pull toys with our wood toy plans.

Click below for more
Craft Projects and Patterns
|
~ Projects By Theme ~
- Animals
- Seasonal
- Holidays
Get this entire project
WITHOUT
Ads, Banners, Logo or Margins
The PDF Version contains all instructions and patterns in an easy print format.
Purchase the Ad Free / Easy Print PDF Version for only $1.49

|
|
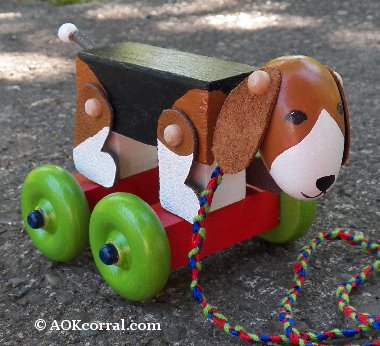
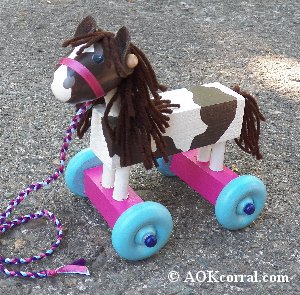
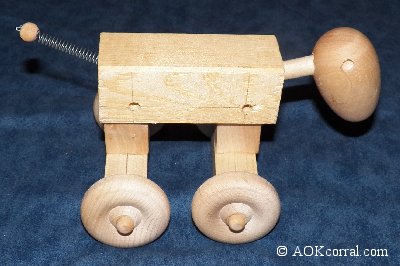
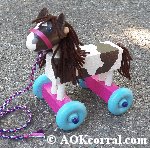
Easy to Make Wood Pull Toys
~
July 2012
|
|
You may Print this page as it is ...OR...
Purchase the Easy Print Version for $1.49
The Easy Print PDF Version contains all instructions and patterns for Dog & Horse without margins, ads or logos.
|
|
|
- Untreated, 2 x 2 lumber, any length 4 inches or longer. (This lumbers actual measure at the end is about 1 ½ x 1 ½)
- 1 square dowel
- 7/16 round dowel
- 1/4 round dowel
- Pre-cut, 1 square wood cubes 2 per toy
- 2 ½ long - Solid wood egg 1 per toy
- 2 Wood wheels 4 per toy
- 1/8 Wheel axels 10 per toy
- 1/2 inch wood bead 1 per toy
- 2 inch spring -1 per toy
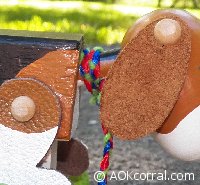
- Thin leather pieces in dog colors
- Wood glue
- Acrylic Paints
- Clear varnish
- Saw
- Drill
- 1/4 drill bit
- 7/16 drill bit
- Adjustable clamp with handles
- Pliers
- Ruler
- Marking Pencil
- Scissors, sharp enough to cut leather
- Paint brushes
|
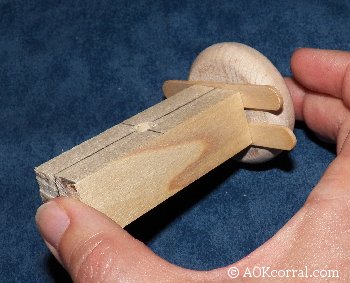
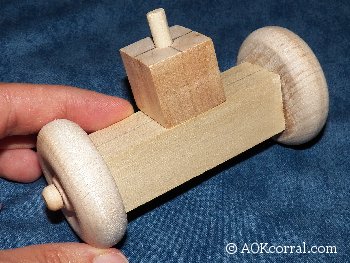
- Cut 1 - 4 inch length of the 2 x 2 lumber
- Cut 2 3 inch lengths of 1 square dowel
- Cut 1 2 inch length of 7/16 round dowel
- Cut 2 2 inch lengths of 1/4 round dowel
- Cut 6 Cut off all but 1/4 of the dowel on 6 wheel axels. (This makes the axels into 1/4 plugs that will hold on the ears and legs.)
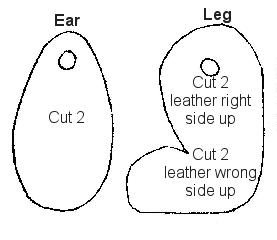
- Cut 2 ear pieces
- Cut 4 leg/foot pieces according to pattern directions.
- Cut holes in all pieces at markings on patterns. Make sure your holes are just under 1/4 in diameter so the knob on the wheel axel will hold the leather piece onto the body.
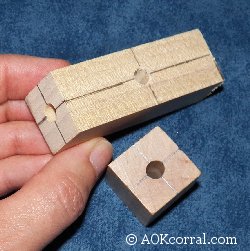
- Measure and mark the center on one side of each of the 1 square pieces and drill straight through at the center mark with 1/4" drill bit.
- Measure and mark the center on one of the long sides of each of the 3 pieces and then drill about 1/2" into the center mark with 1/4" drill bit.
- Measure and mark the center on both of the ends of each of the 3 pieces and then drill about 1/2" into the center mark with 1/4" drill bit.
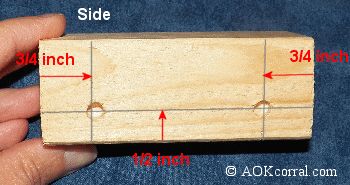
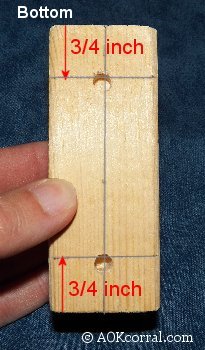
- On the BOTTOM of the body; draw lines at 3/4" from the front edge and 3/4" from the back edge and measure and mark a perpendicular line down the length of the body at the center.
- Using your 1/4" drill bit, drill about 1/2" into the body where the lines intersect.
- On the long SIDE of the body; draw lines at 3/4" from the front edge and 3/4" from the back edge and measure and mark a line 1/2" from the bottom edge.
- Using your 1/4" drill bit, drill about 1/4" into the side of the body where the lines intersect.
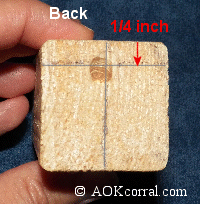
- On the BACK end of the body; draw a line across the piece at 1/4" from the top edge and measure and mark a perpendicular line at the center.
- Using your 1/4" drill bit, drill into the body where the lines intersect at about a 45 degree angle, down toward the bottom of the body, about 1/2" deep.
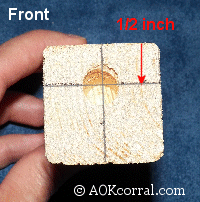
- On the FRONT end of the body; draw a line across the piece at 1/2" from the top edge and measure and mark a perpendicular line at the center.
- Using your 7/16 drill bit, drill into the body where the lines intersect at about a 45 degree angle, down toward the bottom of the body, about 3/4" deep.
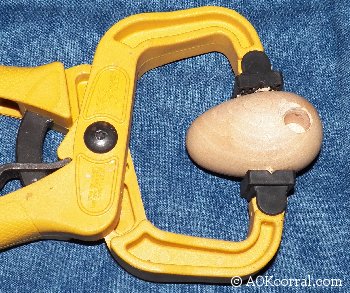
- Lay a wood egg on its side and hold with hand clamp.
- With your 7/16 drill bit, drill straight into the wide end of the wood egg.
- To find the right position for drilling the ear attachment hole, put together the head and body with the 2 long, 7/16 dowel. Do not use glue at this time.
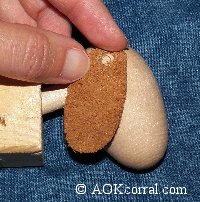
- Lay the leather ear against the head where you want to connect it and draw a mark onto the wood through the hole in the leather. Set leather aside.
- Take the wood egg head off the dowel and use the hand clamp to hold it again while you drill 1/4" deep holes with your 1/4 drill bit at the ear mark locations.
- Put some glue into the hole at one end of the 3 piece and slide one wheel axel through the wheel and into the hole with glue. Check for excess glue that might touch the wheel and wipe it off.
- Slide a Popsicle stick on each side of the axel between the inner wheel and the 3 piece to create a small gap between the wheel and the frame.
- Repeat for the other wheel.
- Let dry completely and remove the Popsicle sticks. Your wheels should turn on the axel.
- Put some glue into the hole along the long side of the 3 piece.
- Take one of the 1 squares and push a 2 piece of ¼ dowel through the hole in the square and into the hole with glue. Make sure the square and the 3 piece are pressed against each other. (There should be about ½ of dowel sticking out the top of the square.)
- Put together the other wheel assembly.
- Glue the egg head to the front of the body with the 2 length of 7/16 dowel.
- Pinch the end of the spring together and insert through the wood bead.
- Bend the tip of the spring to secure the bead in place.
- Put some glue into the hole at the back of the body and insert the other end of the spring.
- Glue the wheel assembly dowel into the bottom of the body.
- Let all pieces dry together.
- Paint the pull toy and let dry.
- Optional: varnish or clear coat the toy for shine, let dry completely.
- To attach the ears and legs; put some glue into the holes and use the axel plugs to secure the ears and legs to the head and body.
- Paint and varnish the axel plugs if desired.
|
You may Print this page as it is ...OR...
Purchase the Easy Print Version for $1.49
The Easy Print PDF Version contains all instructions and patterns for Dog & Horse without margins, ads or logos.
|
|
|
|
|