~ How To Projects ~
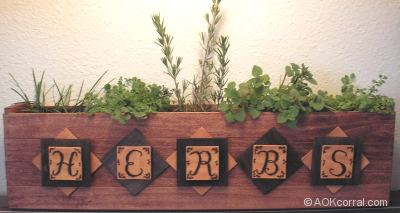
Herb Garden Window Box

Click below for more
Craft Projects and Patterns
|
~ Projects By Theme ~
- Animals
- Seasonal
- Holidays
|
|
Herb Garden Window Box
~
March 2006
|
- Wood for Box: (We used poplar wood boards that are available in the precut wood trim department at most major home improvement stores. The boards you need should be precut into the following measurements before going to the instructions below.)
- One piece: 1/2" thick - 3.5" wide - 36" long
- Six pieces: 1/4" thick - 1.5" wide - 24" long
- Basswood for Decoration: (Basswood can be found at most major craft or hobby stores. It is a soft light wood that is great for wood burning. Because it is light and soft, care must be taken when cutting.)
- One piece: 1/8" thick - 2" wide - 24" long
- One piece: 1/8" thick - 3" wide - 24" long
- Pattern for HERBS wood burn decoration. - Click Here
- Wood Burner
- Hand Saw
- Exacto Knife / Sharp Utility Knife
- Fine-Medium Sand Paper
- Ruler and Pencil
- Drill with 1/16" drill bit
- Panel Nails: 25 mm thick - 1" long
- Hammer
- Wood Glue
- Varnish and Brush
- Wood stains:
- Red Chestnut
- Colonial Maple
- Dark Walnut
|
- Take the large piece of wood that is 1/2" thick - 3.5" wide and 36" long. Measuring from one end of the board, mark a line at 6" from that end and then at 12" from that same end.
- Carefully saw through the wood along these lines. (You will now have two 6" long pieces - the sides and one 24" piece - the base.)
- Take the larger piece of basswood that is 3" wide and 24" long. Measuring from one end of the board, mark lines every 3" from that end all the way across the board.
- Turn the wood over and do the same thing on the other side measuring from the same end of the board.
- Very carefully, score into each of the lines on both sides of the wood with your exacto knife or sharp utility knife.
- Continue to score one line at a time until you have cut all the way through the wood creating 3" square pieces.
- Take the smaller piece of basswood that is 2" wide and 24" long. Measuring from one end of the board, mark lines every 2" from that end 5 times.
- Turn the wood over and do the same thing on the other side measuring from the same end of the board.
- Cut along these lines carefully just as you did for the other piece of basswood creating 2" square pieces.
- Sand the cut edges of all your wood pieces.
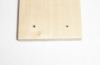
- Using a 1/16" drill bit, drill the following holes into the following pieces to make assembly easier.
- Drill 2 holes on each end of the 1.5" x 24" long pieces about .25" from the edges.
- Drill 3 holes on each end of the 3.5" x 24" long piece at about .5" from each of the edges and one in the center.
- Print out the HERBS Pattern - Click Here
- Cut out each of the letter squares.
- Rub the back of the pattern with a pencil (or get some carbon paper).
- Lay the letter pattern on one of the 2" square basswood pieces (if using carbon paper, put it between the pattern and the wood) and then trace the lines of the design.
- Preheat your wood burner and test on an extra piece of basswood.
- Follow the lines with your wood burner for each of the letters and the additional corner decorations. You may want to adjust these designs or add to them as you like.
- Stain (or paint) all the wood pieces for the window box and decoration pieces in your desired colors. The colors we used are listed here. One coat only unless specified differently.
- All pieces for the main window box are stained in Red Chestnut.
- All 2" square letter burned pieces are stained in Colonial Maple.
- Five of the 3" squares of basswood are stained in Dark Walnut.
- Three of the 3" squares of basswood are stained in Colonial Maple, 2 coats.
- (You may choose to apply one coat of clear varnish at this time to get the best coverage of each pieces of wood or you can varnish the completed box at the end.)
- First, assemble the 1/2" thick end pieces onto the 1/2" thick bottom piece through the pre-drilled holes as shown.
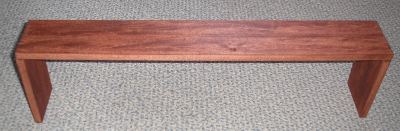
- Turn the box onto it's side.
- Next, starting from the bottom and working up, nail each of the 1/4" thick boards one at a time onto the side of the box through the pre-drilled holes.
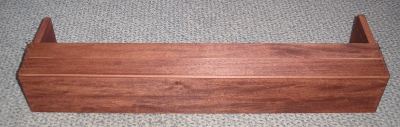
- Turn the box over and do the other side.
- You will need to apply at least one coat of clear varnish to the entire box if you did not do this step earlier. This will help protect the wood from moisture.
- Use wood glue to put together the square pieces as shown in the photo but do not glue them to the box yet. Let dry.
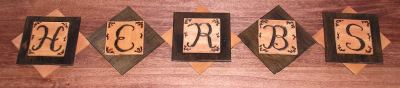
- Apply one coat of clear varnish to each letter decoration and let dry.
- Lay each finished letter decoration along one side of the herb window box and adjust to center them.
- Glue each piece in place and let dry.
- To add your plants be sure that you plant them in 4" square pots and include some sort of water catch at the bottom. (Many plants come in plastic 4" square pots from your local nursery or garden store.)
- You can make a water catch by cutting a generous piece of aluminum foil and covering the bottom of the pot with it or jar lids turned upside down and placed below the pot also work.
|
|
|


