~ How To Projects ~
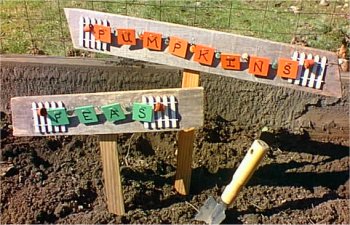
Garden Signs

Click below for more
Craft Projects and Patterns
|
~ Projects By Theme ~
- Animals
- Seasonal
- Holidays
|
|
Garden Signs
~
March 2002
|
- 3" wide x 1/2" thick Wood for Signs (Cut into various lengths from 12" to 20" depending on the number of letters in the plant name.) More info below.
- Approx. 1" wide x 1/4" thick wood for stakes. (Cut into 20-24" lengths)
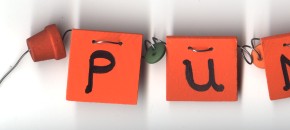
- 1 1/4" Square Wood Pieces (1/8" thickness)
- 5/8" Mini Wood Flower Pots (with small hole in bottom, if no hole you will need to drill one.)
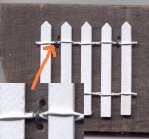
- 2" tall Mini Wood White Picket Fence
- Small Nails
- Craft Wire
- Colored Buttons
- Pencil
- Permanent Black Marker
- Paint & Paint Brush
- Clear Acrylic Sealer Spray
- Hammer
- Needle Nose Pliers
- 1/16 Drill Bit and Drill
- (If your wood for signs and stakes is not pre-cut for you, you will need a hand saw.)
- (Optional: Letter Stencil)
|
- Paint the correct number of wood squares for the veggie or flower name you are making. Also, paint mini flower pots.
- Drill two small holes along one edge of each square. The holes should be about 1/2" apart. (This edge becomes the top of the letter square.)
- Write one letter on each square with a permanent marker. (Suggestion: Use a pencil first to prevent mistakes, then go over that with the permanent marker or use a letter stencil.)
- Cut a long piece of craft wire. (36-40" long)
- To put the name together you will be working from right to left, end of name to beginning of name.
- Start by taking the last letter in the veggie or flower name, send the wire, from the back of the square, up through the right hole and continue to pull the wire through until there is only 6" left at the end.
- Hold the wire in its place, then send the wire back down through the left hole and pull all the wire through.
- Next, still working to the left, Take your pencil and wrap the wire around it twice to form a double wire curl.
- String a colored button onto the wire and past one of the wire curls.

- Take the next letter and send the wire, from the back of the square, up through the right hole and continue to pull the wire through until the two squares are separated by only the double wire curl (approx. 1/2") when laid flat.
- Hold the wire in place, then send the wire back down through the left hole and pull all the wire through.
- Continue with steps 8-11 until you reach the last letter square (first letter in the name). If you see that you are going to run out of wire before you have worked through the whole name, connect a new piece of wire, behind one of the letter squares using your pliers, cut off any excess length and continue.
- After the last letter is added, curl the wire once again and instead of threading a button onto the wire, thread a mini flower pot (top first) onto the wire.
- Pull the flower pot top opening over the wire curl to help hold the pot in place.
- Leave 5" on the end of the wire and cut.
- Go back to the other end of the name and curl the wire, then thread another mini flower pot onto the wire (top first) pulling the pot top opening over the wire curl as you did on the other end.
- Spray the front and back of the name sign with Clear Acrylic Sealer and let dry.
- Cut the wood for the Sign to the correct length. Measure you completed name from the edge of the first letter to the edge of the last letter and add a total of 4" extra (2" for each end)
- Center a stake on the back of the sign and nail into place with two nails.
- Cut two pieces of mini picket fence that are at least 5 pickets long.
- To determine the correct placement of the fence pieces, lay the name out on the sign and adjust it to center.
- Lay the fence pieces under the beginning and end of the name and move them as needed so that the first and last letters of the name slightly overlap the fence pieces.
- Holding the fence piece in place, make pencil marks above and below the fence's top connecting wire near the right and left ends. Do the same for the other fence piece. (see photo)
- Holding the name in its desired placement, make pencil marks (1/8" apart) above and below the name sign's wire, somewhere near the center of the sign.
- Remove the name and fence pieces, drill small holes at marks.
- Connect each fence piece to the sign by threading craft wire through a hole above the fence's top connecting wire and down through the hole below the fence's top connecting wire.
- Twist both wire ends together in the back of the sign to secure. Trim ends.
- Finish connecting the fence pieces in this manner.
- Lay the name out on the sign again and center.
- Thread the wire ends of the name through one of the holes used to connect the fence pieces.
- Adjust to center, then secure the wire at the back of the sign to one of the other wire ends left from securing the fence pieces.
- Secure the center of the name sign onto the base by threading craft wire through the center holes as you did for the fence and twist in the back. Trim ends.
- Spray an additional coat of Clear Acrylic Sealer over the entire Garden Sign. Let Dry.
|
|
|


