~ How To Projects ~
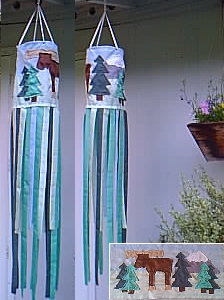
Wilderness Windsocks

Click below for more
Craft Projects and Patterns
|
~ Projects By Theme ~
- Animals
- Seasonal
- Holidays
|
|
Wilderness Windsocks
~
June 2000
|
- Nylon lining fabric
- Light Blue (3/4 yard)
- Light Green (1 yard)
- Medium Green (1 yard)
- Dark Green (3/4 yard)
- Dark Brown (1/2 yard)
- Light Brown (1/4 yard)
- Gray (1/4 yard)
- White (1/4 yard)
- Matching Thread
- Sewing Machine
- Iron and Ironing Board
- Sewing Scissors
- Pins
- Measuring Tape
- 16 Gauge Galvanized Steel Wire & Wire cutter
- 4 Grommets and Grommet tool
- Nylon Cord
|
- Cut out one piece of light blue nylon fabric and one piece of light green nylon fabric; each measuring 8 1/2 inches high and 25 1/2 inches long.

- With right sides together, stitch the two pieces together along the full 25 1/2 inches in length.
- Press the raw edges of the fabric up against the blue fabric.
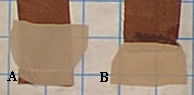
- Using light blue thread, top stitch the seam allowance in place against the blue side of the fabric as shown in Photo1. A.
- To create the casing for the wire, fold the opposite raw edge of the light blue fabric, in toward the wrong side one inch and press. Fold that edge in toward the wrong side again another one inch and press again. Pin in place. Photo1 B.
- Do the same thing to the raw edge of the light green fabric.
- Stitch 5/8 inch from pressed edge through all thickness of fabric. (Be sure to use the same thread color as the fabric you are stitching.)
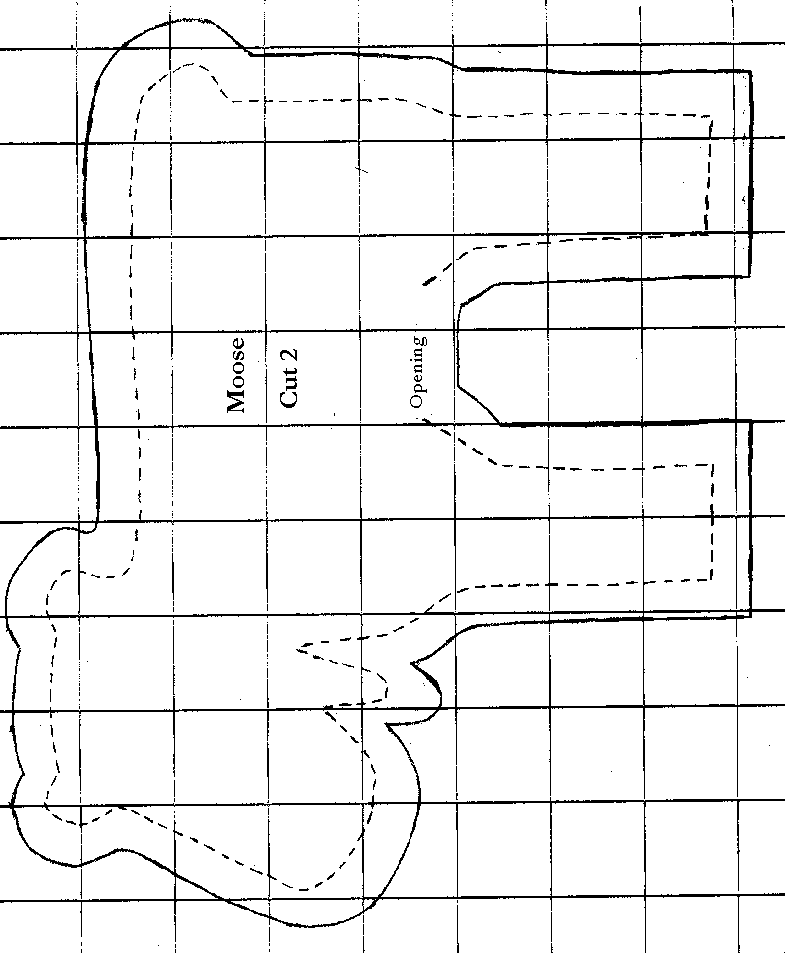
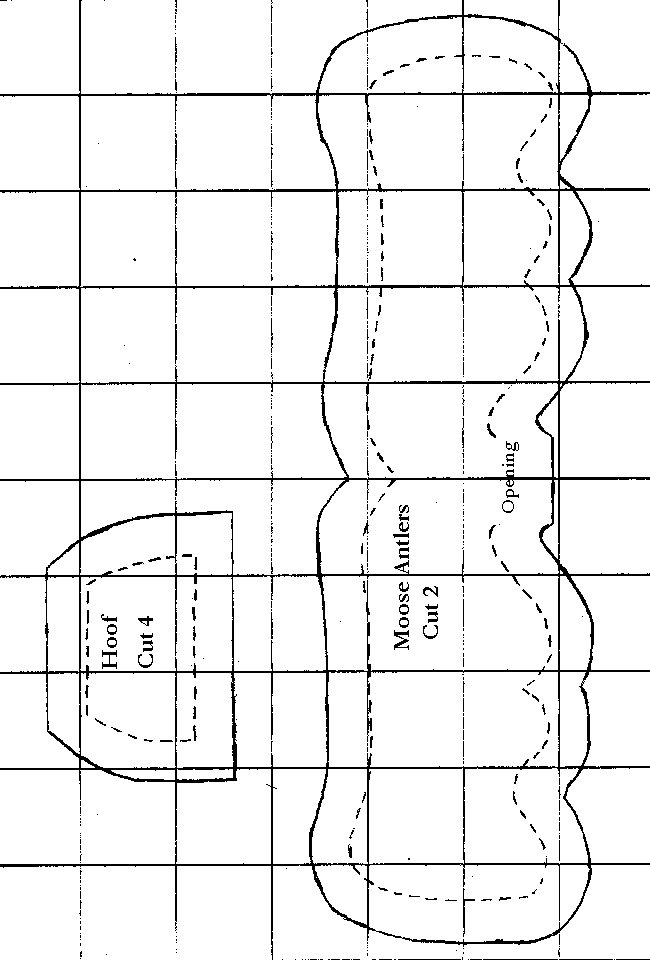
( Moose Patterns Page 1 - Click Here)
( Moose Patterns Page 2 - Click Here )
- Cut out two pieces of the moose figure using dark brown nylon fabric.
- Cut out four pieces of the moose hooves and two pieces of the moose antlers using light brown nylon fabric.
- With right sides together, pin, then stitch the moose antlers together along seam line as shown on the pattern.
- Clip corners and trim seam allowances, turn right-side-out.
- Use the eraser end of a pencil inside the antlers to gently push all the curves and corners completely out.
- Press the antlers flat.
- With right sides together, pin, then stitch the moose hooves to the moose legs as shown in Photo2 A.
- Press the hoof/leg seam open Photo2 B.
- Pin the moose figures right sides together.
- Stitch the entire body of the moose together leaving the belly open as shown on the pattern.
- Trim excess seam allowances and clip corners. Turn the moose right-side-out again using the eraser end of a pencil to push all the curves and corners completely out.
- Press the moose figure flat.
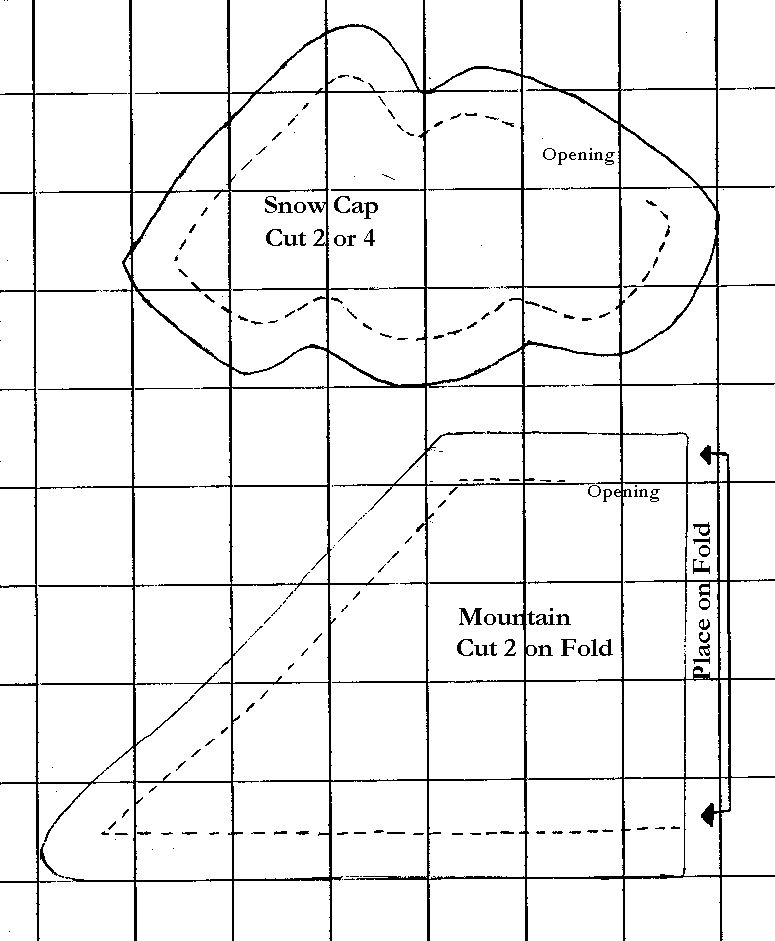
( Mountain Pattern - Click Here )
- Cut out two pieces of the mountain pattern using gray nylon fabric.
- Cut out two or four pieces of the snow cap using white nylon fabric. (Depending on the thickness of your fabric, you may need to double the snow cap sides so that they are not transparent.)
- Pin the two gray mountain pieces right-sides-together and stitch, leaving the opening in the top as shown on the pattern.
- Trim seam allowances and clip off corners. Turn the mountain right-side-out, pencil the corners completely out and Press.
- If your white is thin and you need to double the thickness; pin and stitch two pieces together all the way around at about 1/4 inch from the raw edge. (Do this to the other two pieces as well.)
- Now take both of your doubled pieces or both of your original pieces and pin them right-sides-together.
- Stitch them together leaving the opening as shown on the pattern.
- Trim seam allowances at different lengths, clip curves almost to the stitching, and clip corners. Turn right-side-out and press.
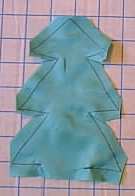
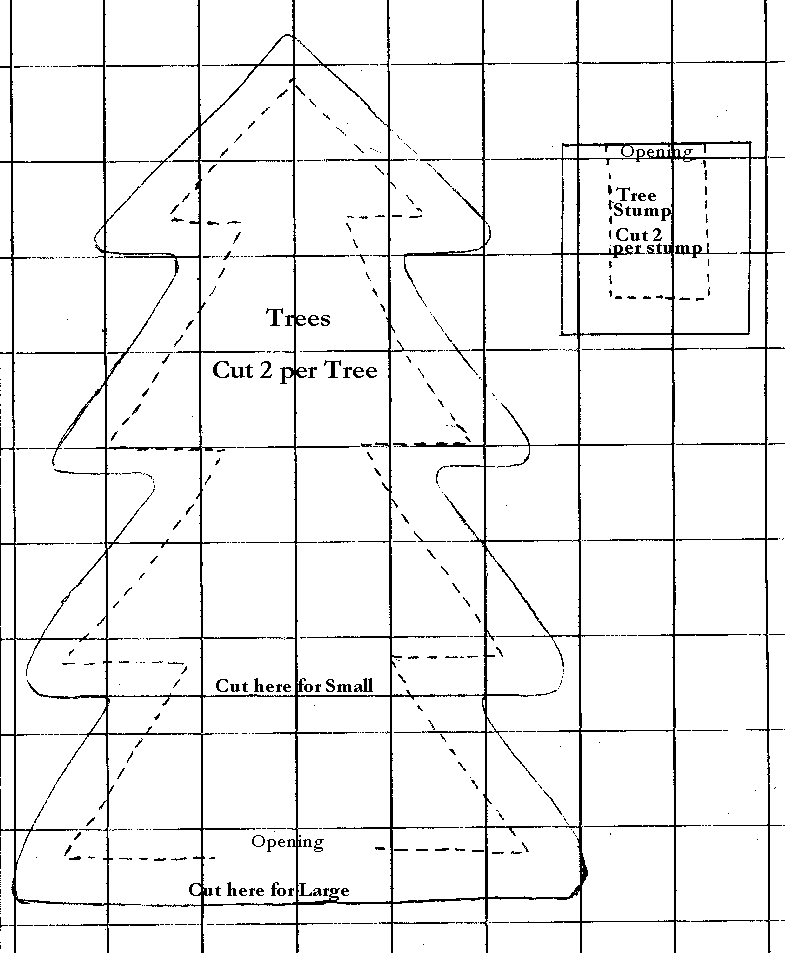
( Tree Pattern - Click Here )
- Use the tree pattern to cut all the trees that are needed. The Large tree and two small trees were done with Dark Green and two additional small trees were done with Medium Green.
- Pin each tree, right-sides-together.
- Stitch along the seam line as shown in the pattern, leaving the opening at the bottom of the tree.
- Trim off extra fabric at points and clip into corners until almost to the seam line. Photo3
- Turn the tree right-side-out and press carefully.
- Cut the tree stumps out of dark brown.
- Pin them, right-sides-together and stitch them along the seam line as shown on the pattern.
- Clip corners and trim seam allowances, turn right-side-out, and press.
- Using a flat surface, arrange the pieces of the scene onto the Windsock Base as shown in Photo4.
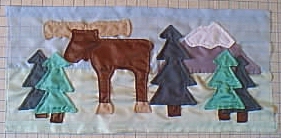
- Pin the bottom most pieces onto the windsock base. (For example, the tree trunks are placed under the tree crowns and therefore should be pinned on, and sewn on, first.)
- Be sure to use thread that matches the fabric for these steps;
- Sew on the tree trunks and mountain base first.
- Snow cap and dark trees next.
- Light trees and moose antlers.
- Lastly, the moose figure.
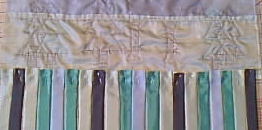
- To make the windsock tails, you will need to cut out the following strips:
- 6 Medium Green strips measuring 3" x 36"
- 4 Dark Green strips measuring 3" x 36"
- 7 Light Green strips measuring 3" x 24"
- 3 Light Blue strips measuring 3" x 24"
- Fold each strip in half along the long side with right-sides-together, and pin in place.
- Stitch along one short end and all the way up the length of the strip to the other end...leaving that end open.
- Turn right-side-out. (Use the eraser end of a pencil to push the wrong side into the inside.)
- Press flat.
- Repeat with for all tails.
- Arrange and pin the tails onto the bottom of the windsock base as shown in Photo5.
- (Be sure to leave 1/2" on each end of the windsock base for a seam.)
- Stitch through all thickness along previous stitching on windsock base two times.
- Fold windsock base in half, right-sides-together, and pin.
- Stitch the edges together 1/2" from raw edges.
- Turn right-side-out.
- Attach all four grommets to the top of the windsock just above the casing seam line. The grommets should be placed at even distances from each other around the top. (Make sure there is enough room above the grommet in the casing for the wire.)
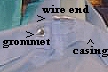
- On the inside of the windsock casing, next to the seam, cut a small hole through only one layer of the fabric. See Photo6
- Cover the end of the wire with tape to keep it from tearing the fabric.
- Feed the wire through the hole and all the way around the windsock, shaping the windsock circle as you feed.
- Cut the wire off at the hole and tape that end too, push it into the hole.
- Tie a 12" piece of nylon cord through each of the four grommets.
- Bring all four pieces together, centered above the windsock, create a loop and tie.
|
|
|


