~ How To Projects ~
Bag Holder
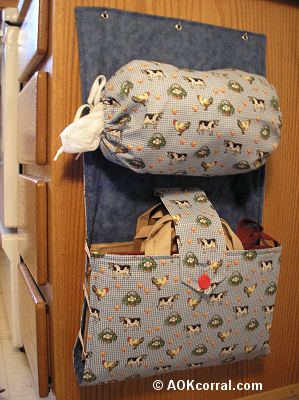
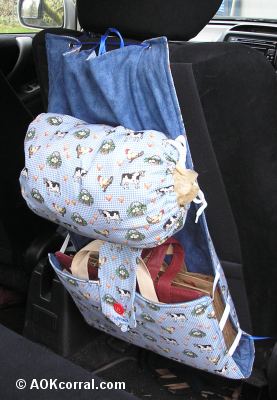
Learn how to make a bag holder that includes a plastic bag holder and a grocery shopping bag holder for all those reusable bags. Keep all your bags organized and within reach in one place.

Click below for more
Craft Projects and Patterns
|
~ Projects By Theme ~
- Animals
- Seasonal
- Holidays
Get this entire project
WITHOUT
Ads, Banners, Logo or Margins
The PDF Version contains all instructions to make this project in an easy print format.
Purchase the Ad Free / Easy Print PDF Version for only $1.49

|
Bag Holder for Plastic Bags, Shopping & Grocery Bags
~
May 2011
|
You may Print this page as it is ...OR...
Purchase the Easy Print Version for $1.49
The Easy Print PDF Version contains all instructions to make this bag holder project without margins, ads or logos.
|
|
|
- Fabric A = 1 yard of decorative cotton fabric. (This will form the front pocket and plastic bag holder)
- Fabric B = ½ yard of a contrasting solid cotton fabric. (This will form the background)
- 1 Piece of thin cotton batting large enough for a 37" by 17" piece.
- Matching sewing thread
- One half yard of ½" wide elastic
- One pair of 27" shoelaces (preferable complementing the fabric)
- Three, ½" eyelets/grommets & tool
- One, ¾" diameter, matching button
- Tape measure
- Fabric marking pencil
- Fabric scissors
- Sewing Machine
- Iron & ironing board
|
- (Note: If fabric A contains a single direction design, please note the additional instructions for cutting the following pieces.)
- Base: Cut 1 rectangle measuring 36 inches long by 16 inches wide (For single direction designs: make sure that the fabric design is viewed correctly when the 36 inch length is vertical.)
- Plastic Bag Holder: Cut 1 rectangle measuring 20 inches long by 17 inches wide (For single direction designs: make sure that the fabric design is viewed correctly when the 20 inch length is vertical.)
- Button Flap: Cut 1 rectangle measuring 10 inches long by 8 inches wide (For single direction designs: make sure that the fabric design is viewed correctly when the 10 inch length is vertical.)
- Cut 1 rectangle measuring 36 inches long by 16 inches wide
- Cut 1 rectangle measuring 37 inches long by 17 inches wide
- Lay the pre-cut batting onto your worktable and then lay the 36" x 16" rectangle you cut out of Fabric B, centered, on top of it with the wrong side against the batting and right side up.
- Smooth out any wrinkles and pin the fabric to the batting around all edges.
- Select one of the 16" ends of the fabric to be the top edge of the bag holder.
- Measure 1 ½" from that top edge and along the long side of the fabric; make a mark with your fabric pencil. Make the same measurement and mark on the opposite long side.
- With a ¼" seam allowance, stitch along each of the long sides of the fabric from the bottom edge to the marks.
- Remove pins and trim the batting around all sides up to the fabric edges.
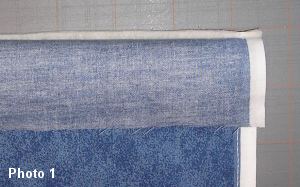
- At the top edge, fold the fabric back against itself at the marks and cut the batting away along this edge. (see photo 1)
- Now, starting from the bottom edge, measure and mark along both the long, 36" sides at 1 ½", 4 ½", and 7 ½".
- Cut 6 pieces of elastic measuring 3 inches each.
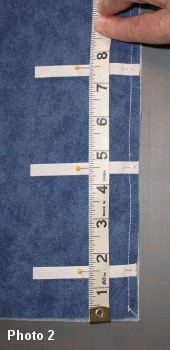
- Pin one piece of elastic at each of the marks so that one end of the elastic is flush with the fabric edge and the rest of the elastic extends toward the center of the bag holder. (see photo 2)
- Attach each piece of elastic by stitching through all thickness along the ¼" seam allowance. Stitch over the elastic at least three times to secure.
- If necessary, re-position pins to pin down the loose end of the elastic to hold it in place for the next steps.
- Lay the large rectangle you cut out of fabric A, (36" x 16") right sides together, on top of your bag holder. Adjust so that all raw edges are even and pin in place. (IMPORTANT NOTE: If you are using a single direction fabric for fabric A, make sure your fabric will be viewed correctly by laying the piece upside down so that the correct view "top" of the fabric pattern is at the bottom edge of the bag holder.)
- Stitch each long side together with ½" seam allowance.
- Stitch along the bottom edge with ½" seam allowance.
- Stitch along the top edge with ½" seam allowance but leave a space of 4 inches in the middle un-stitched and open so you can turn the bag holder right side out.
- Remove all pins and trim off corners.
- Turn the bag holder right side out through the top opening and remove the pins from the elastic strips.
- Push out all corners; turn the raw edges of the opening inside to match the sewn edge. Press all edges.
- Do a ¼" edge stitch along each long side, then along the top and bottom edges making sure to close the top opening with your stitching.
- The next step is to make some measurements and pin markings along each of the long, 36" edges.
- Lay out the bag holder base with the Fabric B side up. Start your measuring from the top (the top is the end without the elastic).
- Make your pin markings by sticking the pin into the fabric perpendicular to the edge at the following locations: 5 ½",7", 11 ½", 14 ½", 17 ½", and 20 ½". (Measure and mark along both long edges.)
- Place the medium rectangle from Fabric A, (20" x 17"), on your ironing board, turn and press ¼" hem on each of the 17" long edges.
- Stitch along each pressed edge to hold it in place.
- Next, turn and press 1" on each of the 20" long edges.
- Then, press under ¼" on raw edge.
- Stitch close to inner pressed edge; this will create a casing for the laces to go through.
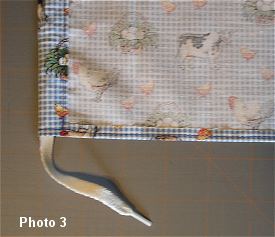
- Stick a safety pin in the end of one of the shoelaces and send it through the casing. Remove the safety pin and repeat on the other side. (see photo 3)
- Fold the 8" width of the button flap piece in half with right sides together.
- Stitch together with a ½" seam allowance along the 10" length of the piece.
- Lay the piece down on your worktable with the 10" length vertical and the any single direction fabric design viewed correctly.
- Measure to find the center between the fold and the seam on the bottom edge. Then, make a mark at the center and ½" from the raw edge.
- Then, measure along the seam, starting from the bottom edge and extending up 1 ½"; make a mark.
- Measure along the fold, starting from the bottom edge and extending up 1 ½"; make a mark.
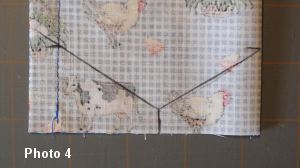
- Take a straight edge and draw a line from the mark at center and ½" from bottom edge to the mark at 1 ½" up from bottom seam. Also, draw a line from the center point mark again to the 1 ½" mark up from bottom of folded edge. (see photo 4)
- Stitch along each of the drawn lines, overlapping at the center mark.
- Trim fabric to within ¼" of stitching.
- Turn the button flap, right side out, push edges and corners out and then press.
- Turn ½" of the top raw edge to the inside and press.
- Stitch across the top edge with ¼" seam allowance to close.
- Measure and mark from the pointed tip of the button flap at 1 inch and again at 2 inches.
- Create horizontal ¾" buttonholes at each of these marks.
- Lay out the bag holder base with the Fabric B side facing up and the top edge up.
- Take the plastic bag holder piece and lay it out in front of you with the hemmed edges at top and bottom, the casing edges at sides, and any single direction fabric viewed correctly. Now, grasp the bottom edge and flip the plastic bag holder over toward the top. Your plastic bag holder piece should now be wrong side facing up, top edge is at the bottom, and any single direction fabric pattern on the other side should be upside down.
- Find the pin marks measured at 5 ½" from the top of the bag holder base.
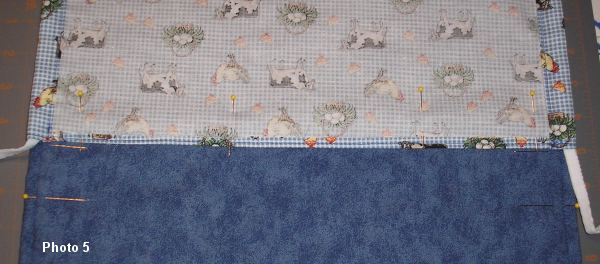
- Line up the edge of the plastic bag holder with the 5 ½" markings; pin in place. (see photo 5)
- Stitch the bag holder to the base from just to the inside of the casing, ¼" from the hemmed edge, and all the way to the casing on the other side.
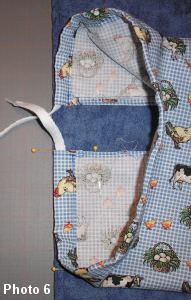
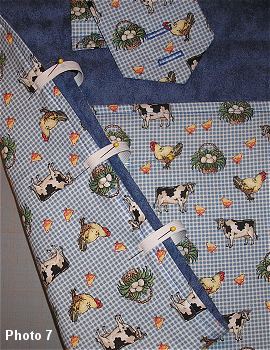
- Next, take the other hemmed end of the plastic bag holder piece, bring it down and line up the edge along the 7" measurement marks, right side down. Pin in place. (see photo 6)
- Carefully stitch the piece to the base from just to the inside of the casing, ¼" from the hemmed edge, and all the way to the casing on the other side, being careful not to catch any other part of the bag holder in the stitching.
- Find the marks on the side of the bag holder base that are 11 ½" from the top edge and follow them to the center of the bag holder. Insert a couple of pins to mark the line at the center.
- Lay the button flap on the base with its tip end pointing up, the other end along the marked line, and right side against the base. Check to make sure that the piece is centered and pin in place.
- Stitch the button flap to the bag holder base ½" from the straight edge on the marked line.
- Fold the bottom end of the bag holder base up enough to match each of the elastic strips to the pin markings at 14 ½", 17 ½", and 20 ½".
- Wrap ¾" of each elastic end around to the back of the bag holder base at the pin markings and pin into place.
- Stitch each piece of elastic to the base along the edge stitching, passing over the elastic two or three times for added strength.
- Sew a button onto the front of the bag holder pocket at the center and 2" from the top edge.
- Measure and make marks along the top edge of the bag holder base about ¾" from the top edge and horizontally at 2", 7 ½", and 13".
- Apply eyelets at each of these locations according to the manufacturers directions.
|
You may Print this page as it is ...OR...
Purchase the Easy Print Version for $1.49
The Easy Print Version includes all instructions for making the bag holder without margins, ads or logos.
|
|
|
|
|