- Fabric (see instructions for amounts)
- 1 Package of low loft batting for the size of comforter you are making
- Matching sewing thread
- Embroidery thread and needle for some hand quilting
- Rotary cutting mat and ruler (optional: 6 ½ quilters square)
- Rotary cutter
- Quilters pins
- Fabric marking pencil
- Fabric scissors
- Sewing Machine
- Iron & ironing board
|
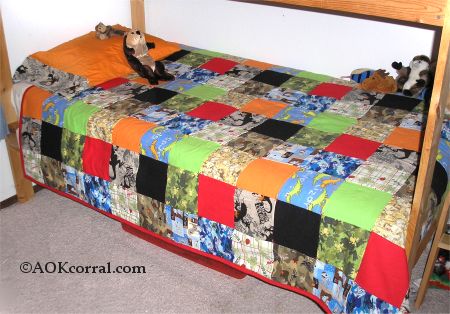
Our quilted comforter is made using 6 ½ cut squares, which become 6 squares when stitched into the comforter. All seam allowances (raw edge beyond stitching) are ¼ unless otherwise stated. Batting should be purchased as a complete comforter size piece.
To figure out how much fabric you need of each color, you should make a rough design plan. A good way to plan out your design is to use a piece of graph paper and trace out the correct number of squares for your comforter size. Color in the squares until you come up with a design you like. You can refer to our comforter diagram for layout of squares to help with your design.
If your fabric has lines or directional prints, you will need more fabric for cutting the squares correctly in the pattern. Good fabrics are flannel, quilting fabrics, cottons, and cotton blends. These amounts assume your fabric is 42" to 45" off the bolt and may shrink a bit.
Yardage for Backing: 6 yards; cut into two, 3 yard pieces
Yardage for Binding: 1 yard; 10 - 3" x 36" strips
Yardage for Squares; 6 1/2 yards; 180 squares (about 30 squares per yard)
*Important: WASH and IRON ALL fabric before you begin cutting!
If you dont know about fabric grains and you need to learn about selvage, lengthwise or crosswise grain, read
Cutting Fabric on the Grain.
If you need help learning how to cut the squares or the binding strips using a rotary cutter, read
How to Cut Quilt Squares and Strips.
All squares for this comforter are 6 1/2 inches. Cut 180 squares in total.
Cut binding strips along the lengthwise grain. Strips should be cut at 3 inches wide. When cut at 36 inches long, you should need 10 strips.
Cut off selvages to prepare for stitching.
- Lay your fabric on a table or floor. Measure and mark about 1 inch from the selvage edge at intervals of 10 to 20 inches along the full length of the side.
- Slide your cutting mat under your fabric and line up the edge of your quilters ruler with several of the marks along the side.
- Using your rotary cutter, cut along the ruler, lining up marks and adjusting the fabric as you go.
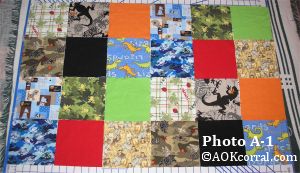
- Lay one section of squares out in their correct positions. (Photo A-1)
- Check each square to make sure that the lengthwise grain is vertical on all pieces. (To do this, pull lightly along the edges to find the side that does not stretch when pulled. The sides that do not stretch are the lengthwise grain.)
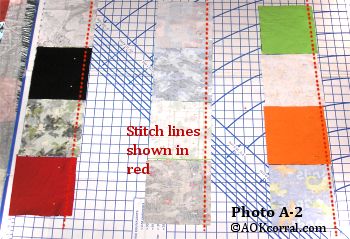
- Prepare to stitch vertical columns of your section. Do this by matching right sides together of each pair of squares in vertical columns and pinning in place. Repeat across the section. For a section with an odd number of columns, simply add the single column last.(Photo A-2)
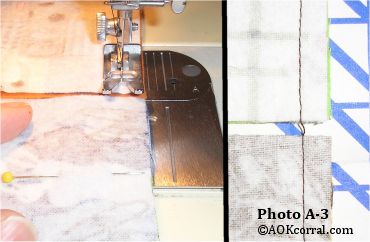
- Stitch on a continuous thread, all pairs of squares in one vertical column, keeping your design order intact. Repeat for each additional vertical column in the section. (It is OK to have a little bit of space between the squares as long as the stitching does not stop.) (Photo A-3)
- Open out stitched vertical columns and place in their correct design positions again.
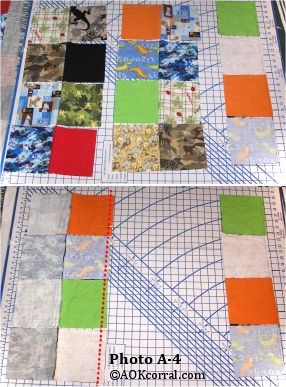
- Match right sides together and pin the unstitched edges of the stitched vertical column sections. (Photo A-4)
- Stitch on a continuous thread as before.
- Repeat until the whole section is stitched together with continuous threads in vertical columns.
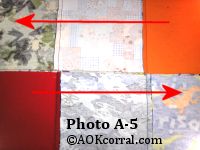
- Take the section to your ironing board and press the seam allowances in opposite direction with each horizontal row. (Photo A-5)
- Next you will stitch together the horizontal rows in your section.
- Fold two of the horizontal rows of squares with right sides together.
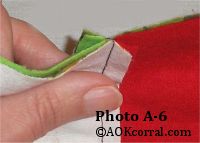
- Match up the squares and seams, then pin in place. (Because you pressed the seam allowances on each horizontal row in opposite directions, the seam allowances for each row should lay in opposite directions. Keep the seam allowances in these opposite directions when stitching. Photo A-6)
- Repeat steps 11 and 12 for each horizontal row until the section has been completely stitched together.
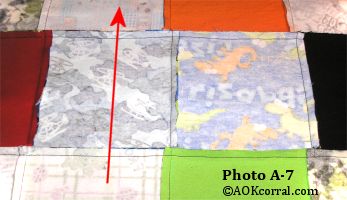
- Press all the horizontal seam allowances toward the top of your section. (Photo A-7)
- Create all other sections using steps 1 through 14.
- To complete the top of the comforter you will need to combine all your sections into one completed comforter top. Refer to your design plan and lay out all the completed sections to their correct positions.
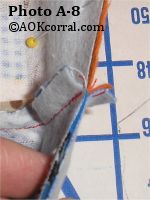
- (For crib size, skip to 20) First you will join left and right sections with a vertical seam. With right sides together, raw edges even, and seams lined up, pin the left and right sections together. Notice that the seam allowances for both sections will be pointing up toward the top. This is correct. (Photo A-8)
- After stitching, open out seam allowances and press with an iron.
- Continue joining all left and right sections with vertical seams and press out seam allowances.
- Lastly, you will need to join all segments with horizontal seams. Lay out your segments in their correct design placement again.
- Put right sides together and match up squares and seams. Pin together and stitch horizontal seam. Repeat for all additional horizontal seams needed to complete the comforter top.
- Press these last horizontal seams up toward the top edge.
- Pin the backing pieces with right sides together and raw edges even.
- Stitch the pieces together with a ½ seam allowance.
- For larger comforters, requiring more than two widths of fabric, repeat these steps for the additional piece.
- Spread out the seam allowances and press flat with your iron.
- Excess fabric will be trimmed off after the comforter is assembled.
- Prepare a large work area such as a clean floor. If you have a fold-out, cardboard, fabric cutting board, you should set that out in the middle.
- Lay out your backing with the wrong side up and smooth out any wrinkles.
- Open up your poly-fil batting and lay it out, centered over the backing fabric. Be careful not to wrinkle the backing. Make sure that you can see the backing fabric on each side so you know that your batting is centered.
- Smooth out the batting, starting from the center and smoothing out to all edges. Check to make sure that the batting still fits within the backing fabric edges. If not, redo.
- Lay out your comforter top, right side up, onto the batting. Be careful not to wrinkle or move the batting.
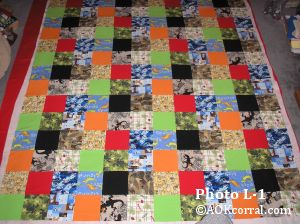
- Smooth out the top working from the center out to all sides. Make sure your comforter top fits within the batting edges. You should be able to see batting extending beyond the comforter top on all sides. (Photo L-1)
- When you have all layers together, begin pinning them in place through all thickness, starting with the center squares and pinning away from the center, up and down and left to right in the form of a cross.
- Continue pinning the layers together so that there are pins in every square through the cross and around the edges, and pins in every other square throughout the rest of the comforter.
- When finished, fold the comforter and check to make sure that your backing is smooth. If you find wrinkles or bunched up fabric, you will need to remove the pins and re-assemble the layers.
To join all the layers together you will stitch a simple X with embroidery floss at each square intersection. Use the embroidery floss as is with all strands intact. You will stitch your X tacks in a similar order as you pinned the layers together. Start from the center and work in a cross, left to right and top to bottom, for several intersections, then fill in the others in between. Your work will shape out like a diamond as you go along and you will finish with each corner area.
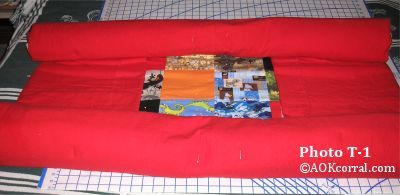
- Lay out your cardboard fabric board on a large bed, then lay out your comforter on the bed.
- Fold in the 2 sides part way, leaving several squares in the center uncovered. Then roll the top and bottom sides toward the center, leaving several squares uncovered. (Photo T-1)
- Thread your needle with embroidery floss.
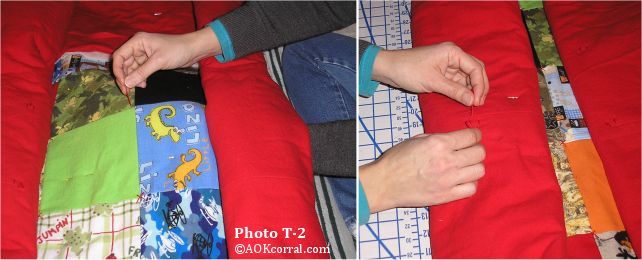
- Starting from the center intersection, stitch an X with embroidery floss in the following manner; (Photo T-2)
- Send your needle up from the back at one corner and use your other hand below the comforter to feel and hold the end of the thread. Leave about 1 ½ inch to 2 inch of thread at the back. (you may have to roll the comforter a bit to look underneath at first until you can feel the right length of the end)
- Stitch the X with ½ inch long stitches being careful not to pull tight as that may cause the fabric to bunch up.
- Roll the comforter up enough for you to see the back of your stitching.
- Tie the two ends in a secure knot and trim the ends.
- Complete X tacks throughout the entire comforter.
To finish the edges of your comforter you will add a binding around the outside edges. A binding is a strip of fabric that closes in all the unfinished edges on a quilt/comforter. To additionally prepare your comforter for sewing on the binding you will need to add a basting stitch around the outside edge.
- Prepare a needle and a long piece of sewing thread.
- Lay your comforter out on a large bed and smooth it out.
- Stitch, 2 inch long, running stitches through all thicknesses at about 1-2 inches from the edges of the comforter. Continue all around the comforter.
- Remove all pins.
- Lay your comforter on top of your cutting mat on the floor or a large table.
- Using your ruler and rotary cutter, carefully trim off all excess batting and backing fabric along the edges of the comforter by lining your ruler up to the comforters quilted top edge and cutting the other layers to match.
You are now ready to add a binding to your quilted comforter. Go to our page on How to Bind a Quilt for the directions on finishing your comforter with a quilt binding.
|
You may Print this page as it is ...OR...
Purchase the Easy Print Version for $1.95
The Easy Print Version contains all the instructions and diagrams for crib, twin, full, and queen size comforters as well as tutorials for grain, cutting, and binding.
|

|
|
|