~ How To Projects ~
Giant Chess Board & Pieces

Click below for more
Craft Projects and Patterns
|
~ Projects By Theme ~
- Animals
- Seasonal
- Holidays
|
|
Large Chess Board & Pieces (Part 1 - Chess Board)
~
July 2006
|
- 2 and 1/2 yards black cotton fabric
- 4 yards gold/tan cotton fabric
- Low loft cotton batting measuring no less than 49" x 49"
- Thread to match gold/tan fabric
- Thread to match black fabric
- Clear Plastic Sheet for making pattern template
- Sewing Machine
- Ruler
- Tape Measure
- Fine Point Marker
- Sharp Scissors
- Quilter's marking pencil
- Quilting Pins
- Iron & Ironing Board
- (A Rotary cutter, cutting board, and straight edge are very helpful)
|
- Pre wash and press fabrics before cutting out pattern pieces.
- When cutting, use the cutting layout photos below as a guide.
- Make a pattern template by accurately measuring a 6.5 inch by 6.5 inch square onto a clear plastic sheet using your ruler and fine point marker. (Be very accurate.)
- Always place right sides together when doing a seam.
- Always pin carefully in place to keep the pieces from shifting while sewing.
- Follow the seam allowance instructions below.
- Remove the pins as you come to them, do not sew over them.
- Press all seams according to the instructions below.
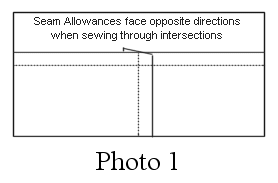
- When joining rows, make sure that the intersections (the places where two squares come together) line up with each other and that the seam allowances are facing opposite directions. (Photo 1)
Seam Allowance is 1/4" unless otherwise noted.
Press all seams in each section and in the joining of sections toward the black fabric square.
When joining rows together, press all seams in the same direction each time.
Chess Board Quilt Measures 49" x 49" upon completion.
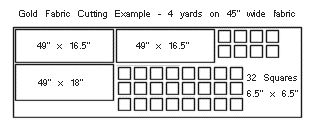
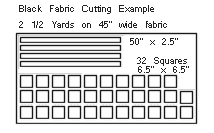
- Before cutting out any squares on your fabric, cut out pieces for the back and binding as shown in the cutting layout photos. Cut your pieces out according the the following dimensions.
- Gold/Tan fabric: One piece, 49" x 18"; Two pieces, 49" x 16.5"; 32 pieces, 6.5" x 6.5".
- Black fabric: Four pieces, 50" x 2.5"; 32 pieces, 6.5" x 6.5".
- To cut out the squares, lay the fabric out on your cutting table with the wrong side up.
- Place the pattern template on your fabric with one straight edge parallel to the lengthwise grain of the fabric. (The lengthwise grain is the direction along the edge of the fabric that does not unravel.)
- Carefully draw lines around the pattern template edges with the quilter's pencil.
- Draw a straight line inside each fabric square in the direction of the lengthwise grain.
- Cut pieces out very carefully for best results.
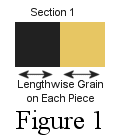
- Sew one black fabric square to one gold fabric square with the lengthwise grain in a horizontal position on each piece to make Section #1 (Figure 1)
- Repeat to make a total of 32 Section 1's
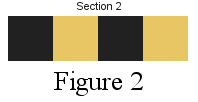
- Sew two Section 1's together to form Section #2 (Figure 2)
- Repeat to make a total of 16 Section 2's
- Sew two Section 2's together to form a Completed Row (Figure 3)
- Repeat to make a total of 8 Completed Rows
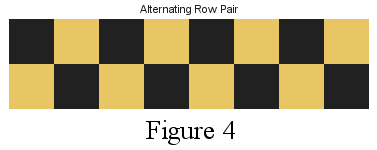
- Sew together two Completed Rows to form a Alternating Row Pair (Figure 4)
- Repeat to make a total of 4 Alternating Row Pairs
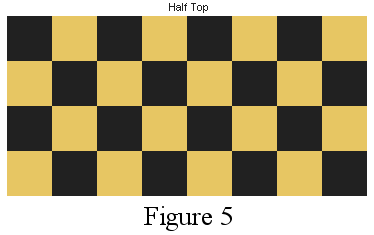
- Sew together two Alternating Row Pairs to form a Half Top (Figure 5)
- Repeat to make a total of 2 Half Tops
- Sew together the two Half Tops to complete the Full Chess Board Top
- Press the completed Chess Board Top again if needed.
- The seam allowance for the back of the chess board is 1/2 inch.
- Pin one of the 49" x 16.5" pieces to the 49" x 18" piece, wrong sides together and along the 49" edge.
- Stitch, remove pins and press all seam allowances in one direction.
- Next, pin the other long edge of the 49" x 18" piece to the other 49" x 16.5" piece, wrong sides together.
- Stitch, remove pins and press all seam allowances in one direction.
- Prepare the batting by pressing out any deep wrinkles and folds so that it lies flat and then cutting out a piece measuring 49" x 49".
- Lay the batting out on your cutting board.
- Lay the Chess Board Back over the batting with the right side facing up toward you and the wrong side against the batting.
- Adjust the back so that it is centered on the batting and smooth it out.
- Place pins about every 12 inches around the outside edge through both the batting and the back piece to hold them in position together.
- Flip the quilt back with batting over so that the other side of the batting is facing up and flatten out on your cutting table.
- Lay the Chess Board Top over the batting with its right side facing up toward you and the wrong side against the batting.
- Adjust the top so that it is centered on the batting and smooth it out. (The back and batting will be slightly larger than the top. This extra will be trimmed in a later step.)
- Place pins about every 6 inches around the edges of the quilt top through all thickness.
- Remove the pins used to secure the back to the batting since you now have pins on the top through all thickness.
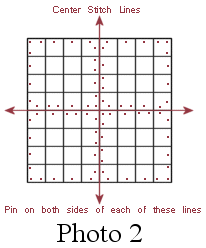
- Place pins along both sides of the center stitch line running side to side on your chess board top.
- Then, place pins along both sides of the center stitch line running up and down on your chess board top. (Photo 2)
- Using your gold/tan thread in your sewing machine and starting from the center, sew along the center stitch line as close to the stitched line as possible to the edge.
- Turn around and do the other side from the center to the edge.
- Now lay your quilt out on the cutting board again.
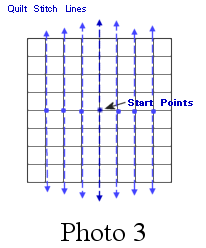
- Take the pins out around that stitched line and place them along both sides of the next stitch line (either side) running up and down on your chess board top.
- As you did on the center line, sew along the stitched line each time starting from the center and working toward the edges.
- Repeat these steps to stitch through all up and down stitch lines on the Chess Board Top. (Photo 3)
- Remove all pins except those holding the corners and a few along the edge.
- Press out any wrinkles if needed.
- With right side of quilt facing up, trim off excess batting as backing fabric along top quilt edge.
- Lay the quilt out on your cutting board face up.
- Take two of the binding strips and fold each one in half, wrong sides together and press.
- Open one of the binding strips.
- Center the binding strip along one edge of the quilt with right sides together and raw edges even.
- Pin the binding in place and then sew (1/4 inch seam allowance).
- Turn the binding up along the seam and press the seam.
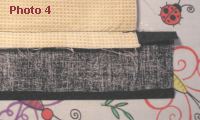
- Turn the quilt over, fold in and press 1/4" along the other long raw edge of the binding. (Photo 4)
- Now, fold the binding over the raw edge of the quilt just until the 1/4" pressed fold just covers your seam line from sewing on the other edge of the binding.
- Pin the binding into place and edge stitch (1/8" from edge) through all thickness.
- Trim the ends of the binding that extend past the quilt edge so that they are even with the quilt edge.
- Repeat this same process for the opposite side of the quilt.
- To make the finishing bindings for the last two sides of the quilt you will follow the previous directions except that you will finish the short ends by folding them in and lining them up with the other sides.
- Take one of the last pieces of binding and fold in and press 1/2" on the short edge.
- Then, fold the binding strip in half wrong sides together and press.
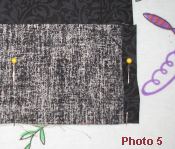
- Open the binding strip again and place the strip, right sides together along one of the remaining raw edges of the quilt but instead of centering the binding, line up the folded short end with the edge of the quilt. (Photo 5)
- Pin the binding in place until you reach about 6" from the other end.
- Fold in the other short end of the binding as much as needed until the new folded edge lines up with the edge of the quilt, press and finished pinning in place.
- Continue to finish this binding strip as you did for the other two sides.
- Follow the same instructions for the last side of the quilt.
|
|
|