~ How To Projects ~
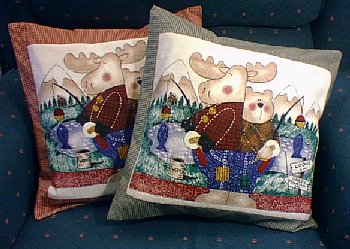
Kitchen Towel Pillow Covers

Click below for more
Craft Projects and Patterns
|
~ Projects By Theme ~
- Animals
- Seasonal
- Holidays
|
|
Kitchen Towel Pillow Covers
~
January 2002
|
- New Kitchen Towel
- 1/2 to 1 Yard of Matching Fabric (Choose anything from Cotton to Decorator Fabrics.)
- 14" x 14" Pillow Insert
- Sharp Scissors
- Pins
- Tape Measure
- Iron and Ironing Board
- Sewing Machine OR if you do not have a sewing machine, Needle and Thread. (You can find instructions for hand-stitching below if you do not have a sewing machine.)
|
There are basically two types of kitchen towels that you might be using. They are listed here, as well as directions for cutting out the design portion to use in your pillow cover.
- A.) Towels with two separate designs at each end. (For this kind of towel you can cut the towel in half and make two pillow covers from it.)
- For towel type A., cut the hem or fringe off each end of the towel.
- Measure the towel's length from end to end to find the center.
- Make marks at the center and cut the towel in half along the center line.
- Now, measure the towel's width.
- If the towel's width is more than 14", you will need to cut off equal amounts from both sides of the towel so that the finished width is 14". (For example: If the width of the towel is 15", that is 1" more than 14". Divide the excess in half, half of 1" would be 1/2", So....cut 1/2" from each side of the towel.)
- You should now have the design portion of the towel centered on a piece measuring 11" high and 14" wide, or 12" high and 14" wide. (If your finished measurements are different, trim off some more of the towel edges until you end up with one of the above finished sizes...Be careful to make sure the design stays centered.)
- B.) Towels with a continuous design from one end to the other. (For this kind of towel you can usually make only one pillow cover per towel.)
- For towel type B., cut the hem or fringe off each end of the towel.
- Find the part of the towel design that you want to be the center of design.
- From the center point, measure 7" horizontally, toward each side edge of the towel and make marks.
- From the center point, measure 5 1/2" to 6" vertically (whichever better fits your desired design), toward each end of the towel and make marks.
- Cut out the design along the marks.
- You should have a piece of the towel measuring 11" or 12" high and 14" wide with the design pattern centered on your cut piece.
If you have a cutting board with measurement lines to follow, you may want to use that, otherwise, make the following pattern pieces on paper first. Use the paper pattern pieces as a guide to cut out the fabric pieces.
The measurements for your fabric cuts will depend on whether you have a finished design piece of 11" x 14" or 12" x 14".
They are listed here:
- Fabric Pieces needed for a cut towel design of 11" x 14"
- Cut 2 strips measuring 14" long and 4" wide.
- Cut 2 strips measuring 16" long and 2" wide.
- Cut 2 pieces measuring 16" long and 11 1/2" wide.
- Fabric Pieces needed for a cut towel design of 12" x 14"
- Cut 2 strips measuring 14" long and 3" wide.
- Cut 2 strips measuring 16" long and 2" wide.
- Cut 2 pieces measuring 16" long and 11 1/2" wide.
All seams are sewn 1/2" from the raw edges unless otherwise stated.
If you do not have a sewing machine, try using a backstitch to sew your seams. Click Here for Backstitch Instructions
- Lay out your towel design piece, right side up.
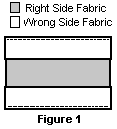
- Pin the 14" long strips along the top and bottom of the towel design piece, right sides together, as shown in figure 1.
- Stitch together (1/2" from outer edge.)
- Remove the pins, open out the fabric and press the seams open.
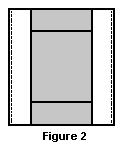
- Next, pin the 16" long strips along each side of the design front, right sides together, as shown in figure 2.
- Stitch together (1/2" from outer edge.)
- Remove the pins, open out the fabric and press the seams open. Set aside.
- For each of the back pieces you will need to make a finished edge or a hem.
- Lay out one of the 11 1/2" x 16" pieces, wrong side up.
- Fold in one of the 16" side edges 1/2" and press.
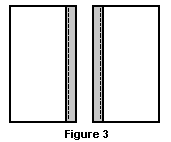
- Then fold the same edge in again, 1", and press.
- Pin the hem in place and stitch 1/4" from the inside edge. See figure 3.
- Make the same finished edge or hem on the other back piece.
- Lay out the back pieces on a table or ironing board wrong side up and finished edges facing each other. (As shown in figure 3.)
- Bring one of the finished edges over the other.
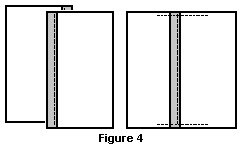
- Adjust the placement of the uppermost piece so that the final measurement from one side to the other is 16". See figure 4.
- Pin the two pieces together at the top and bottom edges where they overlap.
- Stitch the two pieces together, 1/4" from the raw edge.
- Remove the pins.
- Lay the front piece out, right side up.
- Lay the back piece over the front piece, right sides together.
- Pin together.
- Stitch around the whole pillow, pivoting at the corners.
- Clip the extra fabric off of the corners.
- Turn the pillow right side out and lightly press the edges of the pillow cover.
- Insert a 14" square pillow insert.
- You can add a button and buttonhole, a snap, or some velcro to the middle of the pillow cover back opening to keep it closed during use.
|
|
|


